Kit's Crafts
  • Home
  • About
    • Selling Handmade Goods
  • Knitting
  • Crochet
  • Sewing
  • Crafting
    • Just for Fun
    • Wall Decor
    • Christmas Fun
    • Party On
  • From the Kitchen
    • Chocolate
    • Sweet
    • Savory
  • Quiet Book
  • The Shop

Handmade Christmas Ideas

11/19/2013

0 Comments

 
Lets get real, the holiday season is upon us and Christmas isn't really that far away. If you have high hopes for a handmade Christmas, now is the time to get started on those one of a kind gifts. The great news is that there are a LOT of gift ideas out there that really don't take much time. Today, I am going to highlight some from this very website to get you jump-started.
Kit's Crafts - #HandmadeChristmas Knitting
This first group is for all of the knitters out there.
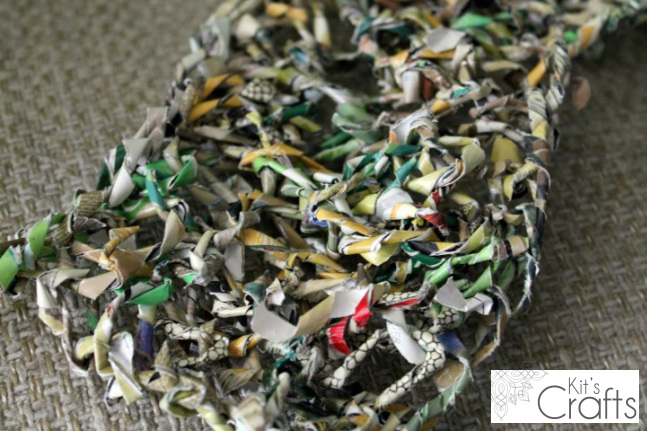
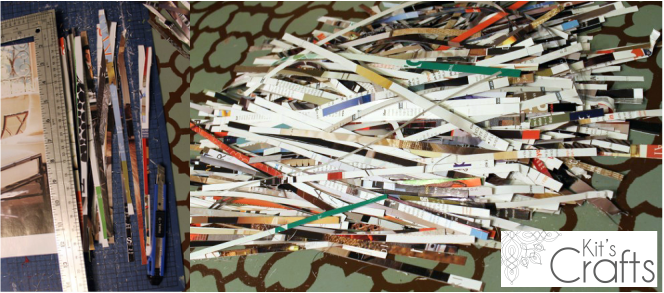
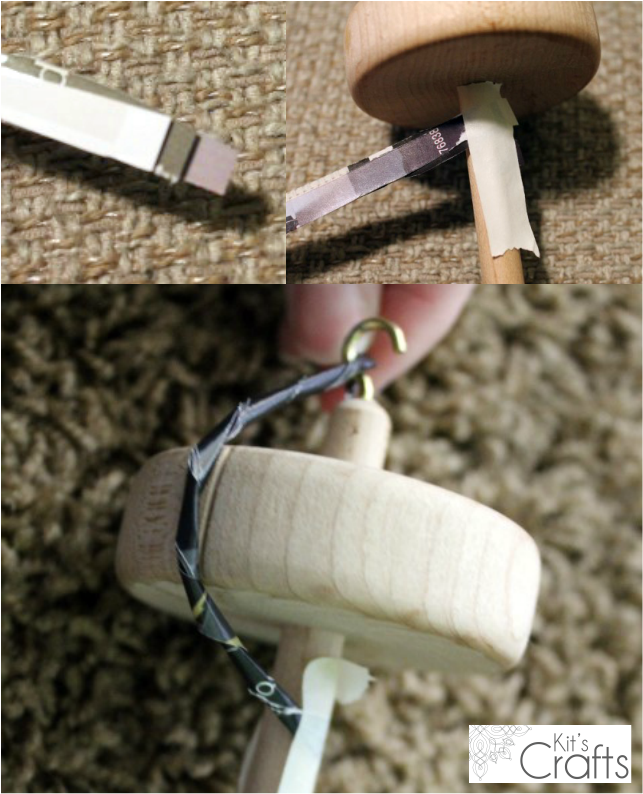
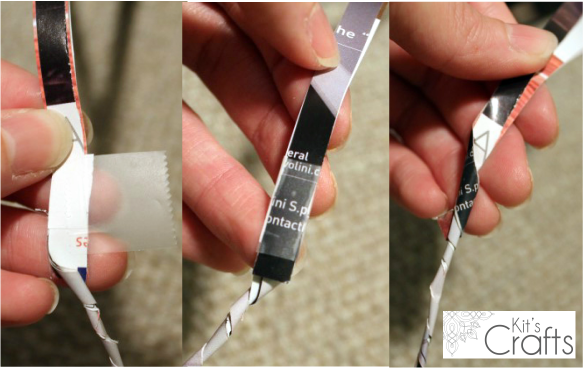
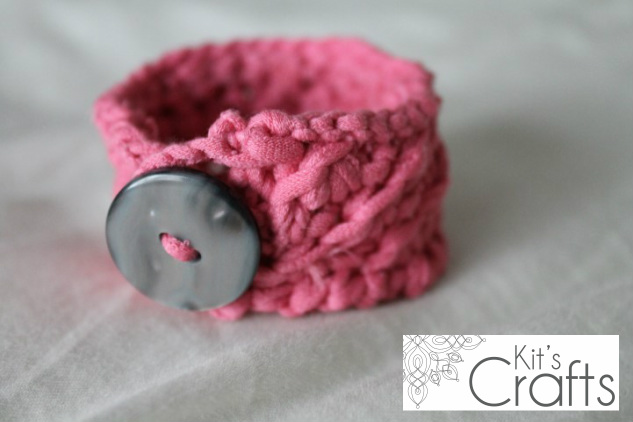
1. T-Shirt Yarn Star Bracelet - The great thing about this gift is that you don't even have to make a trip to the craft store, just make your own tarn from your closet!
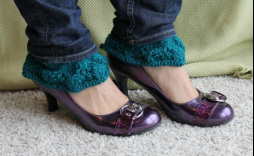
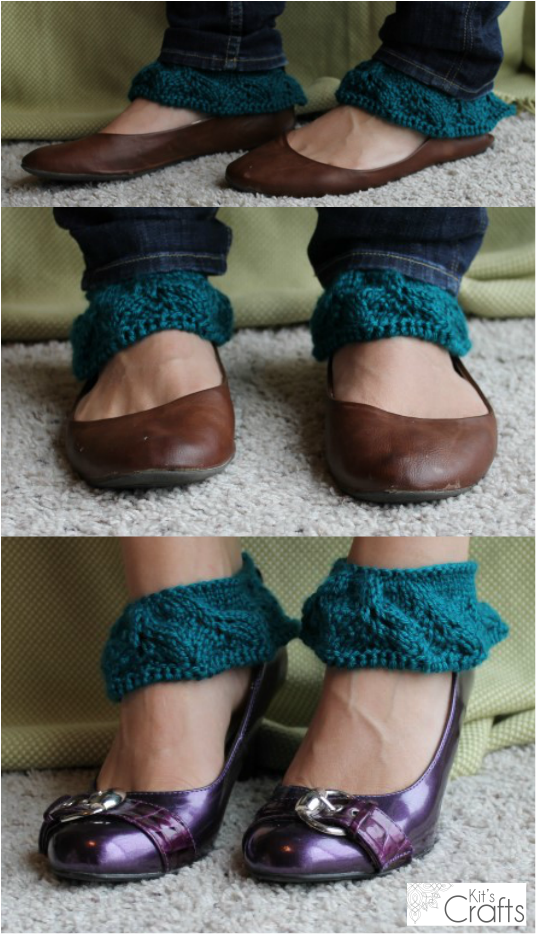
2. Fancy Spats - Liana - Use some left over yarn from your stash for this adorable fashion statement.
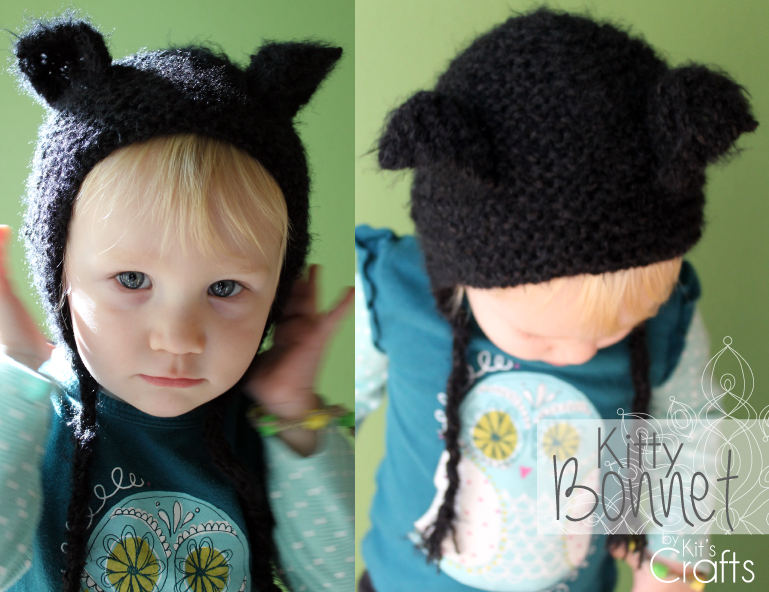
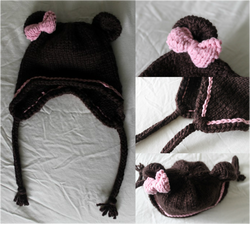
3. Baby Bear Hat - Made with chunky yarn and few embellishments, this darling hat is incredibly quick and easy to make.
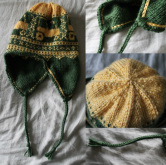
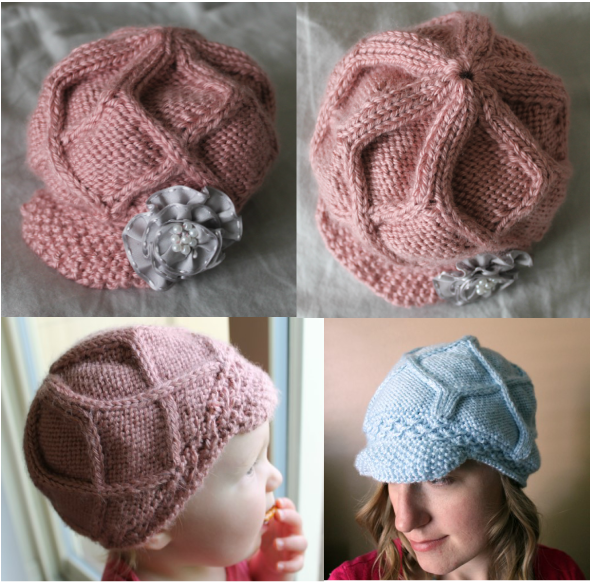
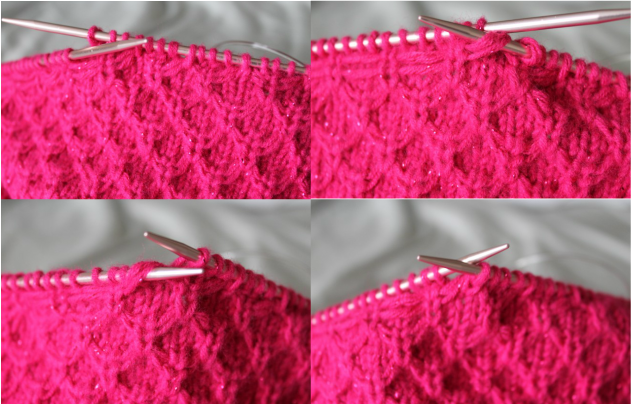
4. Tractor Hat - This is a great hat for the boys in your life. Plus, it is a great base for an earflap hat, just swap out the chart.
Kit's Crafts - #HandmadeChristmas Crochet
Now to some lovely crochet projects.
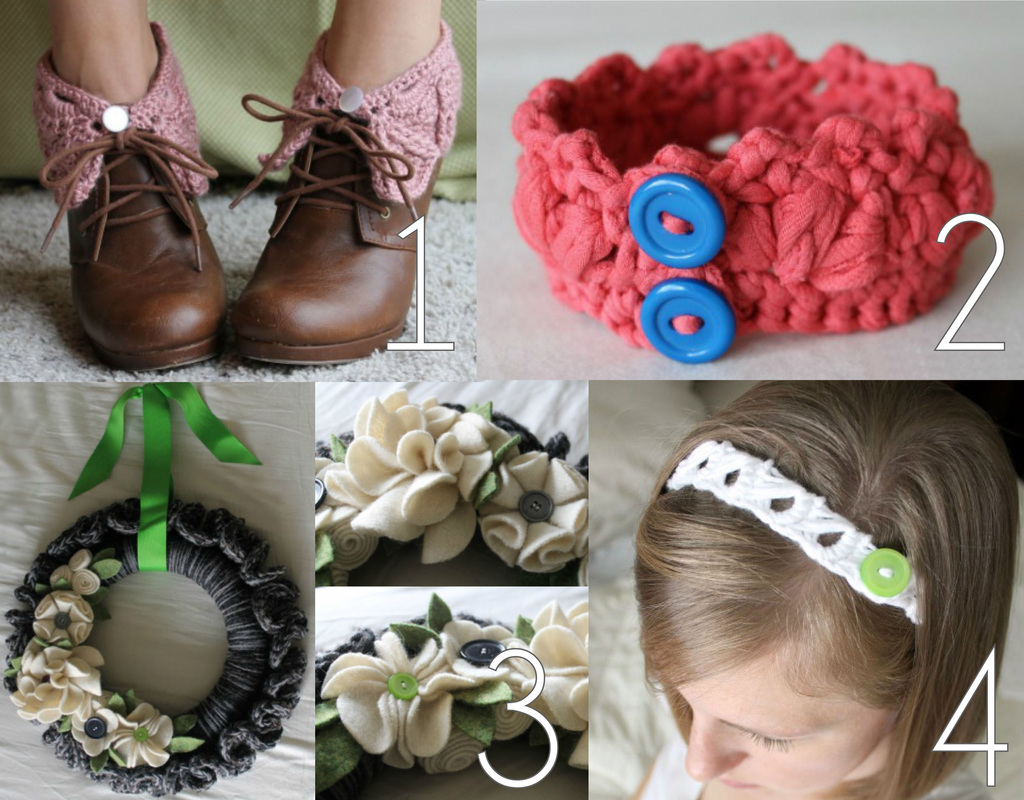
1. Fancy Spats - Cathedral - These little shoe collars are the perfect gift for that person with a unique style.
2. T-Shirt Yarn Cluster Bracelet - If you are low on cash, then this is the item to give to your friends. Not only is it adorable, but you can make it from t-shirts in your closet.
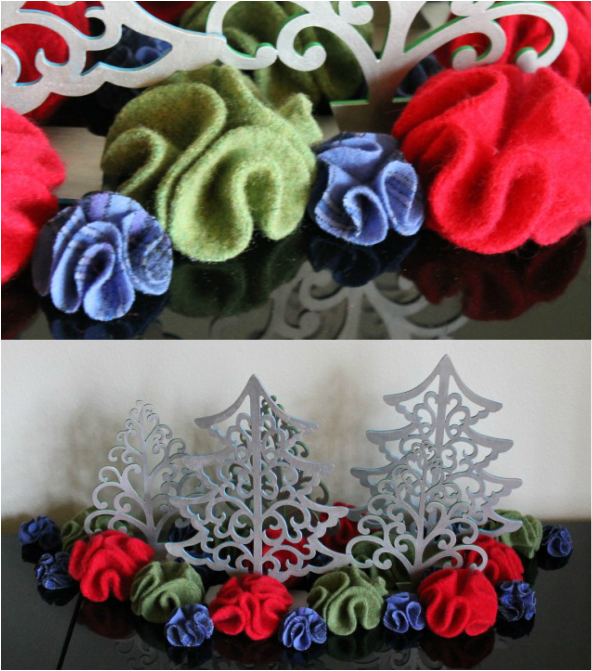
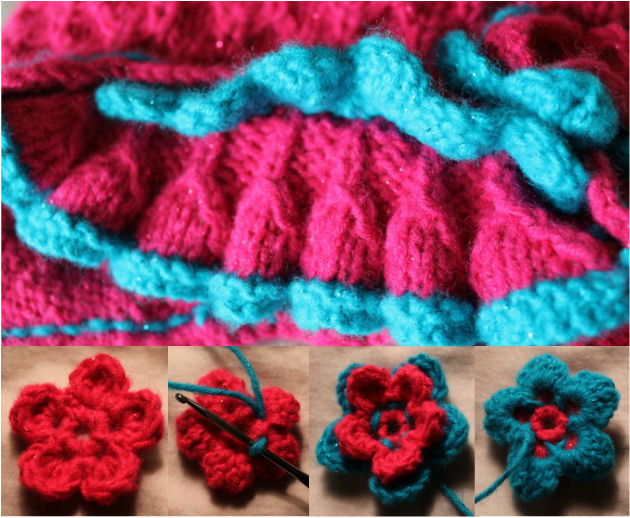
3. Ruffle Wreath - Perhaps you would like to add to your decor stash or maybe you just aren't sure what to buy for someone on your list. This gorgeous wreath is easy to make and fairly inexpensive too. (You can make the flowers from old sweaters!)
4. Broomstick Lace Headband - Really, does it get any easier?! Make these as stocking stuffers and use up some of your left over yarn or even make some tarn to create this headband with.
Kit's Crafts - #HandmadeChristmas Sewing
Ok Sewers, here are some ideas for you. 
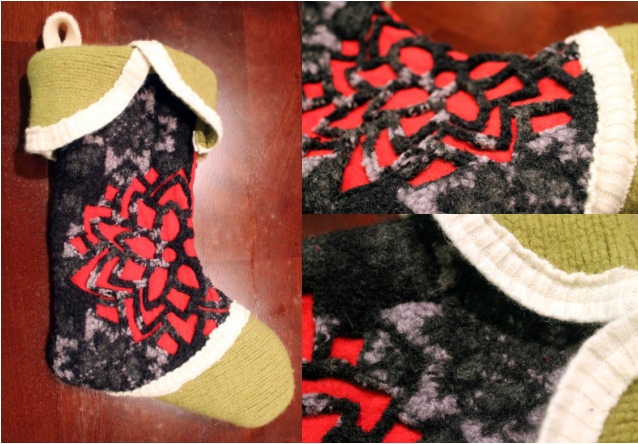
1. Poinsettia Stocking - So, the stocking itself is pretty cool, but you could use the same technique for a pillow, which would also be adorable.
2. DIY Library Bag - This bag is so easy and doesn't take much material. It would make a great gift for friends and family. You could make it on a smaller scale and fill it with homemade soaps and scrubs.
3. Custom Stuffie - Here is an outline for how to make your own custom little stuffed animal for the little cutie in your life.
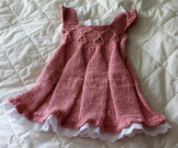
4. Men's Dress Shirt to Baby Dress - This would be awesome out of a great red or green plaid shirt!
Kit's Crafts - #HandmadeChristmas
Here are some random crafts that don't necessarily fall under a specific category.
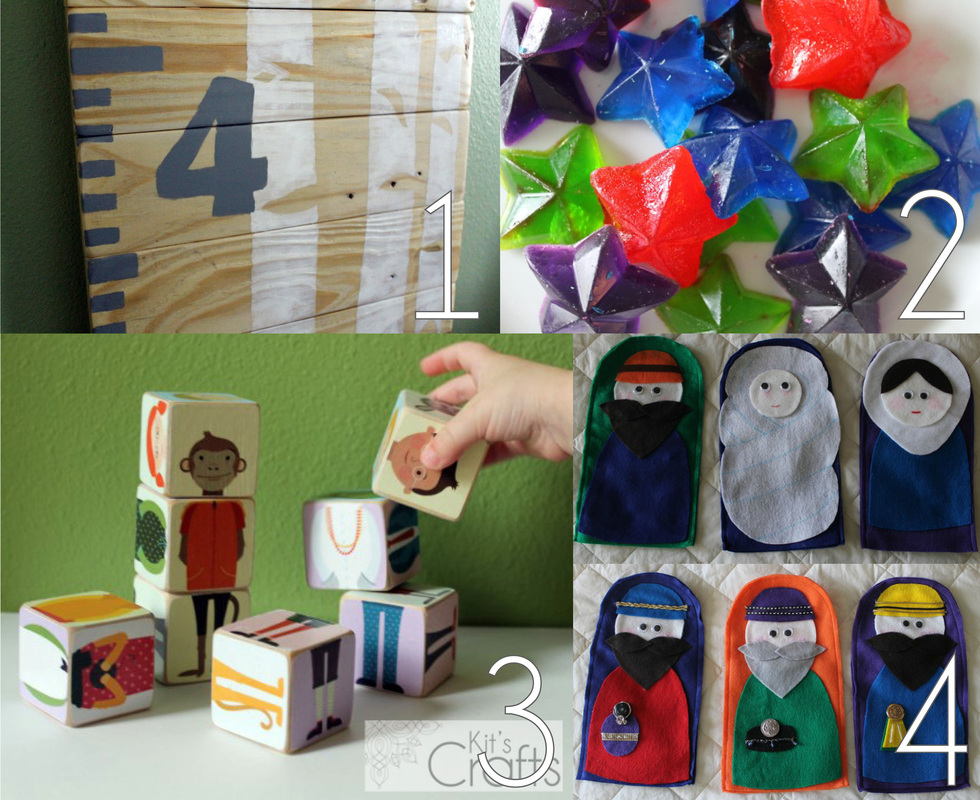
1. Pallet Growth Chart - This would be a great gift for someone with growing children or grand children
2. DIY Bath Crayons - Can we say stocking stuffers?
3. Olliblocks - So fun, so quick, so easy.
4. Nativity Puppets - Switch up the telling of Jesus' birth with some simple felt puppets

If you are not so much into making things, but want the look of handmade, check out my Etsy Shop.

You might also like:

Picture
Picture
Picture
Picture
Gina's Craft Corner
0 Comments

Kitty Bonnet

10/22/2013

0 Comments

 
A few years back, a friend gave me her small stash of yarn as sh didn't figure she would use it. Within the skeins was this fuzzy black yarn that I didn't really care for. It has been kicking around the bottom of my large plastic tote this whole time without an evident purpose. Well, at the beginning of this month I saw it and thought, "What the heck, I will make a quick bonnet from this and hope for the best." When I finish it, I actually really liked the little hat, so I thought I would add it to my list of free knit patterns. Enjoy!
Kit's Crafts - Kitty Bonnet #FreePattern
I only did one size for this bonnet, however, it is REALLY stretchy and could probably fit anywhere from a 1-year-old up to a small 3-year-old. It is knit flat from the front to the back then folded in half and sewn together on one side. It is a VERY easy pattern and I would recommend it for beginners.

Gauge: 2" = 14 rows x 8 stitches in Garter Stitch

Materials:
Size 10 knitting needles
100 yards fuzzy worsted weight yarn
2 stitch markers
Yarn needle

Abbreviations:
CO = Cast On
K = Knit
STS = Stitches
PM = Place Marker
SSK = Slip, Slip, Knit
K2Tog = Knit 2 Together

Pattern:
CO 60 using long tail cast on method
Knit every row until piece measures 3.5"
K30, PM, K30
K1, SSK, K to 2sts before marker, SSK, SL marker, K2tog, K to 3sts before end, K2tog, K1
K across
repeat previous 2 rows 8X
Bind off leaving a long enough tail to sew the two sides together. Your piece should measure approximately 14" x 5 1/2"

Ears (make 2):
CO 20 using long tail cast on method

Row 1: K1, SSK, K14, K2tog, PM, K1 (18 STS) 
Rows 2, 4, & 6: K across
Rows 3, 5 & 7: K1, SSK, K to 2 before the marker, K2tog, slip the marker, K1 (16 STS) (14 STS) (12 STS)
Row 8: K7, PM, K7
Row 9: K to 2 before the marker, SSK, slip the marker, K2tog, K to end (10 STS)
Row 10: K across
Repeat Rows 9 and 10 until there are only 4 STS left. For the next row, SSK, K2tog, turn K2tog
Bind off, leaving a long enough tail to sew the ear to the hat. 

Finishing:
Fold your hat in half so that the shorter ends are together and sew along the bind off side. 

Position and attach each ear. 

Cut 6 pieces of yarn twice the length you would like the braids to be. Fold three of the pieces in half. Pull the loop at the half of these three strands through one corner of the hat, then pull the loose ends of these same three pieces through the loop and pull tight. Braid the three (now six) strands and tie a knot at the bottom. Repeat on the other corner with the remaining three lengths of yarn.

Weave in any loose ends.

You might also like

Picture
Picture
Picture
Picture
0 Comments

Magarn Ideas

8/20/2013

0 Comments

 
Last week, I posted a tutorial for how to make yarn from recycled magazines. I had a few people ask me what to make with this material. So, this post is purely to inspire some creativity with magarn. Obviously, since any exposure to moisture would compromise the strength of the magarn, it should probably only be used for decorative purposes, so all of my suggestions are with that in mind.
Kit's Crafts - Magarn Ideas
The most obvious use to me, and what I had in mind when I originally made this, is to knit or crochet it, so most of my ideas are using that method. The above picture is a sample of knitted magarn. I have a couple of suggestions for knitting and crocheting magarn, though, you will want to use large needles (size 10+) or a large hook (size N+). Also, you may want to invest $4 on a leather thimble from Joanns (in the sewing section) to protect your pointer finger from the coarseness of the paper. Now to some ideas.
Picture
Round Doily Dishcloth from Scraps & Heirlooms
Picture
Four Round Doily from Flushed with Rosy Colour
Picture
Yarn Basket from Pickles
Picture
Chunky Crocheted Basket Pattern from Crochet in Color
Picture
Amigurumi Elephant from Lion Brand
Picture
Dachshund Balloon Animal from Lion Brand
Picture
How to Weave a Wicker Basket from Jon's Bushcraft
Picture
Basic Weaves from Merriam-Webster Visual Dictionary Online
For the doilies at the top, you could display them on the wall or use them as a decorative plate or even a place mat. I put the amigurumi animals in because I thought it would be really cool to make one and display it like a sculpture either in the living room or high up in a kid's room. As for the weaving on the bottom right, you could weave up a quick table runner or place mats or be really ambitious and weave up a whole table cloth for decoration! Another thought I had was to make a sample of your favorite lace stitch to display on the wall. I hope these ideas get the wheels in your head spinning with ideas of what wonderful things you could make with this lovely material. I would love more ideas of what you all come up with and pictures would be even better! Comment with your ideas and email pictures to [email protected].
0 Comments

Magarn (Magazine Yarn)

8/12/2013

0 Comments

 
As those of you who follow me may have noticed, I have been looking for alternatives to yarn in an effort to be more economical in my crafting. Well, a few months back, I came across a tutorial for Handspun Recycled Newspaper Yarn on Green Upgrader. I was greatly intrigued, but couldn't help but think of how incredibly dirty newspaper is, so what came to mind is the three shelves in my closet that are jam packed with out-dated interior design and architecture magazines that I have been hoping to upcycle. At first, I tried using the same method as the newspaper yarn? However, the problem here is that newspaper is thinner and more malleable than magazines. While contemplating this, I began to think about plying yarn, using multiple strands of a material and my AHA moment was revealed!
Kit's Crafts - #Magarn (Magazine Yarn)
Materials:
Magazine
Craft Knife
Self Healing Mat
Straight edge
Drop Spindle (I got mine on Ebay for around $12 and it came with a niddy noddy)
Scotch Tape or another clear tape
Masking Tape (optional)

Step 1:
Cut 1/4" strips of your magazine using your craft knife, straight edge, and self healing mat.
Kit's Crafts - #Magarn (Magazine Yarn)
Step 2:
Create a start to ply the #magarn. Take 3 magazine strips and stack them on top of each other, but staggered a bit as in the picture. Tape the strips to the drop spindle, then twist the strips between your fingers until you have enough to reach the hook.
Kit's Crafts - #Magarn (Magazine Yarn)
Step 3:
Roll the spindle on your leg as you would do for wool or newspaper yarn, leaving about 2" - 3". While pinching the first rolled strips, pick up 3 more strips and stack them as you did the first, then use them to overlap the previous strips. Tape all 6 strips together with a piece of scotch tape, then manually roll the section of scotch tape. Repeat this step until you have as much magarn as you need.
Kit's Crafts - #Magarn (Magazine Yarn)
If you are looking for some ideas of how to use this lovely stuff, I composed a post to inspire some ideas.
0 Comments

Fancy Spats - Liana

7/12/2013

0 Comments

 
My Fancy #Spats patterns have been primarily crochet, but fear not knitters, I bring you Liana. It is a simple, lacey vine stitch that is easy to memorize. It comes in one size, which is approximately 11 1/2" around the ankle and 2 1/2" tall. As with most of my patterns, I used Caron Simply Soft for this pattern, but you can use any lightweight worsted yarn. It's a quick, fun knit and the end product adds such a fun frilly detail to the top of shoes.
Kit's Crafts - Fancy Spats - Liana
Materials:
50 – 60 yards (45 – 55 meters) Caron Simply Soft or lightweight worsted yarn
Size 7 (4.5 mm) Needles
Yarn Needle
Size D (3.25 mm) Crochet Hook
2 half inch (1.3 cm) buttons

Only $4.50
0 Comments

T-Shirt Yarn Star Bracelet

5/20/2013

0 Comments

 
Alright, as promised, here is my next post which is another t-shirt yarn bracelet, but unlike the Cluster and the Circle, this one is knit instead of crochet. However, just like the others it is a really quick project. Enjoy!
Kit's Crafts - T-Shirt Yarn Star Bracelet
This bracelet was written using US standards. The yarn for this bracelet is made from a T-Shirt cut into one long continuous ½” strip. Here is a tutorial on how to make tarn. Although this bracelet is pretty easy to knit up, working with tarn can be tricky. If you are using purchased tarn, check the width of the tarn. The original was knitted with tarn that is ½” wide.

Gauge:
In stockinette stitch, 2” = 9 stitches X 14 rows, however, this may vary based on the thickness of the T-Shirt you use, as well as how close you cut to ½” for your strip.

Sizes:
Small, approximately 6” long (Medium, approximately 7” long) (Large, approximately 8” long) 

Materials:
* 10 - 15 Yards T-Shirt Yarn (WPI = 7)
* Size 6 Needles
* Yarn Needle
* 1 Button at 1” diameter or 2 buttons at ½” diameter
* D Hook

Only $3.00 for a PDF download.
0 Comments

Cable Star Hat

4/9/2013

2 Comments

 
About a month ago, I attended a baby shower and I came up with the following pattern for a little hat to give to the new baby. It was too cute not to share, so I have posted the pattern for sell through Ravelry. If you are not familiar with Ravelry, you are seriously missing out. It is a data base full of all kinds of patterns for pretty much all things knit and crochet. I generally go there first when I decide I am going to knit or crochet something. You can friend me there, if you like. Anyway, the pattern for this hat is pretty easy and the sizing covers from a newborn up to an adult. It is very stretchy so it will last a while despite fast growing children.

Materials:
* Size 4 (US) Circular Needles
* Size 4 (US) Double Point Needles
* Cable Needle
* Yarn Needle
* ½ skein Caron Simply Soft Yarn (Victorian Rose)
* Ribbon or flower to adorn

Only $4.00 for a PDF download.
Since my original post for this hat, I have added length to sizes Toddler – Adult at row 9, which is right after the star stitch band. I also added an extra row of star stitches to sizes Child – Adult. The bottom right photo displays the changes.
Picture
2 Comments

Ricky's Blanket

1/24/2013

0 Comments

 
When my husband and I bought our condo I told him that I really wanted to tile the backsplash in our kitchen. I found out that every May, Contempo Tile has a psycho sale to get rid of discontinued tile and tile from deals that went south. We went last May and found the most beautiful travertine tiles. We walked away with 50 square feet and supplies for installation spending only $80. The only problem is that we do not own a tile saw. So, we contacted a guy my husband works with, Ricky and not only did he let my husband borrow it, but he showed up to help. Below is a picture of the end product, which I must say turned out even better than I had hoped!
Picture
Anyway, as a thank you to Ricky, I made him an afghan. I really don't like to make blankets because it seems to take forever, but Ricky had mentioned he was looking to get one (his house is REALLY cold). My inspiration for the general design of the blanket came from a bathroom mat by Thomas O'brien. I kept the stripe pattern, but changed the colors to go with Ricky's house, then added a wide binding. The final measurements are 72" x 64", so really I guess it is more of a blanket than an afghan. Originally, I had planned on just knitting the blanket, but it was taking forever, so I ended the madness and attached a fabric binding to get the final size.
Kit's Crafts - Ricky's Blanket #FreeKnitPattern
Materials:
* 2-3 Skeins Lion Brand Vanna's Choice in Charcoal Gray
* 2-3 Skeins Lion Brand Vanna's Choice in Fern
* 2-3 Skeins Lion Brand Vanna's Choice in Beige
* 2-3 Skeins Loops and Threads, Impeccable in True Gray
* Size 13 Needles
* Blue Courderoy, two strips measuring 76" x 30" each and two strips measuring 44" x 18" each (Prewash before using)
* Sewing machine and thread

Abbreviations:
CG = Charcoal Grey
CO = Cast On
K = Knit
STS = Stitches

Gauge:
8 Rows and 5.5 Stitches = 2" in Stockinette Stitch

Instructions:
* With a double strand of CH and using a long tail cast on, CO 180 STS. Follow stripe pattern knitting every row with a double strand. Bind off and weave in ends.
* Fold each fabric strip in half lengthwise and iron (two 15" x 76" strips and two 9" x 44" strips)
* Open the fold, then fold up each long side 3" and iron (two 12" x 76" strips and two 6" x 44" strips)
Picture
Complete the following steps fully with each strip one at a time, it will be MUCH easier.
* Pin along the fold  and every so often in the middle to secure the binding folds while you attach the bindings to the blanket
* Lay the blanket out on the floor, it will have some stretch, start with the short sides and adjust the blanket to match 2" shy of the 6" x 44" strip on each side, then pin with long pins being careful to get
through all layers
* Take it to the sewing maching and do a straight stitch with a 3/8" seam allowance

For the long strips:
* Fold over and iron 2" on each of the short sides of the long strips
* Roughly, line up the centers of the stip and the blanket and pin from the center to the ends, adjusting the blanket as you go, matching up the edge of the blanket to the fold just made
* Tuck the short strips into the 2" fold of the long strip ends
* Sew the strip to the blanket
* Repeat with remaining strip

Finishing:
* Sew along the folds/edges of the strips
0 Comments

Bucking Bronco Hat

1/3/2013

4 Comments

 
Some of you may remember the tractor hat I posted not too long ago. This is essentially the same hat, with the exception of the color work pattern.
Kit's Crafts - Bucking Bronco Hat #FreeKnitPattern
This hat is knitted from the bottom up, starting with the ear flaps. For the body of the hat, I start out knitting in the round then switch to the intarsia in the round method for the Tractor Chart (it could be stranded if the intarsia method is too confusing, but make sure to keep the strands loose as the hat WILL NOT be stretchy) and I finish off the hat by knitting in the round. Also, the braid attached to the ear flaps is an 8-stranded square braid.

This hat is for a child, 4-12 years old. If you would like a different size, adjust your needles and/or your yard.

Print the pattern.

Gauge: 
7 rows is 1", 5.5 STS is 1"

Materials:
Size 4 Double
Point Needles (DPNs) and Circular Needles
1 skein of Caron Simply Soft in Bone and Chocolate
Size E Crochet Hook
Yarn Needle
Bronco Chart

Abbreviations:
MC = Main Color (Chocolate)
CC = Contrast Color (Bone)
CO = Cast On
K = Knit
M1A = Make 1 Away
STS = Stitches
PM = Place Marker
K2Tog = Knit 2 Together
SC = Single Crochet
SL = Slip Stitch

Ear Flaps:
Using the circular needles, with MC, CO 3 STS
Row 1: K1, P to 1 before end, K1
Row 2: K1, M1A, K to 1 before end, M1A, K1
Repeat Rows 1 and 2 until there are 33 STS (30 rows total). Repeat Row 1 once more. Cut yarn. Push the ear flap out of the way of the needles and hold on the circular part.
For the second ear flap, repeat the same process as for the first, but don't cut the yarn.

Hat Body:
Turn and K across the 2nd ear flap. Using a Cable CO, loosely CO 27 STS, K across the 1st ear flap. Again, using the Cable CO, loosely CO 3 STS, PM. (96 STS)
Being careful not to twist, connect for knitting in the round. Knit 2 rows in MC then start Bronco Chart.
Switch to DPNs in the last row of the Bronco Chart.
The rest of the hat will be knitted in the CC.

Decreases:
Round 1: *K10, K2Tog, repeat from * around (88 STS)
Round 2, 4, 6, 8, 10: K around
Round 3: *K9, K2Tog, repeat from * around (80 STS)
Round 5: *K8, K2Tog, repeat from * around (72 STS)
Round 7: *K7, K2Tog, repeat from * around (64 STS)
Round 9: *K6, K2Tog, repeat from * around (56 STS)
Round 11: *K5, K2Tog, repeat from * around (48 STS)
Round 12: *K2, K2Tog, K2 repeat from * around (40 STS)
Round 13: *K3, K2Tog, repeat from * around (32 STS)
Round 14: *K1, K2Tog, K1 repeat from * around (24 STS)
Round 15: *K1, K2Tog, repeat from * around (16 STS)
Round 16: K2Tog around (8 STS)
Cut a 6" tail and using the yarn needle, thread through the remaining STS and pull tight to close up the hole then go through the top of the hat and tie a knot inside of the hat. Weave in loose ends.

Finishing:
SC around the edge of the hat with MC. Weave in ends.
Using CC, loosely SL into the knit stitches around the base of the SCs just made. Weave in ends.
Using MC, make 4 long strands for the braids (I usually just do the length between my hands outstretched). Fold in half and using the crochet hook, pull about an inch of the middle of the strands through the middle of the ear flap, then pull the ends through the loop just made. Cut the ends to about 3" past how long you want the braid to go, then do the square braid and tie a knot at the end. Trim up
the ends if necessary.
4 Comments

Girly Girl Hat

12/14/2012

3 Comments

 
I came up with a basic version of this hat a few years ago and wrote down most of the pattern. Recently, I had a friend contact me about making some hats for her kids for Christmas and resurrected this pattern for her daughter. I think it is a better version then the original.
Kit's Crafts - Girly Girl Hat #FreeKnitPattern
This hat is knit from the bottom up and makes use of the mock honeycomb stitch. The earflaps are knit back and forth then the hat is knit in the round. For the crown, decreases are made with cables. A ruffle is added to form a "brim" and adorned with a crocheted scalloped edge. To add charm, pom poms are attached to an 8-stranded square braid. To complete the girliness of this lovely little hat, a flower with a button center is added to the corner.

Gauge:
14 rows = 2"
10.5 STS = 2"

Materials:
* Size 4 Double Point Needles and Circular Needle
* Red Heart Shimmer in Hot Pink and Turquoise
* E Crochet Hook
* Yarn Needle
* Plastic Pom Pom Maker (or one from cardboard)
* 3/4" Button for flower

Gauge:
In Stockinette Stitch

Sizing:
* Child ages 3-10 yrs, (Teen and Adult)

Abbreviations:
MC = Main Color (Hot Pink)
CC = Contrast Color (Turquoise)
CO = Cast On
K = Knit
P = Purl
M1A = Make 1 Away
WYIF = With Yarn In Front
PS = Pick up 2 strands below and knit with the next stitch (Image below)
STS = Stitches
X = Times
PM = Place Marker
K2Tog = Knit 2 Together
SC = Single Crochet
SL = Slip Stitch
SLM = Slip Marker
K2TOG = Knit 2 together
CB8 = SL 4 STS to cable needle, hold in back and K4, [K2TOG, K2] from the cable needle
CB7 = SL 4 STS to cable needle, hold in back and K3, [K2TOG, K2] from the cable needle
CB6 = SL 3 STS to cable needle, hold in back and K2TOG, K1, [K2TOG, K1] from the cable needle
CB4 = SL 2 STS to cable needle, hold in back and K2TOG, K2TOG from the cable needle
PSSO = Pass Slipped Stitch Over
SC = Single Crochet
DC = Double Crochet
TR = Triple Crochet
Picture
PS = Pick up 2 strands below and knit with next stitch
Ear Flaps:
For all sizes

Using the circular needles, with MC, CO 3  STS
All Odd Rows: K1, P to 1 before end, K1Row 2: K1, M1A, K1, M1A, K1 (5 STS)
Row 4: K1, M1A, SL3 WYIF, M1A, K1 (7 STS)
Row 6: K1, M1A, K1, SL3 WYIF, K1, M1A, K1 (9 STS)
Row 8  K1, M1A, K3, PS, K3, M1A, K1 (11 STS)
Row 10: K1, M1A, [K1, SL3 WYIF] twice, K1, M1A, K1 (13 STS)
Row 12: K1, M1A, K1, [K1, SL3 WYIF] twice, K2, M1A, K1 (15 STS)
Row 14: K1, M1A, K4, [PS, K3] twice, K1 M1A, K1 (17 STS)
Row 16: K1, M1A, K1, [K1, SL3 WYIF] 3X, K2, M1A, K1 (19 STS)
Row 18: K1, M1A, K2, [K1, SL3 WYIF] 3X, K3, M1A, K1 (21 STS)
Row 20: K1, M1A, K5, [PS, K3] 3X, K2 M1A, K1 (23 STS)
Row 22: K1, M1A, K2, [K1, SL3 WYIF] 4X, K3, M1A, K1 (25 STS)
Row 24: K1, M1A, K3, [K1, SL3 WYIF] 4X, K4, M1A, K1 (27 STS)
Row 26: K1, M1A, K6, [PS, K3] 4X, K3 M1A, K1 (29 STS)
Row 28: K1, M1A, [SL3 WYIF, K1] 6X, SL3 WYIF, M1A, K1 (31 STS)
Row 30: K1, M1A, K1, [SL3 WYIF, K1] 7X, M1A, K1 (33 STS)

Child:
(You will no longer make increases)
Row 32: K4, [PS, K3] 7X, K1 (33 STS)
Row 34 and 36: [K1, SL3 WYIF] 8X, K1
Row 38: K2, [PS, K3] 7X, PS, K2 

Teen and Adult:
Row 32: K1, M1A, K3, [PS, K3] 7X, M1A, K1 (35 STS)
Row 34: K1, M1A, K1, [SL3 WYIF, K1] 8X, M1A, K1 (37 STS)
Row 36: K1, M1A, K2, [SL3 WYIF, K1] 8X, K1, M1A, K1 (39 STS)
(You will no longer make increases)
Row 38: K5, [PS, K3] 8X, K2 (39 STS)
Row 40 and 42: K2, [SL3 WYIF, K1], K1 9X, K1
Row 44: K3, [PS, K3] 9X

Cut yarn. Push the ear flap out of the way of the needles and hold on the circular part.
For the second ear flap, repeat the same process as for the first, but don't cut the yarn.

Hat Body:
Child:
Using a cable cast on, CO 3 STS, knit across 1st ear flap, again using the cable cast on, CO 27 STS, knit across 2nd ear flap, PM. Being careful not to twist, connect for knitting in the round for the rest of the hat. (96 STS)

Teen and Adult:
Using a cable cast on, CO 5 STS, knit across 1st ear flap, again using the cable cast on, CO 29 STS, knit across 2nd ear flap, PM. Being careful not to twist, connect for knitting in the round for the rest of the hat. (112 STS)

All Sizes:
Rounds 1 and 3: K2, *SL3 WYIF, K1, repeat from * until the last 2 STS, SL2 WYIF
Rounds 2 and 4: SLM WYIF, SL1 WYIF, K around
Round 5: *K3, PS, repeat from * around
Rounds 6, 8, 10, 12: K around
Rounds 7 and 9: *SL3 WYIF, K1, repeat from * around
Round 11: K1, *PS, K3 repeat from * to last 3 STS, PS, K2

Child:
Complete these 12 rows 4 times, then rows 1-6 once more, knit one more round and switch to double point needles.

Teen and Adult:
Complete these 12 rows 5 times, then rows 1-6 once more, knit one more round and switch to double point needles.

Decreases:
Round 1:
CB8 around (84 STS, 98 STS)
Rounds 2 & 3: K around
Round 4: CB7 around (72 STS, 84 STS)
Rounds 5 & 6: K around
Round 7: CB6 around (48 STS, 56 STS)
Round 8: K around
Round 9: CB4 around (24 STS, 28 STS)
Round 10: K2TOG around (12 STS, 14 STS)

Cut yarn leaving a 6" tail, thread tail through STS and pull tight to close hole. Weave in ends.
Using an E crochet hook, with MC, SC around the edge. Using the same hook, with CC, loosely SL into the knit stitches at the base of the SC's just made.

Ruffle:
With CC, CO 87 STS using a long tail cast on.
Row 1: K12, *P3, K9, repeat from * until last 3 STS, K3
Row 2: K3, *K9, P3, repeat from * until last 12 STS, K12
Row 3: Switch to MC, K3, *SSK, K5, K2TOG, P3, repeat from * until last 3 STS, K3 (73 STS)
Row 4: K3, *P7, K3, repeat from * until last 3 STS, K3
Row 5: K3, *SSK, K3, K2TOG, P3, repeat from * until last 3 STS, K3 (59 STS)
Row 6: K3, *P5, K3, repeat from * until last 3 STS, K3
Row 7: K3, *SSK, K1, K2TOG, P3, repeat from * until last 3 STS, K3 (45 STS)
Row 8: K3, *P3, K3, repeat from * until last 3 STS, K3
Row 9: K3, *SL 1, K2TOG, PSSO, P3, repeat from * until last 3 STS, K3 (31 STS)
Row 10: K3, *P1, K3, repeat from * until last 3 STS, K3
Row 11: K3, *P3, K1, repeat from * until last 3 STS, K3
Row 12: K6, *P1, K3, repeat from * until last 3 STS, K3
Row 13: K3, *P3, K1, repeat from * until last 3 STS, K3

Bind off, cut a long tail and, using the tail, sew ruffle to hat just above the SC's

Scalloped Edge:
Using E hook with CC, CH 25, turn, SC in 2nd CH from the hook, SC across
Turn, *Skip SC, 5DC in next SC, skip SC, SL in next SC, repeat from * across
Cut yarn, leaving a long tail, sew to hat with tail

Flower:
Using E hook, with MC, CH 5, SL in 1st CH to join in circle, 
CH4, SC in circle, [CH3, SC in circle] 4X, SL in CH4, CH1, (DC, TR, CH1, TR, DC, SL) in CH4 space, then in each CH3 space, SL into 1st SLCut YarnFrom the back side, w/CC, pull up loop around one of the SC posts, CH1, [CH4, SC] around remaining posts, SL in 1st CH
CH1, turn, [SC, 2DC, TR, CH1, TR, 2DC, SC] in each CH4 space (5X), SL in 1st SC
Cut long enough tail to sew flower to hat
Picture
Finishing:
Cut 4 long strands of MC, fold in half and slip knot through middle of one earflap
Make 8-stranded square braid and tie off at desired length
Repeat for second earflap

Make pom pom using either a plastic pom pom maker or two cardboard rings
After cutting the wrapped strands, but before tying off the pom pom, put braid through center of rings
then tie a tight knot, pull the rings from pom pom and position pom pom at bottom of braid

Cut any long ends
Picture
3 Comments
<<Previous
Forward>>
    Kit's Crafts
    Hey there! I'm Kristin, aka Kit. Here is just a peek into my crafting mind. I hope you find something to spur your creativity!
    Instagram

    Kit's Crafts Shop

    Popular Posts

    Picture
    Picture
    Picture
    Picture
    Picture
    Picture

    RSS Feed

    Picture
    Kit's Crafts
    Picture
    The Yarn Box

    Featured Here

    Picture
    Moogly
    Picture

    Categories

    All
    About
    Baby
    Baking
    Bio
    Caramel
    Child
    Chocolate
    Christmas
    Cooking
    Crochet
    Decor
    Dessert
    Dress
    Free Knit/crochet Pattern
    Free Sewing Pattern
    Interior Design
    Knitting
    Link Party
    Materials
    Pattern
    Quiet Book
    Quiet Book
    Recipe
    Selling Handmade Goods
    Sewing
    Spats
    T Shirt
    Tutorial

    Archives

    July 2020
    January 2020
    July 2019
    November 2018
    September 2018
    August 2018
    July 2018
    May 2018
    April 2018
    February 2018
    January 2018
    April 2016
    September 2015
    March 2015
    February 2015
    November 2014
    October 2014
    September 2014
    August 2014
    July 2014
    June 2014
    May 2014
    April 2014
    March 2014
    February 2014
    January 2014
    December 2013
    November 2013
    October 2013
    September 2013
    August 2013
    July 2013
    June 2013
    May 2013
    April 2013
    March 2013
    February 2013
    January 2013
    December 2012
    November 2012
    October 2012

Powered by Create your own unique website with customizable templates.