On Etsy, you can find several quiet books to gain inspiration, one such book, Monster Album, was the inspiration for this page. I knew I wanted to incorporate a lace up page as well as a weaving page, but nothing was quite hitting the right spot. I saw this page and a couple days later it hit me; monsters under the bed!
Materials Needed:
* Fabric (remember to prewash all fabrics)
* Shoelace/ribbon for weaving and lacing (1/4" or bigger, I think mine are too small)
* Felt for the back of the lace up monster
* Buttons for eyes
* 2 Magnets 1/2" in diameter
* (6) 1/4" Eyelets and tools to install (more info below)
* Embroidery thread and needle
* Scotch Tape
* Fray Check
* Steam a Seam
* 9"x9" square of reinforcement for the back of the page, plus extra for lace up monster and magnet
* Pattern
Bedroom:
* Cut window, sky, headboard and pillow from fabric and steam a seam
* Cut 2 beds from fabric
* Using template and bed, position sky, window, headboard and pillow on page and iron
* Satin stitch into place
Weave Monster:
* Cut monster from fabric and steam a seam
* Position on page using the template and bed, then iron in place
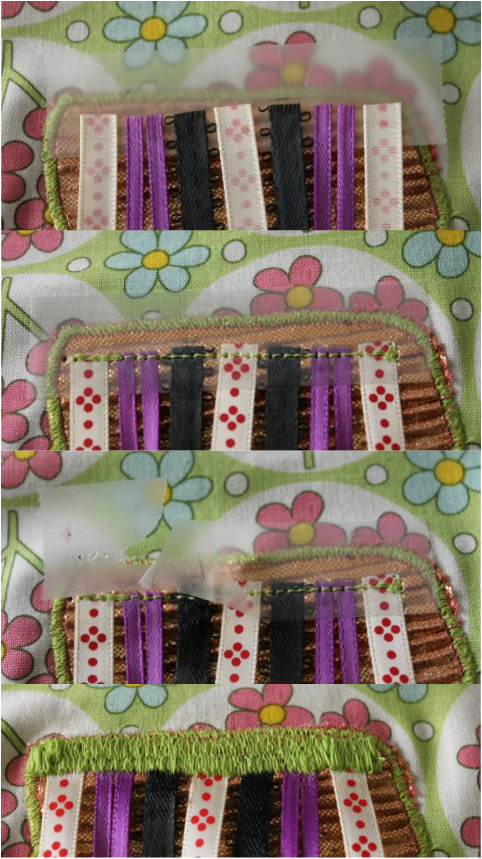
* Cut ribbons to desired length and apply Fray Check to cut side that will not be sewn
* Place a piece of scotch tape sticky side up across the top of the monster
* Place the ribbon where you want it and stick it to the tape
* Flip tape over and stick ribbon to page
* Straight stitch through ribbon then carefully tear away the scotch tape
* Satin stitch across top (I went back over a few times to make sure it was secure)
* Repeat the scotch tape process with the ribbons on the side
* Sew button eyes in place
Lace Up Monster:
* Cut monster from fabric, reinforcement and steam a seam
* Cut off about 1/8"-1/4" around the edge of the reinforcement monster
* Place reinforcement on felt, then steam a seam, the fabric, face up, and iron in place
* Satin stitch into place, cut from felt
* Place buttons for eyes and sew in place
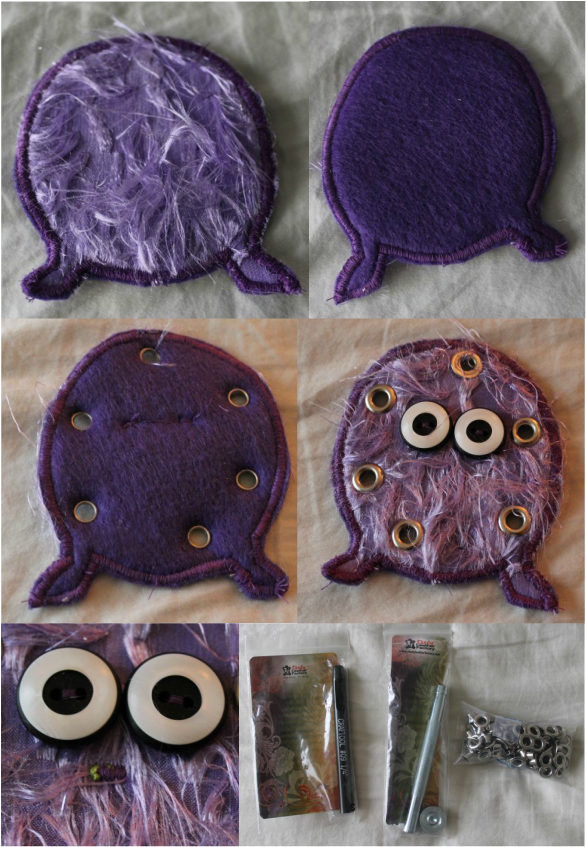
* Position eyelets around body and mark centers
* Punch holes for eyelets, set eyelets
Ok, so here is the deal with the eyelets. There are two ways you can install them. The typical craft store carries eyelet pliers, which I have and tried but 9 times out of 10, the eyelet would not catch all of the fabric around the hole and/or would just smoosh and look very ugly. So, I headed to Tandy Leather, where I picked up a 1/4" punch, eyelet setter and anvil and the eyelets themselves. I also got a scrap of extra thick leather to protect my table when I was punching the holes and setting the eyelets. The smallest pack of eyelets I could find had 100 eyelets, but no worries, this is how you will bind the pages to each other. P.S. If it isn't obvious, I used a hammer to punch the holes and set the eyelets
* Using the template, position the monster on the page and pin
* Satin stitch the center (as shown in the bottom left picture) to attach to page
* Place a button nose so it covers the satin stitch you just made and sew to the page
* Lace with shoelace
Bed:
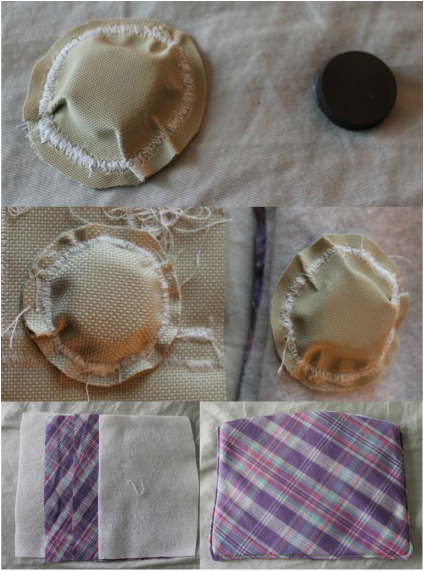
* Cut 4 circles of reinforcement about 2 1/2" to 3" in diameter
* Place one of the magnets in between the two circles
* Satin stitch around the magnet getting as close as possible
* As you are stitching, you will notice that the bottom circle will remain flat while the top one rouches around the magnet, this will be the side that you want to match up with the other magnet
* Find the side of the remaining magnet that attracts to the flat side of the previous magnet and repeat the previous two steps, with the attracted side facing down
* Double check that the flat sides are attracted to one another
* Place the flat side of one magnet against the back of the page roughly where the bed will hit when lifted up (mine overlaps the far left of the window and one of the panes)
* Hand stitch this to the reinforcement being careful not to penetrate the front of the page
* Cut 2 beds from felt, then stack the beds as such: felt, fabric right side up, fabric right side down, felt and sew, using a 3/8" seam allowance, around the sides and bottom
* Turn bed right side out, iron and sew around the sides and bottom as close to the edge as you can
* Place the bed on the page and holding the top in place, fold up the bed and place a pin where the magnets will meet
* Turn bed wrong side out and place magnet flat side down where the pin marks then hand sew to the felt being careful not to catch any fabric
* Turn bed right side out again and place on page then fold up to double check that the magnet is sewn in correctly
* Pin bed to page and satin stitch along the top to attach (I went over this seam a couple times too)
Bear:
* Cut bear from fabric and steam a seam
* Place and iron bear on page
* Satin stitch around edges
* Embroider eyes and nose
Being extra careful not to catch the bed, sew a 1 1/2" binding to the page


