Kit's Crafts
  • Home
  • About
    • Selling Handmade Goods
  • Knitting
  • Crochet
  • Sewing
  • Crafting
    • Just for Fun
    • Wall Decor
    • Christmas Fun
    • Party On
  • From the Kitchen
    • Chocolate
    • Sweet
    • Savory
  • Quiet Book
  • The Shop

Baby Bear Hat

12/7/2012

4 Comments

 
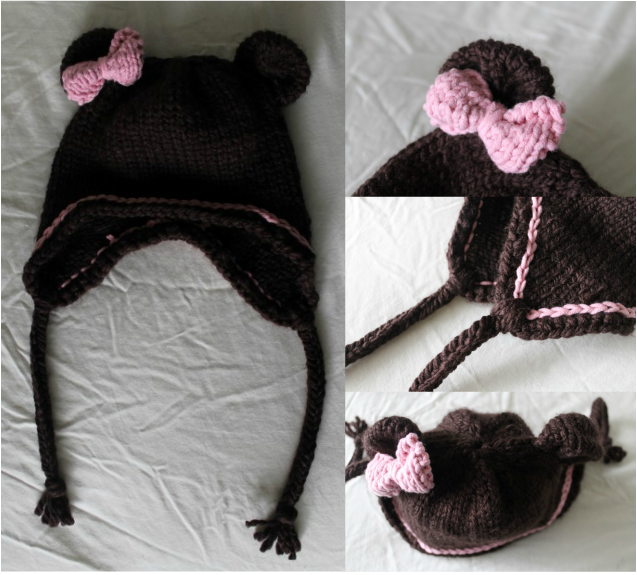
I finished this hat a couple days ago for a friend and it was too cute not to post. The inspiration came from this darling hat on etsy.
Kit's Crafts - Baby Bear hat #FreeKnitPattern
This hat is knitted from the bottom up, starting with the ear flaps. The braid attached to the ear flaps is an 8-stranded square braid. The ears and bow are knitted separately and sewn in place. This hat is for a newborn (3-6 months) (6-12 months). If you would like a different size, adjust your needles and/or your yard.

Print the pattern.

Gauge: 
10 rows is 2", 6.5 STS is 2"

Materials:
Size 10 Double Point Needles (DPNs) and Circular Needles
1 skein of Bernat Softee Chunky in Dark Taupe
1 skein of Lion Brand Baby's First in Fairy Tale
Size J Crochet Hook
Yarn Needle

Abbreviations:
MC  = Main Color
CC = Contrast Color
CO = Cast On
K = Knit
M1A = Make 1 Away
STS = Stitches
PM = Place Marker
K2Tog = Knit 2 Together
SC = Single Crochet
SL = Slip Stitch

Ear Flaps:
Using the circular needles, with MC, CO 3 STS
Row 1: K1, P to 1 before end, K1
Row 2: K1, M1A, K to 1 before end, M1A, K1
Repeat Rows 1 and 2 until there are 15 STS (17 STS) (19 STS).
Repeat Row 1 once more. Cut yarn. Push the ear flap out of the way of the needles and hold on the circular part.
For the second ear flap, repeat the same process as for the first, but don't cut the yarn.

Hat Body:
Turn and K across the 2nd ear flap. Using a Cable CO, loosely CO 13 STS (13 STS) (15 STS), K across the 1st ear flap. Again, using the Cable CO, loosely CO 3 STS (3 STS) (3 STS), PM. Total: 44 STS (52 STS) (56 STS)
Being careful not to twist, connect for knitting in the round. Knit all rounds until the hat reaches 5" (5.5") (6") and switch to double point needles for the decreases.

Decreases for all sizes:
Round 1: *K2, K2Tog, K2 repeat from * around (40 STS)
Round 2 and 4: K around
Round 3: *K1, K2Tog, repeat from * around
Round 5: K2Tog around

Cut a 6" tail and using the yarn needle, thread through the remaining STS and pull tight to close up the hole then go through the top of the hat and tie a knot inside of the hat. Weave in loose ends.

Finishing:
SC around the edge of the hat with MC. Weave in ends. Using CC, loosely SL into the knit stitches around the base of the SCs just made. Weave in ends. Using MC, make 4 long strands for the braids (I usually just do the length between my hands outstretched). Fold in half and using the crochet hook, pull about an inch of the middle of the strands through the middle of the ear flap, then pull the ends through the loop just made. Cut the ends to about 3" past how long you want the braid to go, then do the square braid and tie a knot at the end. Trim up the ends if necessary.

Ears:
Using MC with an invisible cast on, CO 12 STS while leaving an 8" tail
Row 1, 3, 5, 7, 9, 11: K across
Row 2, 4, 6, 8, 10, 12: Purl across
DO NOT BIND OFF

Cut an 8" tail and using the yarn needle, thread tail through stitches, sinch together and tie to secure. Use the yarn needle to thread original tail through cast on stitches (removing scrap thread as you go), sinch and tie to secure and cut working yarn.

Repeat the same process for the second ear. Use the tails to secure the ears to the hat.

Bow:
I got the pattern for the bow from Cornflower Blue. I did number 2, but I only cast on 11.

***UPDATE***
So, the blog I refer to for bow pattern that I used originally has been privatized or something, so here is a link to a similar bow, the Not-So-Itty-Bitty Bow by Untangling Knots.
Picture
Oombawka Design
Foodies and Crafties Soiree
4 Comments
Rhondda Mol link
8/4/2013 03:43:16 am

Hi Kristin,
Thank you for linking up at my first link party :) I really appreciate it!
Rhondda

Reply
Kristin Baird link
8/4/2013 12:22:37 pm

Of course! It is always fun to join a new party! I will be sure to link up next Wednesday too!

Reply
Christina
4/21/2014 12:43:31 pm

I saw this pattern on ravelry.com and loved it! I am so excited to try it. I just can not figure out how to get the pattern for the bow.

Reply
Kristin link
4/21/2014 02:16:42 pm

Thanks for bringing that link to my attention. I have provided another link to a similar bow. I hope that works for you.

Reply


Leave a Reply.

    Kit's Crafts
    Hey there! I'm Kristin, aka Kit. Here is just a peek into my crafting mind. I hope you find something to spur your creativity!
    Instagram

    Kit's Crafts Shop

    Popular Posts

    Picture
    Picture
    Picture
    Picture
    Picture
    Picture

    RSS Feed

    Picture
    Kit's Crafts
    Picture
    The Yarn Box

    Featured Here

    Picture
    Moogly
    Picture

    Categories

    All
    About
    Baby
    Baking
    Bio
    Caramel
    Child
    Chocolate
    Christmas
    Cooking
    Crochet
    Decor
    Dessert
    Dress
    Free Knit/crochet Pattern
    Free Sewing Pattern
    Interior Design
    Knitting
    Link Party
    Materials
    Pattern
    Quiet Book
    Quiet Book
    Recipe
    Selling Handmade Goods
    Sewing
    Spats
    T Shirt
    Tutorial

    Archives

    July 2020
    January 2020
    July 2019
    November 2018
    September 2018
    August 2018
    July 2018
    May 2018
    April 2018
    February 2018
    January 2018
    April 2016
    September 2015
    March 2015
    February 2015
    November 2014
    October 2014
    September 2014
    August 2014
    July 2014
    June 2014
    May 2014
    April 2014
    March 2014
    February 2014
    January 2014
    December 2013
    November 2013
    October 2013
    September 2013
    August 2013
    July 2013
    June 2013
    May 2013
    April 2013
    March 2013
    February 2013
    January 2013
    December 2012
    November 2012
    October 2012

Powered by Create your own unique website with customizable templates.