|
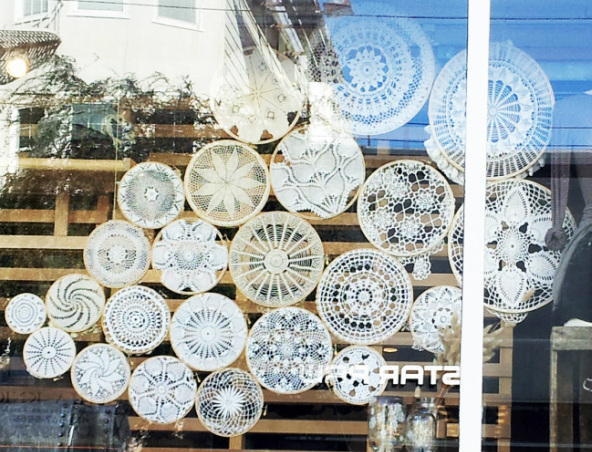
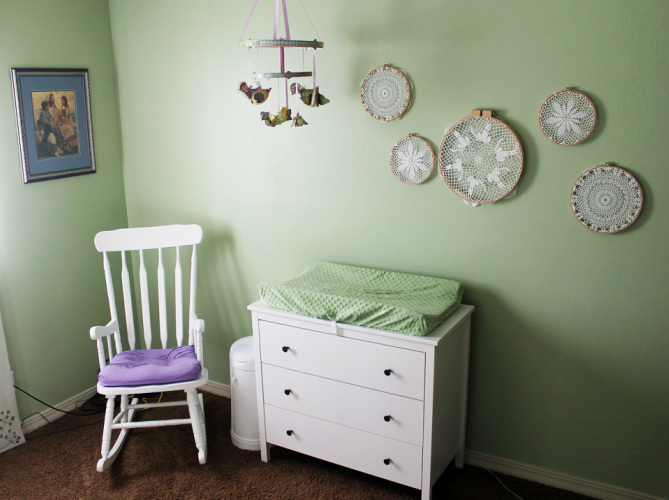
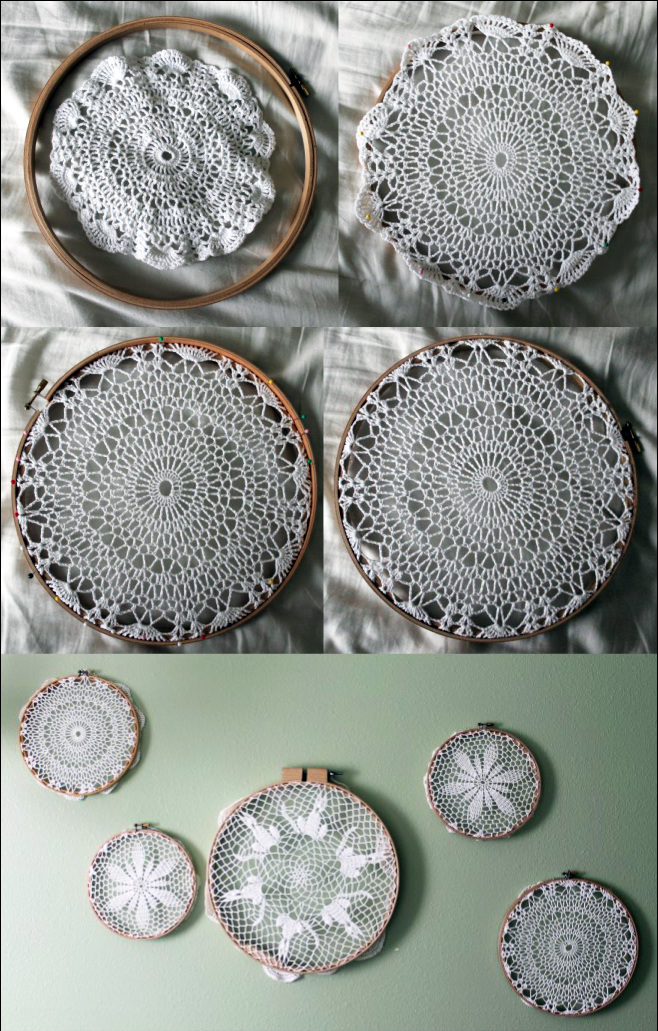
During the last Christmas season, we spent some time in San Francisco and, while walking around the Marina District, I noticed the window of an uber hipster shop, Brandy Melville. I have seen a lot of different ways of using doilies, but this has to be my favorite. I took a picture with my phone to bring home and reinterpret. To recreate this, I headed to a local thrift store for doilies then off to the craft store for embroidery hoops and, $10 later, I had the look. As for the process, I washed and bleached the doilies, then sprayed them with water so that they were damp. I tugged and pulled with all my might, put each one over an inside ring, then pinned to hold while I stretched even more. Then put the outside ring on and stretched them a bit more before completely tightening it and voila!
1 Comment
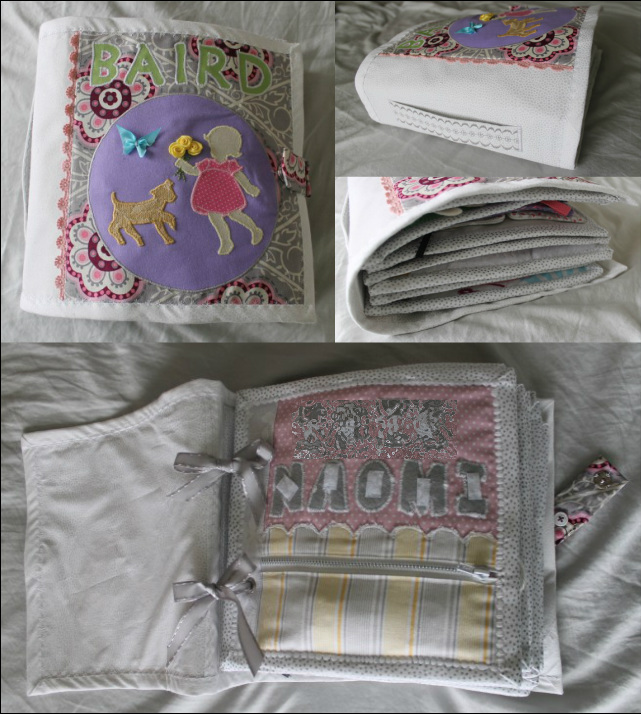
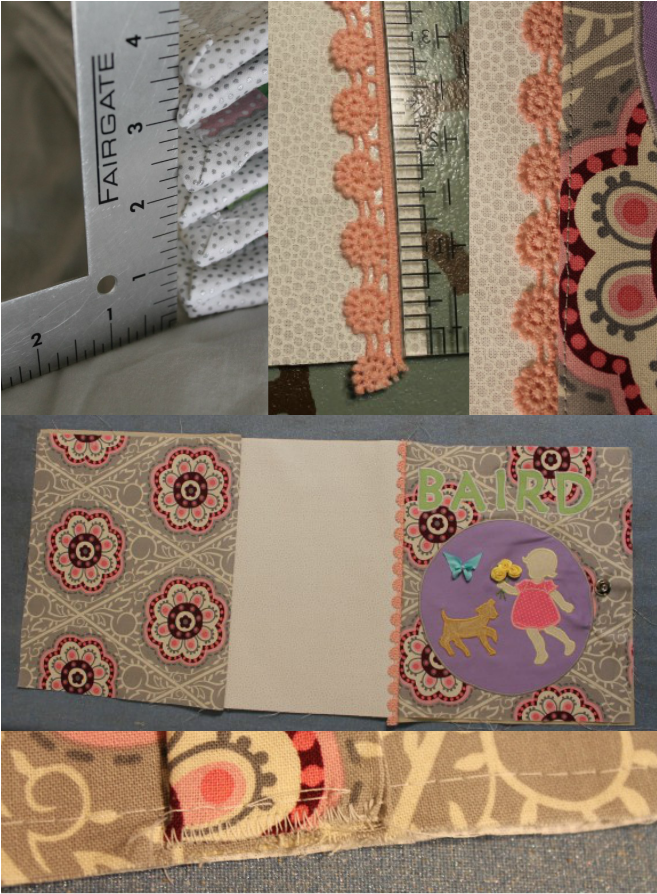
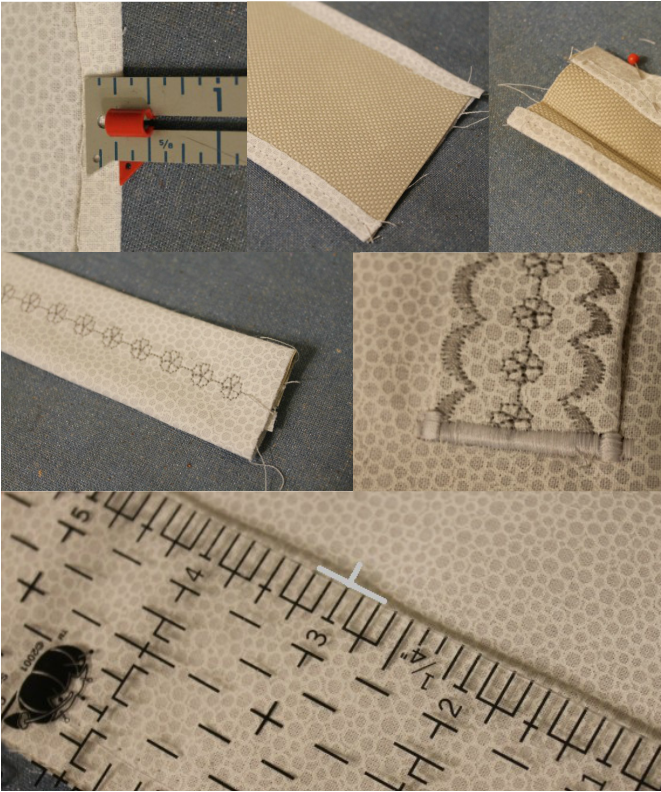
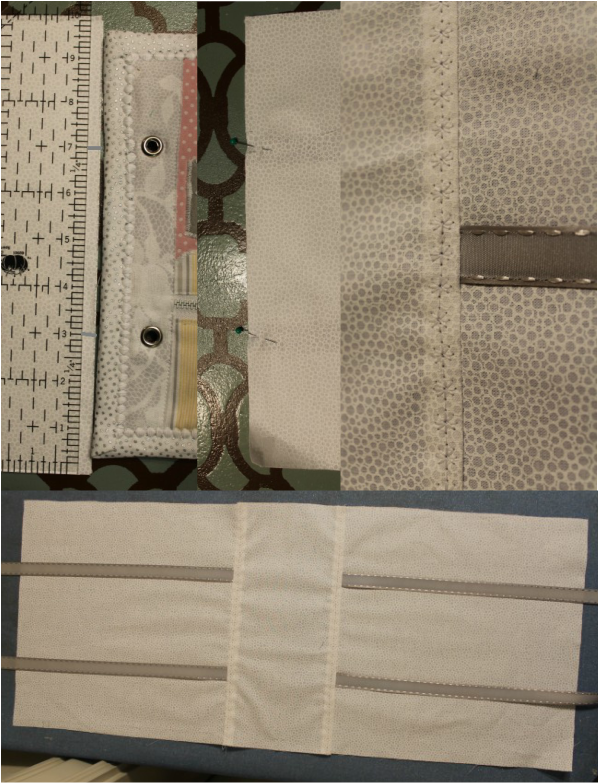
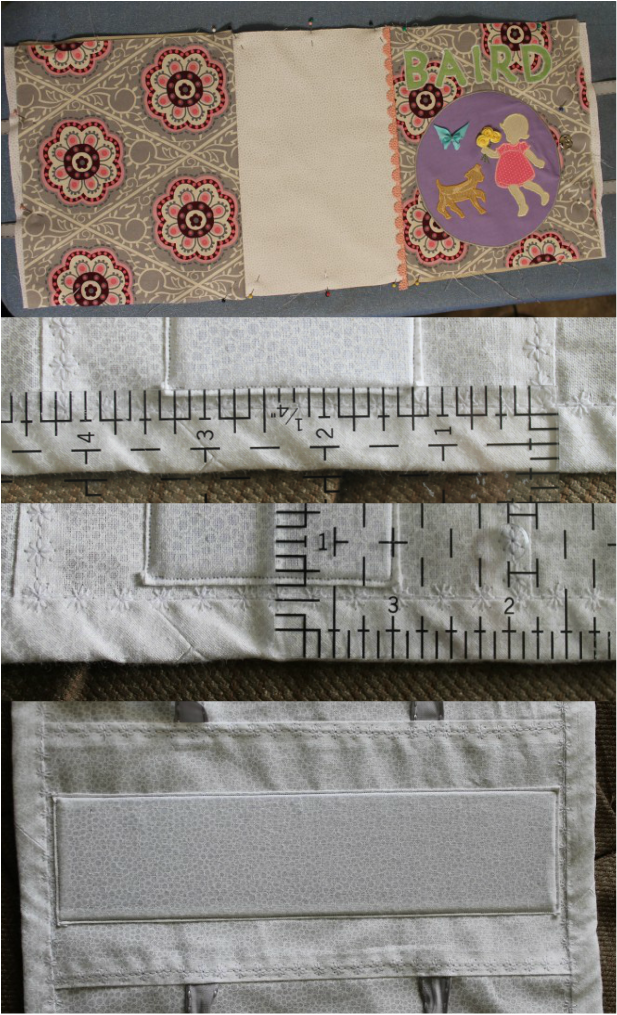
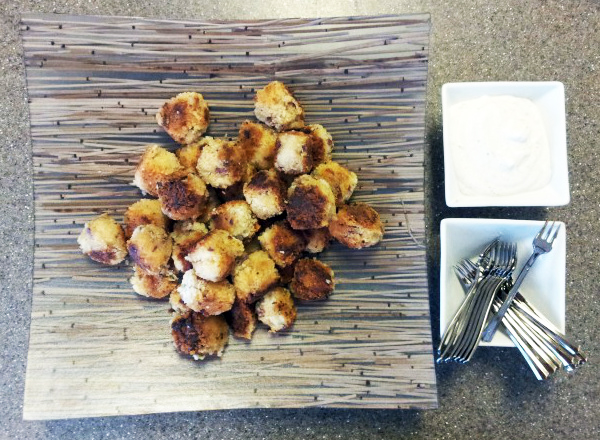
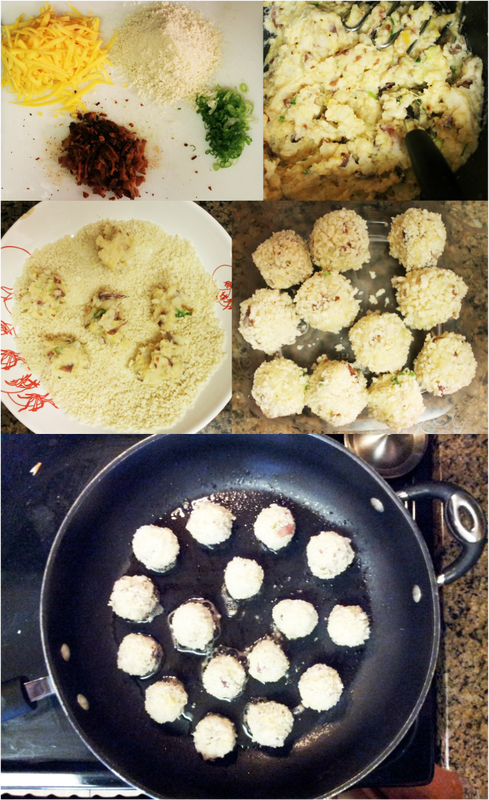
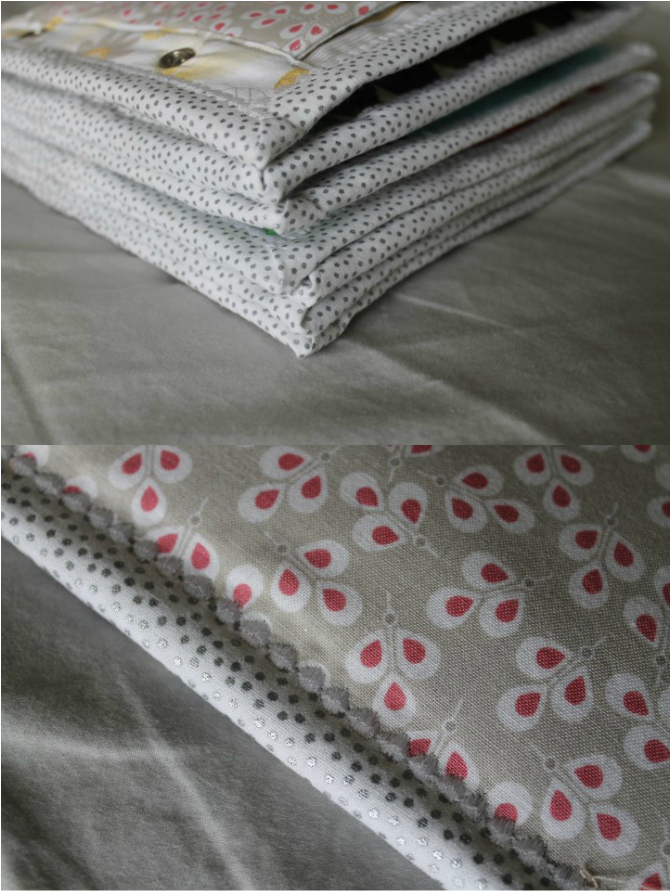
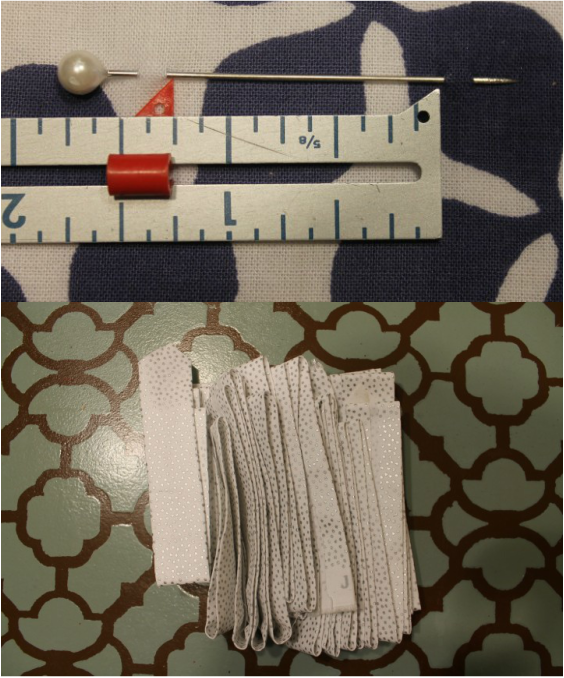
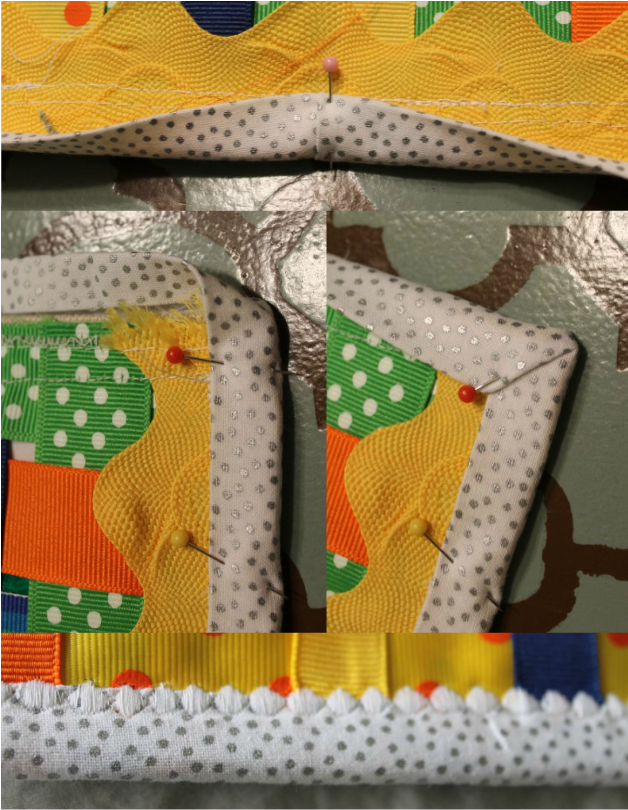
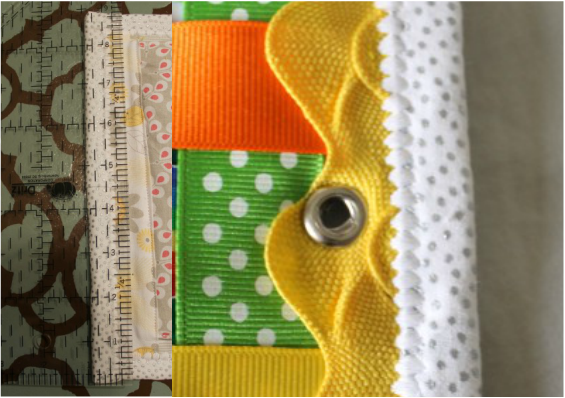
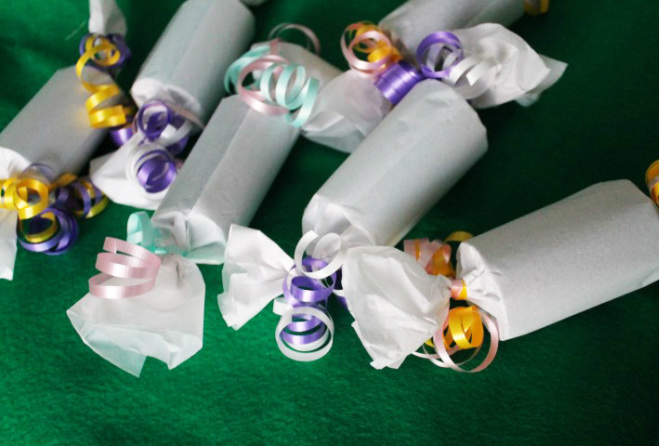
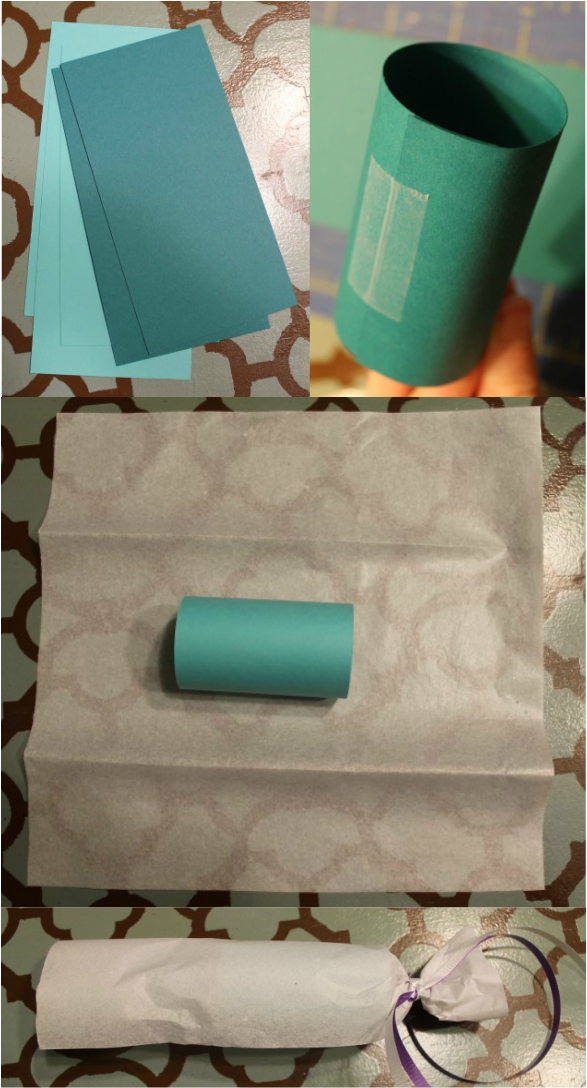
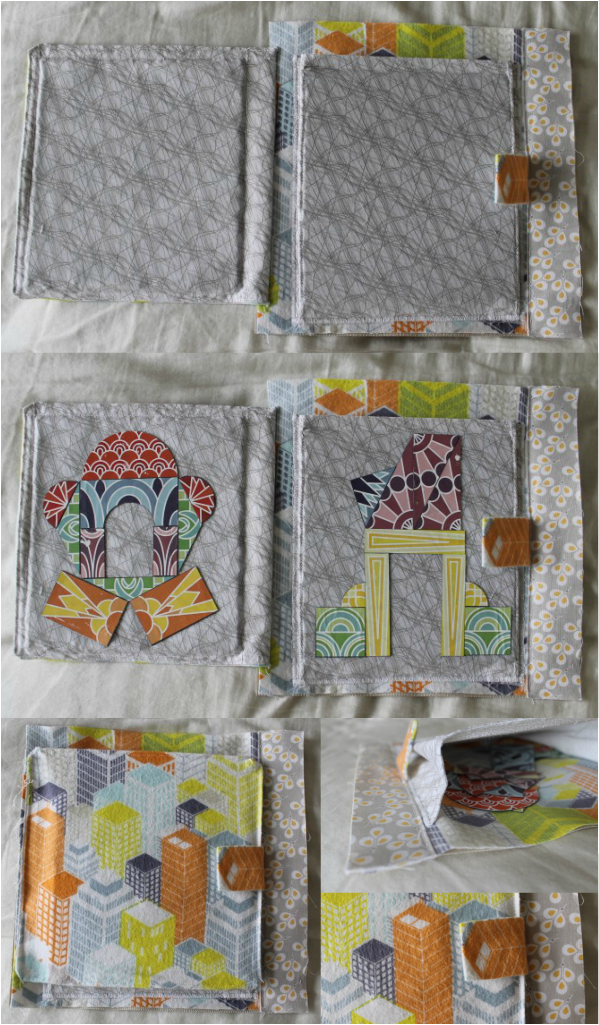
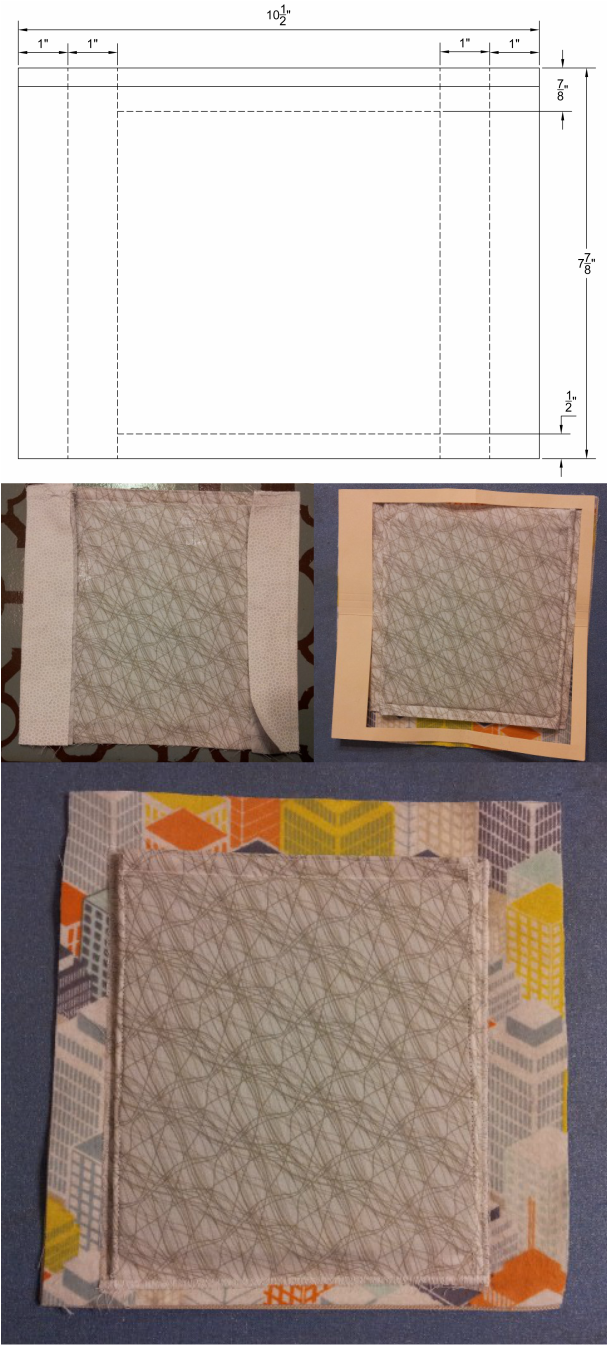
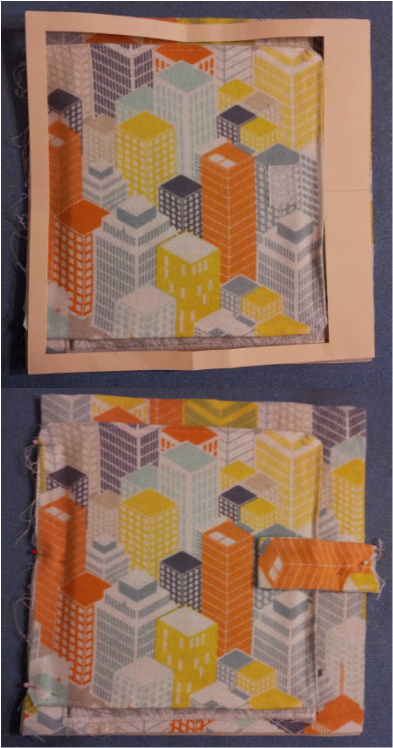
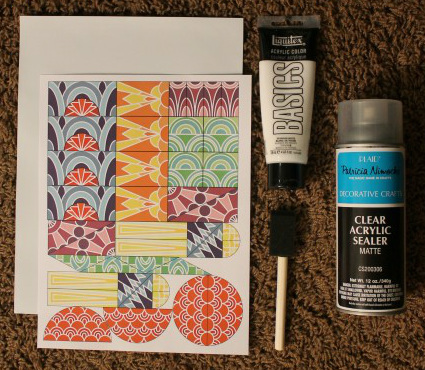
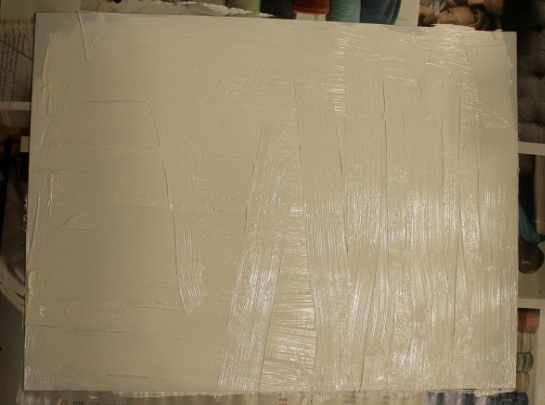
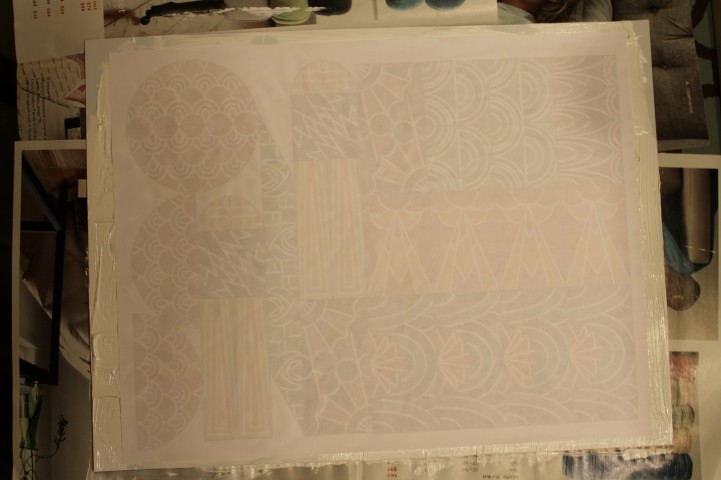
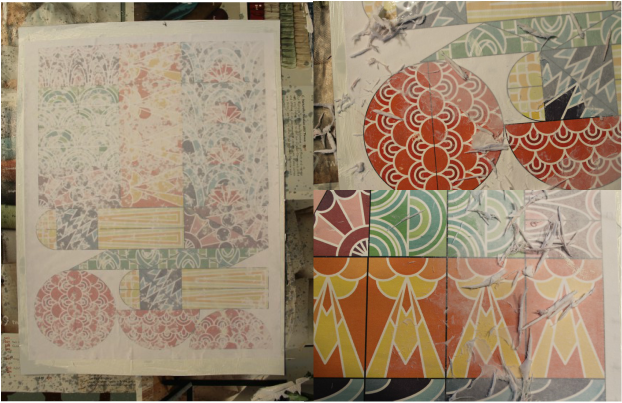
This is a post I have been looking forward to for quite some time. It is the LAST POST for the quiet book! I can't believe it is finally done! The day after I finished it, I found myself anxiously looking for something to work on, which I will post about later.... Anyway, I am very pleased with the results of my efforts on this book and hope you feel the same. Unlike the previous pages, I have not provided a pattern for the cover. Essentially, I found some silhouettes online that I liked then printed them out, cut them from fabric and satin stitched them to the front. If you choose to do the same, I suggest adding Steam a Seam to your list of materials. Materials Needed: * Fabric for the front and back cover, exterior binding side, bias tape and interior (remember to prewash and iron all fabrics) * Large snap * 1/2" ribbon * Reinforcement for the covers, side and handle * 2 1/2" x 8" rectangle of stiff plastic (I used 2 layers of heavy duty template plastic for quilting) * Fray Check Exterior: * Cut two fabric and reinforcement rectangles at 8 3/4" x 10" for the front and back cover * Add whatever decoration you would like to the front, bearing in mind that there will be a 1/2" bias tape running around the exterior edges and allowing for a 3/8" seam to the binding and making room for the snap in the middle toward the right edge * Stack your completed pages and measure the height then add 3 1/2". Cut a rectangle for the binding (fabric and reinforcement) using this measurement for the width by 10" for the height * I added a little lace trim to the binding, I found it at Michaels in the scrapbook section and it has a sticky back, which was quite useful, I attached it 1/4" from the edge * With right sides together (including the reinforcement), sew the cover to the binding side and the back to the binding side * Iron the seams toward the back and front, then straight stitch close to the edge of the seam to reinforce this seam and secure the lace * Place the female side of the snap about an inch from the edge of the front and centered then hand sew to attach * Cut a rectangle of the cover fabric at 2 3/4" by the height of your completed pages plus 4 1/2" * Fold this rectangle in half to find the center then position and sew the male side of your snap to the front of one side of the rectangle * Fold the rectangle with right sides together and sew along sides with a 3/8" seam allowance * Unfold the rectangle and iron, then position the non-snap side in the center of the back cover with the snap facing up and satin stitch along the edge to attach to the back cover Handle: * Cut a rectangle of your binding side fabric at 3" x 6" and a rectangle of reinforcement at 2 1/2" x 6" * Iron 1/4" of each long side of your fabric rectangle toward the wrong side * Slide the reinforcement under this fold and sew to secure * Fold and iron each long side 5/8" (the center) toward the reinforcement side (you may need to pin to secure for sewing) * Turn handle over and using either a decorative stitch or a zig zag, sew along the center to secure the sides, then do the same along each side * Mark the center of binding side 2" from the top and bottom, then position the handle on these marks and satin stitch the ends as well as about 1/8" up each side Interior: * Cut two rectangles of the interior fabric at 9 7/8" x 10" and one rectangle at the height of your completed pages plus 1 1/4" by 10" * Cut 4 lengths of ribbon at 11" each (this is perhaps a little excessive, but I figure you can always shorten but you can't really lengthen) * Line up the 10" sides of your binding and one of the larger rectangles and mark along the 10" edge for the ribbons at 3" and 7" * Center a ribbon at each mark and sandwich between the two rectangles (right sides together), then sew with a 3/8" seam allowance, repeat for the other side of the binding * Iron seam toward the binding, then using either a decorative stitch or a zig zag, secure the seam and the ribbons Attaching Interior to Exterior: * For the length of the bias tape, refer back to the height of your completed pages, times that by 2 and add 65, the width will be 2 1/4". You should have one long strip, please go to Prudent Baby for instructions. * To make the bias tape, refer to Creative Little Daisy for instructions, but when you put the pin in your ironing board, make the width 1 1/4". Your bias tape should fold over 1/2" on either side with 1/4" between the edges of the fabric. Please email me with any questions at [email protected]. * Place the interior and exterior on top of each other with wrong sides together and pin * Starting at one side of the interior binding side, baste along the edges at about 1/4" from the edge, but DO NOT close, stop at the opposite side of the binding that you started at so you can insert the stiff plastic into the binding * Trim edges to match each other This next step I did not realize was needed until I finished my book, so I had to improvise, which is why mine is different and I don't have progress pictures. Basically, you are stiffening up the binding so when you hold the handle your cover doesn't scrunch up and things fall out. * On the interior, find the center of the short side of the binding and mark the entire length of the long side of the binding 1 1/8" on either side of the center with a fabric pen and straight stitch along these marks * Measure and mark 5/8" from the top with a fabric pen and straight stitch along this line * Slide your stiff plastic rectangle (2" x 8 1/5") into the pocket you just created, then sew along the bottom to secure it * Baste along the bottom edge of the binding side * Refer back to the Page Bindings instructions for sewing the bias tape around the cover (I started in the center top of the back cover), making sure not to catch the ribbons or the wrong side of the snap rectangle Finishing: * Put all of your pages into the book using just the ribbons attached to the back cover of the book * Tie a semi loose bow with the front cover ribbons, then cut leaving plenty to untie and retie the ribbons * Use fray check to prevent the ribbons from fraying * Bask in the delight of a finished project Sometime the week before the Super Bowl, I made Bobby Dean's Simply Smashed Potato Cakes. They were really good, but needed a few tweeks. I began to think about what to bring to the Super Bowl party I would be attending that Sunday and my mind went back to these cakes, but turning them into more of an appetizer by rolling little balls and adding a ranch dip. The result was a success! I'm pretty sure that I will now make mashed potatoes this way, with the exception of the breadcrumbs. Potato Balls Ingredients: Nonstick cooking spray 4-5 red potatoes 4 cloves garlic, peeled and cut lengthwise in half 3 slices of thick cut bacon 1/4 cup chicken broth 1/4 cup plain Greek-style yogurt Salt and pepper 1 1/2 cups plain breadcrumbs (preferably panko) 1/2 cup shredded cheddar cheese 1 finely chopped scallion Ranch Dip Ingredients: 1 1/4 cup plain Greek-style yogurt 1/2 cup skim milk 1 packet Ranch dressing mix Directions: Put the potatoes and garlic in a pot and cover with enough water to go 2 inches past the potatoes. Bring to a boil, then reduce heat and let simmer until the potatoes are tender, about 20 minutes. Drain then return to pot. While the potatoes are cooking, spray a large non stick skillet with nonstick cooking spray, add bacon and fry at medium heat until crispy. Remove bacon and chop into small bits. Reserve bacon fat in the skillet. While potatoes and bacon are cooking, mix the ingredients for the Ranch Dip and refrigerate until balls are ready. Once the potatoes and garlic are returned to the pot, season with salt and pepper, then mash with yogurt and broth, once incorporated, add 1/2 cup of the breadcrumbs, cheese, scallions and bacon bits, then continue to mash until fully incorporated. Put the remaining cup of breadcrumbs in a shallow dish. With a melon baller, scoop about a walnut sized amount of the potatoes and put in the breadcrumbs. Roll around until fully coated with breadcrumbs then set aside while you make the rest. Reheat the bacon fat, if cooled, to medium-high heat. Drop the balls into the skillet, placing them about an inch apart. Rotate every couple of minutes to fry evenly. Serve hot with Ranch Dip. You might also like: Many of the quiet books out there sew two pages, right sides together, then flip them right side out, which is fine, but I personally like the look of the books over at Orange Crafts, which have bias tape around the edges, so that is precisely how I set up these pages. If you prefer the other method, sew the pages with a 1/2" seam allowance and adjust your measurements for the cover, which I will post next week. As a side note, the amount of fabric that I prescribe is ONLY for the 7 pages (front and back) which have been made for this book. If you would like to use the same fabric around the cover, you will need to account for those measurements, which will be given next week. Materials: * 16" of fabric with a 45" width * Iron and Ironing board * Long pin or needle * Eyelet punch, setter and anvil * Metal eyelets Creating the Bias Tape: * Cut 7 strips of fabric, 2 1/4" wide by 45" long So, there are quite a few ways of doing this. Of course, there are the bias tape makers, some of which will even iron it for you after folding, but I am cheap. So I searched the web and I found some pretty interesting methods, The Scientific Seamstress has a great print out for a bias tape maker out of cardstock and, talk about creative, Meijo's Joy has a bias tape maker created from a craft cutter! However, neither of these were the right size and I wanted something that I could do specific to this project. I found the answer at Creative Little Daisy. Please go to her website for instructions, but when you put the pin in your ironing board, make the width 1 1/4". Your bias tape should fold over 1/2" on either side with 1/4" between the edges of the fabric. Please email me with any questions at [email protected]. Sewing pages: Remove all removeable pieces and be careful not to catch the moving pieces when you are sewing. For this step, I went back to the web to find a great solution for doing this, because when I have done blanket bindings before, I always miss the edge on the bottom in places. I found the BEST method on Honey Bear Lane, but rather than redirect you, I posted what I did as it would be easier than trying to describe the specifics. * Match up what pages you would like to go together then, with wrong sides together, baste along the outside about 1/4" from the edges * Unfold one of your bias tapes and line up the edge of the bias tape with the edge of the page (I started on the binding edge because I figure the seam would be more hidden that way) * Starting about 1/4 of the page away and sew along the fold until about 1/4" from the end, back stitch and cut the thread * For the corner, hold the bias tape straight out in front, then fold the tape at a 90 degree angle away from the page, then fold back, lining the fold with the edge just sewn and the tape edge with the edge of the page, pin along this side * Start at the edge and sew along the fold line of the bias tape and over the corner folds you just made until a 1/4" from the next edge, backstitch and clip thread * Repeat the last two steps for all corners DO NOT CLOSE UP THE OPENING ON THE BEGINNING SIDE * Line up the edge of the bias tape along the side you began on, fold back so the fold is at the halfway point, 4 1/2", then cut the remaining off so there is about 1/2" fold over, pin * Line up the remaining bias tape with the page edge and overlap the fold about 1 to 1 1/2", then cut the remaining tape and pin * Sew along the remaining edge to close the gap, removing the pins as you go * Turn the page over and fold the bias tape over the edges of the page * Line up the fold of the bias tape with the seam created from sewing the other side (this ensures that you catch both sides), pinning as you go * For the corners, continue folding the tape over the edge as if the page keeps going and there will be a 45 degree angle, turn 90 degrees and continue folding over the next edge, pinning as you go * You have a few options at this point, you can do a straight stitch about 1/8" in from the edge or you can satin stitch around the edges, or you can get fancy and pick a frilly stitch (I went with fancy) to secure the remaining side of the bias tape Finishing: * On the binding side, mark for your eyelets, I put them 1 1/2" from the edge of the page and at 2 1/2" and 6 1/4" from the bottom * Punch a hole at each of those marks with your eyelet punch * Set the eyelet (If you have questions about the eyelets, refer to the monster page or email me) A couple weeks ago, I was preparing a lesson for church where, as an activity, you give scriptures as clues to what the topic was. Some suggestions were given online and in the manual, but all seemed either boring or not the best for children. As I pondered this, I thought back to New Years and the poppers I bought and realized that would work great! I did a search and every website with a tutorial required toilet paper rolls, but who keeps those on hand... So, for all you last minute party/lesson preparers out there, here is a tutorial for party poppers that does not require toilet paper rolls. Materials: * Card stock (or cereal boxes) * Tape * Tissue paper * Ribbon * Stuff to fill the poppers with Directions: * Start by cutting strips of card stock (or you could use cereal boxes) measuring 6" x 3" * Make a circle overlapping the 3" edge by about 1/2" and tape to secure * Fold your tissue in half lengthwise and again width-wise * Cut along the folds you just made * Cut lengths of ribbon about a foot long * Center a card stock roll in one of the squares of tissue * Wrap the tissue around the roll * Twist one end and tie with a ribbon and stuff the popper with goodies * Twist the remaining tissue end and tie with a ribbon * Curl the ribbon with scissors If you like you can add band around the poppers for more decoration You might also like:Where I partied: Guess what?! This is the last page!!!! This page has changed so many times in my head, so it is no surprise that I saved it for the end. Some of the things that I considered for this page include a puzzle page, a photo flip page, a memory page and the list goes on. Ultimately, I wanted to include something architectural in this book (as both my husband and I are in the field), but the problem remained, how I would actually go about this. I didn't want to do velcro or snaps because I had already done that, so, for a while, I was stuck. Then, a couple weeks ago, while visiting my sister, the bright glimmer of hope shined! One of the toys she uses for her daughter at church is a little tin with magnetic letters in it. Now the problem remained of whether to buy pre-made shapes or to design my own. I leaned toward the design side, but wasn't sure how I would turn it into magnets, then again, my sister shared another idea. A friend of hers had printed pictures of their kids onto magnetic paper, which seemed easy enough, but.... well I will get into that during the process part. Okay, so just to give you an idea of the page construction, basically you are going to create a pocket that is attached to the page to house the magnets then you are going to create a flap that will just increase the surface area for shape building. Also, just as a heads up, when you go to buy the metal, stop by the equipment rental area and ask them to cut two squares at 6" x 6.5", they most likely won't charge you. Materials: * Fabric, for the page and for the metal pocket (keep the latter thin) * Metal sheet (I found mine at the end of the nail isle at Home Depot) * Magnetic paper (make sure to get the kind you can print directly to, if you can't find it, you can do an acrylic transfer) * Velcro * Reinforcement for the page and for the metal * Glue gun and sticks Shapes: Okay, so here is the deal with the magnetic paper. I found mine at JoAnn's, but I didn't really read the directions and there was a picture of a printer on the instructions, so I thought I was good. As it turns out, the printer I saw was actually a cutter, like a Cricut. I had gone to Kinko's to get things printed thinking that they might be able to print on it, but they told me that unless it says on it that you can run it through a laser printer, they won't print it. I had them print the shapes onto regular paper for me, making two copies thinking that Modpodge would work, but it was just a mess. I later read online that there is a vinyl coating over the white part of the magnetic paper, which prevents the Modpodge from sticking, so I went back to the packaging and found that it will take acrylic paint. Not wanting to bust out the brushes, I looked for some way to transfer the image and came across the method of doing an acrylic transfer, which I posted last week and it worked out beautifully! * Download the shapes, I have two options, my magnetic sheet was 9" x 12" so that is what I printed, but some of the shapes are a little small, however there are 4 of each, I came up with a download for an 8 1/2" x 11" sheet of paper and the shapes are bigger, but there are only 2 of each. You can decide which you want. * Print your shapes either on the magnetic sheet or use the acrylic transfer * Using an exacto blade, cut the shapes out Flap: * Cut two squares of the reinforcement at 7" x 6.5", put some glue streaks across the center of one of the reinforcement squares, center one of the metal squares, then attach to a reinforcement square, repeat for the remaining squares * Run a bead of glue around the metal square edges, putting a little extra on the corners to protect from the sharp edges, trim the around the glue * Cut three squares of fabric at 8" x 8.25", one of which will not be seen * On the square that will not be seen, measure and, with a fabric pencil, mark lines according to the dotted lines in the photo below * With wrong sides together, pin the fabric that will not be seen to the inside flap fabric and sew along three of the lines you just marked * Slide one of the metal squares into the "pocket" you just made, then sew the remaining line to enclose the metal square * Cut about an inch of velcro and sew the pokey side to the fabric that will be on the outside of the flap toward the left and roughly in the center and on the right side * With right sides together, pin the inside and outside of the flap together, sew along the top with a 3/8" seam allowance, baste around the remaining edges with the same allowance, cut the corners * Iron the seams toward the center on each side, then unpick just the basted stitches * Flip your flap right side out, then with the folded edges in, sew around the flap to secure Pocket: * Cut two squares of fabric at 10 1/2" x 7 7/8", one of which will be on the inside and not really seen * On the inside square of fabric, measure and mark according to the picture below * With right sides together, pin and sew along the top with a 3/8" seam allowance * Flip the pocket right side out and sew along the marks just made with the exception of the one on the bottom * Slide the remaining metal square into the "pocket" created from the lines just sewn, then sew along the bottom line to secure the metal square * Make a "V" fold (refer to the first group of pictures) along the sewn lines of the two outside panels (they should tuck under the metal panel) then center on the page using the template and pin one side * Satin stitch along the pinned side, then make the "V" fold on the remaining side and satin stitch to the page, finally, "V" fold both sides and satin stitch along the bottom Finishing: * Cut a strip of fabric, 2" x 6" * Fold in half and position the remaining side of velcro, then pin, unfold and sew the velcro * Fold the strip with right sides together and sew along the sides, then flip right-side out * Use the template to position the flap and the velcro strip just made, then pin to page and sew * Add a 1 1/2" border to binding side As part of one of my quiet book pages, I found some magnetic paper that I had the brilliant idea of using to cut shapes from. I went to work designing some shapes only to find that the kind I bought could not be directly printed on (or at least that is what the people at the local Kinkos told me...). My first thought was, "no worries, just use mod podge", but alas, since the design side has a vinyl coating, the mod podge was just a mess and came up fairly easily when I removed it. So, I went back to the packaging to look for further information. All I got was to transfer an image then paint it with acrylic paint. So, I began searching online for how to "transfer" an image for acrylic paint and came across an interesting method. I used it, skeptically, and voila! It worked perfectly! Materials: * Acrylic paint (your choice of color) * Laser printed image on regular paper (ink-jet does not work) (this image will be available for download next week as part of the quiet book page post) * Surface to transfer the image to * Foam brush * Spray bottle with water * Acrylic sealer (optional) Start by covering the surface you are transfering the image to in a thick coat of paint. You should be able to see streaks from your brush. Then put the image, face down, onto the wet paint and smooth out any bubbles (the bubbles will leave spots of the paint). Let the image dry, preferably overnight. It will not work if you do not let it dry completely. Spray the image with water and rub the paper pulp off with your finger. It is okay to be a little bit liberal with your water on this step. Once the pulp is sufficiently removed and the water has all dried, take the image outside and spray with the acrylic sealer
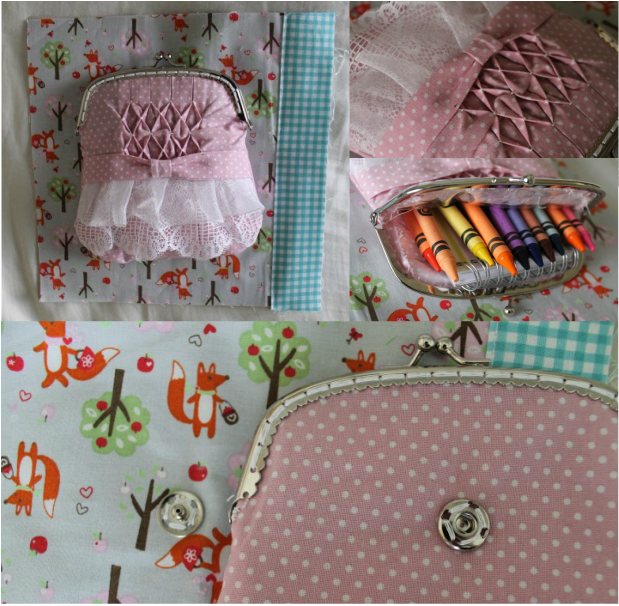
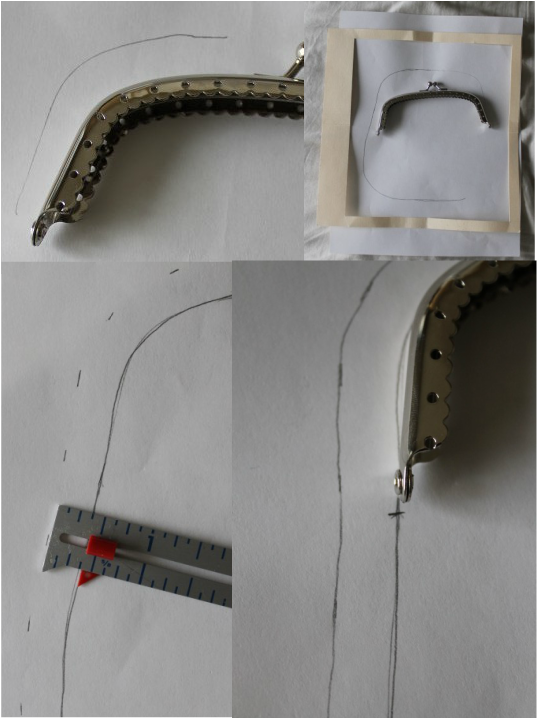
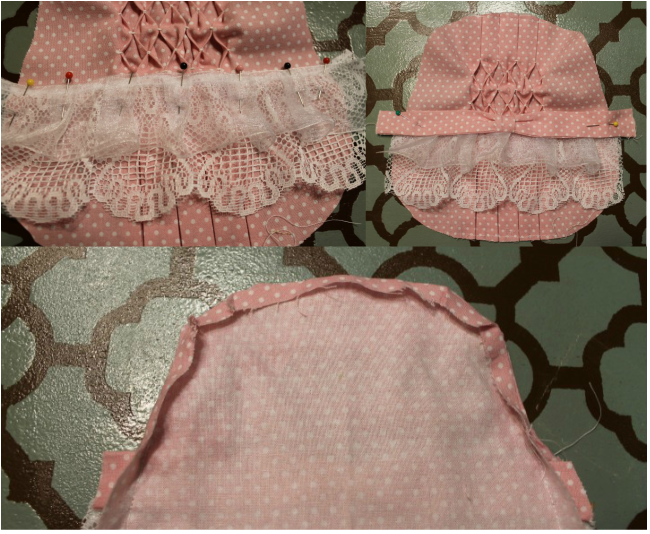
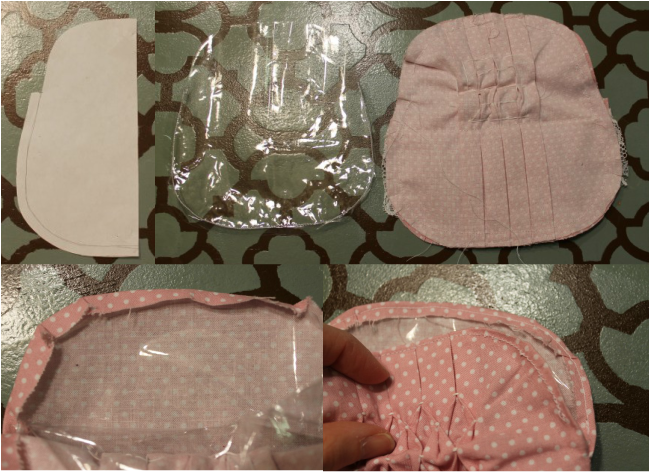
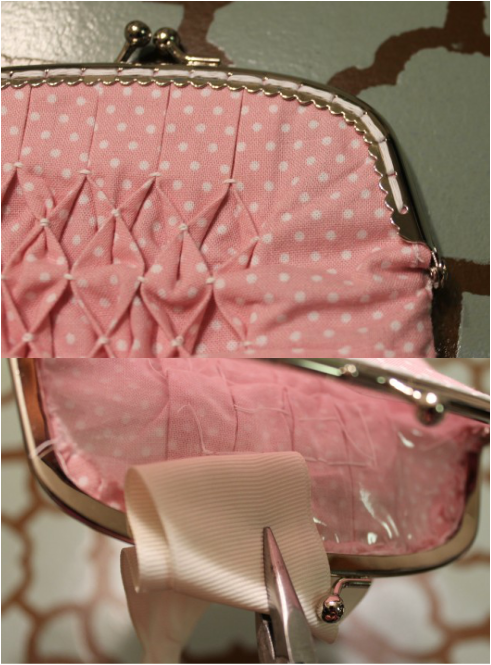
This is another rather simple page, but with embellishments you can add to the time it takes to complete it. The idea came from a couple of places. In my initial research, I happened upon a Monster book which contained a page with a monster that held a notebook and pencil. I really wanted to find some way of incorporating this idea and as I was looking for a page with hair to braid I found the solution. Featured on Girl Inspired, is a braid page that is matched with another page which has a purse to hold hair ties and such. Not long after this discovery, I was wandering the isles at Joanns, looking for something else entirely and stumbled upon some purse frames, so I added it to my cart and saved it for this page. Alright, so I went a little crazy on embellishing here. I found this great tutorial for honeycomb smocking by Tumbling Blocks that I really want to use on a dress for my little one, but I wanted something to practice on so I chose this project. If you decide to do this, smock your fabric first then cut your pattern out. Also, just as an FYI, I used a strip of cardboard 1/2" wide (when you go to the site, you will know what I mean). I am not going to go into detail about the other embellishments, so if you have questions, please email me or leave a comment on the blog. **Update: Since writing this post, I have made several other purses and streamlined the process a bit. To check that out, go to my Kiss Clasp Purse Tutorial. Also, in this tutorial I suggest using vinyl as the lining, which worked great for a while and would have continued to work great, if I hadn't of sewn the large snap on the back through it. I would suggest using a small piece of the reinforcement material on the back side of your outside fabric and sew the snap on before assembling the purse. Materials: * Fabric * Vinyl, or any plastic to line the inside of the purse * Lace, ribbon or any desired embellishments * Purse Frame between 6" and 6.5" wide * Needle and thread * Pliers * Large sew on snap * Crayons and small notebook Purse: * Place your purse frame on paper and trace around the outside edge * Place the page you just drew on under the template, then draw what shape you want your purse to be, keeping in mind that it will bulge out in front, back and pull in the sides * Using a sewing gauge, make dashes every 1/2" or so at a 3/8" distance from your outline for the seam allowance then connect your marks * Line up your purse frame and mark where the hinges meet * Cut out the pattern from the paper then from your fabric for both the front and back and transfer the marks for the hinges to the fabric * Add any embellishments of your choosing * With right sides together, and starting at one hinge mark sew around the purse stopping and back stitching at the other hinge mark, then change to a basting stitch and, without backstitching, sew to the first hinge mark, completely closing up the purse * Make cuts in the seam allowance around the curves * Iron the top seam allowance around the basting toward the purse to create a fold * Unpick the basting, then turn the purse right side out and iron the seams Plastic Liner: * Trim 1/8" off the outside of your pattern, then make a straight cut at the hinge marks to the inside purse line and cut around the top (you will not be sewing around the top of the purse for the liner) * Cut two liners from the pattern * Sew around the bottom of the liner with a 1/4" seam allowance * Make cuts at the curves and finger-fold the seam allowance in toward the purse * WITHOUT turning right-side out, place the liner inside the fabric purse * Fit the top of the liner inside of the basting fold and use a bobby pin to hold, then sew shut Purse Frame: * Open the purse frame and fit the top of the purse inside the frame * Hand sew the purse to the frame * If you have a little bit of a hole where the purse meets the hinges, just hand sew it shut * With a piece of fabric folded over the frame, use pliers to pinch the frame closed Finishing: * Place the female side of the snap on the back of the purse in the middle toward the top then sew to purse * Using the template, place the purse on the page to locate where the male side of the snap will go, then sew to the page going through the reinforcement layer * Add a 1 1/2" border to the binding side of the page |
Hey there! I'm Kristin, aka Kit. Here is just a peek into my crafting mind. I hope you find something to spur your creativity!
Kit's Crafts ShopPopular Posts Featured HereCategories
All
Archives
July 2020
|










 RSS Feed


