Kit's Crafts
  • Home
  • About
    • Selling Handmade Goods
  • Knitting
  • Crochet
  • Sewing
  • Crafting
    • Just for Fun
    • Wall Decor
    • Christmas Fun
    • Party On
  • From the Kitchen
    • Chocolate
    • Sweet
    • Savory
  • Quiet Book
  • The Shop

Add a Fabric Border to Your Knit/Crochet Blanket

6/12/2014

0 Comments

 
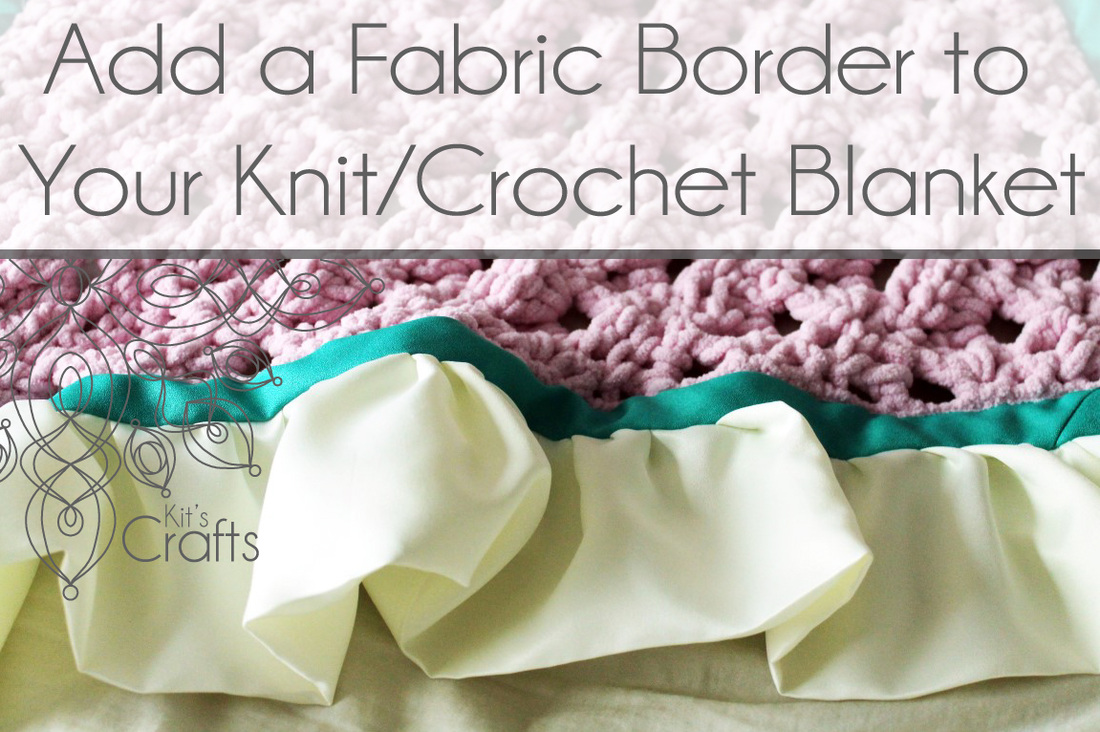
One of my least favorite things to knit/crochet is a blanket. Basically, I get bored. Most recently, I made a blanket for my newest niece. That blanket was frogged at least 4 times, probably more, because I couldn't find a stitch that I actually liked. Finally, I settled on the lovely Sea Mist Shell Stitch by Crochet Geek. I did a small rectangle and planned to crochet a border, but again, I couldn't find a stitch that I actually liked. I remembered Ricky's Blanket that I made about a year and a half ago, where, instead of knitting more length or a border, I sewed fabric around the edges. So, that is what I did with this little blanket. To do this, you would treat the knit/crochet part like a fabric blanket and add a border the same way. If you would like a tutorial for this technique, head over to Ricky's Blanket. 
Kit's Crafts - Add a Fabric Border to Your Knit/Crochet Blanket

Read More
0 Comments

Knitting Bag Tutorial

6/10/2014

2 Comments

 
As I have mentioned before, my crafting desires come in ebbs and flows. Generally I will knit/crochet like crazy for a couple months then I will sew like crazy for a couple months, then go back to knit/crochet. When I am in full knit/crochet mode, I like to take my projects with me, however, I haven't had a great bag to do this. Usually I end up using a large purse to carry everything and my hooks/needles get lost among diapers, snacks and other basic purse worthy items. I thought of this large tote to solve this problem months ago, but didn't get around to making it until now. Below is the tutorial.
Kit's Crafts - Knitting Bag Tutorial

Read More
2 Comments

Yarn Storage Ideas

4/29/2014

1 Comment

 
It goes without saying that anyone with any kind of hobby is likely to have a large amount of supplies on hand, such is true about yarn for those of us that knit and crochet. Problem is, that, if you are like me, the primary place for storing these goods is in large plastic tubs in a closet. The interior designer in me screams to display those unique things that make me who I am, as in that huge stash hiding in the closet, so of course, one needs to get creative.
Kit's Crafts - Yarn Storage Ideas
Today's post is all about inspiring the interior designer in all of you with some ideas I found around the web of how others display their passion for yarn. 
Morrgan's Creatures - A Teetering Tower of Yarn
Who uses CDs any more? Why not fill those storage towers with yarn like this one by Morrgan's Creatures
Knits for Life - The World's Best Yarn Storage Idea
I know I probably shouldn't show partiality, but this yarn display by Knits for Life is by far and away my favorite idea. I am planning to one day do something similar in my home, but perhaps add a frame or some molding around the perimeter.
Tudo Junto & Misturado - Bags with Art
Ok, so this yarn storage idea featured on Tudo Junto & Misturado is more of a travel solution, but what a great idea for a small vintage suitcase! It would also make a great gift to a fellow yarn lover...
Picture
I love these chevron shelves by Preita. Wouldn't this look great above a sofa?!
Harvest Workroom - Popcraft Goes Live
These little wooden boxes
by Harvest Workroom are my second favorite idea. What a stylish way to tuck your stash away.
Easy Makes Me Happy - My Handyman
Easy Makes Me Happy shares this great idea of these diamond shaped shelves. So, this might be tied for second with the wooden boxes...
Now that you have some ideas of how to make that large pile of yarn beautiful, head over to Lion Brand for a really great blog post, 12 Tips on How to Organize Your Yarn Stash. Please share links about organizing yarn that you have found (or even your own) in the comments!

You might also like:

Picture
Picture
Picture
Picture
1 Comment

Unique Knit and Crochet Ideas

3/18/2014

0 Comments

 
A couple days ago, I found out that one of my friends knits. In talking to her about it, she said she had just learned, but didn't think you could knit much beyond hats, scarves and blankets. I honestly didn't answer right away because my mind was buzzing with so many ideas of things you could make with your needles. Finally, I said, "When you knit you are making a fabric, so basically anything you could make with fabric you could knit". Of course, this is true for crochet, too. A wonderful thing these days is that you can find many knit and crochet doilies and tablecloths at thrift stores, so even if you don't have the skill, you can still partake in the fun by upcycling a secondhand find.

Anyway, as I was deciding what to post about today, I thought I would share some ideas, many of which contain patterns/tutorials for you to re create the inspiration. Click on the picture to go to the link. Enjoy!
A-Frame Tent with Crochet Beadspread
Do you remember the A-Frame Play Tent I posted in January? This is the same concept, just use a crocheted bedspread instead of a sheet.
Knit Swatch Bracelet
You will find a tutorial at the link for these bangles.
Crochet Bicycle Guard
Here is a fun way to personalize your bike. This item is for purchase.
Knit Swatch Wall Hangings
The link here provides a basic guideline. I have also seen this done by stretching the swatch over a canvas and attaching it to the back.
Crochet Shoes
You will find a tutorial for this, however, the website is in Spanish, but google translate helps.
Knit Floor Pouf
These little ottomans are hand knitted by Christien Meindertsma.
Crochet Stool Cover
A wonderful tutorial is provided at the link.
Crochet Frames
A guideline is provided at this link for how to make these little frames.
Crochet Pendant Lampshades
This picture is the inspiration for the tutorial found at this link. If you don't know how to crochet, buy up some doilies and connect them for a similar effect.
Crochet Chair Cover
This lovely chair cover was created with a glue gun and a tablecloth. There is no tutorial, but I am sure it wouldn't be hard to figure out.

You might also like:

Picture
Picture
Picture
Picture
0 Comments

Double Pointed Needle Holder

3/4/2014

5 Comments

 
For some time now, I have been trying to organize my craft materials and tools. Only problem, is that I want the tools I use most often to be readily available, so that means they need to look nice too. I searched the internet to come up with some way of organizing my double pointed needles and crochet hooks. Primarily, what I saw was antique pipe holders upcycled as knitting needle holders. So, I went looking at some local antique shops. Unfortunately, I didn't quite find what I was looking for until I stopped by Lost and Found Thrift in Bountiful, Utah. First off, I must do a shout out to this glorious place. Not only do they have great items, but they have pictures all over the store to give you ideas of what some of their products could be turned into with a little DIY. The greatest part are the friendly, helpful owners. After browsing for a bit, I wasn't coming across any pipe holders, so I described what I was needing to Cheryl, one of the owners. She thought for a moment then I saw the light bulb go off and she asked if I had thought of using a floral frog. She went in the back and brought out exactly what I was needing. All that was left was to put it in a container. I remembered a milk glass trifle bowl I bought a while back and, lucky for me, they were a perfect fit! I didn't have to do any adjusting or jimmy rigging at all!
Kit's Crafts - Double Pointed Needle Holder
Now you tell me, isn't that perfect?! It is like my own little bouquet of knitting needles and crochet hooks. I love it! I know that this is a pretty serendipitous find, so if you are looking to organize your needles/hooks, you could also try an old test tube holder or a test tube vase. 
Picture

You might also like:

Picture
Picture
Picture
Picture
5 Comments

Swaner EcoCenter

2/27/2014

0 Comments

 
I decided to post today about the Swaner EcoCenter in Park City, Utah, as I will be selling some items in their gift shop. The EcoCenter is located on the Swaner Preserve, which is a protected habitat spanning more than 1,200 acres. The preserve and center are run by Utah State University (my alma mater). If you are thinking of going to Park City, make a stop here, there are guided tours as well as small exhibits that teach you about the different wildlife that the preserve protects. There is also a viewing dock on the roof that overlooks the expanse of the preserve. It is a great place to spend the afternoon and learn about how we can protect nature and create a more sustainable world. Did I mention that the EcoCenter gained the highest LEED certification possible? Pretty cool stuff... 

Anyway, once you have had a chance to check everything out, head on over to the gift shop. Below is a sampling of the items I made exclusively for the Swaner EcoCenter. 
Picture
Market bags, knit and crocheted using plastic grocery bags.
Picture
Bracelets, knit and crocheted using old T-Shirts
Picture
Wrist purses, knit and crocheted using plastic grocery bags, then lined with fabric from an old skirt

You might also like:

Picture
Picture
Picture
Picture
0 Comments

Plarn Tutorial

2/25/2014

1 Comment

 
Last summer, I brought you tutorials for tarn (T-Shirt Yarn) and magarn (magazine yarn). So, today, I thought I would bring you another yarn alternative, plarn. I think it is easy to say that plarn and tarn are probably the most common yarns made from recycled materials, especially because they are so easily made. Plarn can be a bit time consuming, but it makes some lovely products. Do you remember the Broomstick Bag pattern I shared last summer? That pattern uses about 15 - 20 grocery bags to make. Anyway, here is the tutorial.
Kit's Crafts - Plarn Tutorial
Materials:
Plastic bags
Scissors
Ruler (if you want to be precise, I just winged it...)

Directions:
Flatten out your bag, fold it in half 3 times, pushing the air out as you go. Starting at the bottom, cut strips about 1/2" - 1" wide, but not smaller than 1/2", depending on how thick you want your plarn to be. It will thin out as you are knitting or crocheting it up. I usually cut mine at 1/2". Unfold your strips into large circles. Now, you just create a basic square knot to connect each circle.
Kit's Crafts - Plarn Tutorial

You might also like:

Picture
Picture
Picture
Picture
1 Comment

Seeds Pixie Bonnet

1/28/2014

10 Comments

 
One of my most favorite things to knit or crochet is a pixie bonnet. The simplicity of the little hat is so enticing and just begs for personalization with cables or lace. All you do is knit/crochet up a rectangle, fold it in half and sew along the cast on edge. I wrote this particular pattern with a beginner in mind and kept it simple. This is a great one for learning because you practice stockinette, moss/seed, ribbing and there is a buttonhole involved, which are great techniques for a beginner project!
Kit's Crafts - Seeds Pixie Bonnet
Perfect for beginners, this pattern is quick and easy to make. Essentially you are creating a large stockinette swatch that is punctuated by rows of moss/seed stitch to break up the monotony. Finish off with a few ribbing rows, then sew up the cast on edge to create a lovely pixie bonnet.  It is written using US standards and worked flat. The finished product (after being folded and sewn) is approximately 6 ¾” high and 6 ½” wide. I wrote this for a toddler size, but you could make it bigger or smaller by adjusting your needles and/or yarn or if you want to use it for a smaller child, leave off the extension strap and button one corner to the other.

Print the Pattern.

Gauge:
1” = 5 stitches x 6 rows in stockinette stitch

Size:
Toddler

Materials:
90 – 100 yards (80 – 90 meters) worsted weight yarn
Size 6 (4.25mm) knitting needles
Yarn Needle

Abbreviations:
K = Knit
P = Purl
SL = Slip Stitch
ST = Stitch
Button Hole {refer to pictures} = SL1{A}, bring yarn to the front {B}, SL1 {C}, *slip first sl st over second sl st {D}**, SL1, repeat * to **, SL1, repeat * to **, 3 sts should be bound off {E}, SL first st on right needle back to left needle {F}, turn work.

Bring yarn to wrong side of work {G}, *P into the first st on the left needle without dropping the stitch {H}, slip stitch from right needle to left needle {I}, repeat from * until 4 stitches have been created {J} (one more than was bound off), turn work.

The front side should be facing you {K}, SL first st from left needle to the right needle {L}, pass the second stitch on the right needle over the slipped stitch {M} (getting rid of the extra stitch), SL 1 st from right needle to left needle {N} and K that stitch {O}.
Kit's Crafts - Seeds Pixie Bonnet
Pattern:
Using long tail cast on, with a 30” – 35” tail, CO 60 sts
Row 1: K to end
Row 2: K2, P to last 2 sts, K2
Rows 3 – 10: Repeat rows 1 & 2
Row 11: K2, (P1, K1) to last 2 sts, K2
Row 12: K2, (K1, P1) to last 2 sts, K2
Rows 13 & 14: Repeat rows 11 & 12
Rows 15 – 28: Repeat rows 1 – 14
Rows 29 – 38: Repeat rows 1 – 10
Row 39: K2, (P2, K2) to last 2 sts, K2
Row 40: K2, (K2, P2) to last 2 sts, K2
Row 41: K2, button hole, (P2, K2) to last 2 sts, K2
Row 42: K2, (K2, P2) to last 2 sts, K2
Bind off. Weave in ends. Use tail to sew up the back of the bonnet, then position and attach button.

Extension Strap Pattern:
CO 28 sts
Rows 1& 2: (K2, P2) to the end
Row 3: K2, button hole, (P2, K2) to last 2 sts, P2
Row 4: (K2, P2) to the end
Bind off. Weave in ends. 
Kit's Crafts - Seeds Pixie Bonnet

You might also like:

Picture
Picture
Picture
Picture
10 Comments

Yarn Bomb Decor

12/17/2013

1 Comment

 
I don't know about you, but I am LOVING all of the yarn bombing popping up all over the internet. You can imagine my delight when I walked into my favorite yarn shop, Blazing Needles, and found that they had brought the fun trend indoors and incorporated it into their holiday decor. The wonderfully smart thing here is that a pallet of red and white was used without anything that completely screamed Christmas, so this decor works throughout the whole of winter! I hope the beautiful creations (by the one and only amazing Carol) inspire you to bring the bombing inside and perhaps to your holiday table.
Kit's Crafts - #YarnBomb Decor, Blazing Needles
Here are a few more images of the lovely shop.
Kit's Crafts - #YarnBomb Decor, Blazing Needles

You might also like:

Picture
Picture
Picture
Picture
1 Comment

Blazing Needles

11/26/2013

4 Comments

 
One of the greatest things about knitting and crochet is the community that this hobby attracts. If you live in Utah, you NEED to check out Blazing Needles, where the knit/crochet community spirit is highly encouraged. This shop is really THE place to get started as they offer free classes and the staff is so welcoming! Blazing Needles is a perfect venue to get to know other knitters and/or crocheters and build a network of fellow yarn enthusiasts. Not to mention the complimentary coffee and tea... This gathering place also carries a wide variety of luscious yarns for all of your knitting and crochet needs, among other knit/crochet novelties. Seriously, even if you are just visiting the Salt Lake City area, make a stop here, you will not be disappointed.
Picture
Beyond sending some love to this knit/crochet paradise I also want to highlight them for their generosity. Every year, Helping Kids With Cancer (a non-profit charity that assists with critical needs for kids and their families) puts on a stocking event and auction with help from the community. Basically, stockings are made and filled then donated to children with cancer (some of which may not see next Christmas). The proceeds from the auction go toward helping with various needs the families may have. I made 4 stockings to go to these children, which I wanted to be filled with yarn and needles so that I can pass on the joy I find in knitting and crochet. Last Saturday, I visited Blazing Needles and spoke with Cynthia, the sweet and generous owner, and she agreed to fill them all for me. My heart was so full of gratitude I felt I might burst! Better yet, we hope to start teaching classes for the teenagers facing this immense challenge in the upcoming year. You know, I have always felt that I would like to give back in some way to my community and I am so grateful that I have been blessed with a talent that is easy to share.

Below are the stockings I made, which Blazing Needles will be filling.
Kit's Crafts - Chipboard #Stocking
I made this first stocking using chipboard, glue, tape and wrapping paper. I had originally planned to do a tutorial, but it got too complicated and I had to depart a bit from my original plan. For the most part, I constructed it using the same method outlined in this tutorial on You Tube by Christyj1977. If you are interested in the template I used, email me and I will send it to you.
Kit's Crafts - #FeltStocking Reindeer
The body of this stocking is from a wool skirt I found at a thrift store. The reindeer is just a silhouette I found online when I did an image search. The lace applique was cut from fabric I bought at JoAnns.
Kit's Crafts - #FeltedStocking
The stockings above and below were created using 2 sweaters I found at a thrift store, then felted. The trees on the bottom one were from scraps of the stocking above. I didn't originally plan on doing the border, but the stockings were looking more skeewampus without it. For the borders, I made bias tape. For the border on the top stocking, I used another thrift store sweater. I used some scrap fabric for the border on the bottom stocking. 
Kit's Crafts - #FeltedStocking Trees
By the way, if you would like to donate to Helping Kids with Cancer or you would like to send in some unused yarn or needles for the kids to learn, please email me at kitscrafts2012@gmail.com.

You might also like:

Picture
Picture
Picture
Picture
4 Comments
<<Previous
    Kit's Crafts
    Hey there! I'm Kristin, aka Kit. Here is just a peek into my crafting mind. I hope you find something to spur your creativity!
    Instagram

    Kit's Crafts Shop

    Popular Posts

    Picture
    Picture
    Picture
    Picture
    Picture
    Picture

    RSS Feed

    Picture
    Kit's Crafts
    Picture
    The Yarn Box

    Featured Here

    Picture
    Moogly
    Picture

    Categories

    All
    About
    Baby
    Baking
    Bio
    Caramel
    Child
    Chocolate
    Christmas
    Cooking
    Crochet
    Decor
    Dessert
    Dress
    Free Knit/crochet Pattern
    Free Sewing Pattern
    Interior Design
    Knitting
    Link Party
    Materials
    Pattern
    Quiet Book
    Quiet Book
    Recipe
    Selling Handmade Goods
    Sewing
    Spats
    T Shirt
    Tutorial

    Archives

    January 2020
    July 2019
    November 2018
    September 2018
    August 2018
    July 2018
    May 2018
    April 2018
    February 2018
    January 2018
    April 2016
    September 2015
    March 2015
    February 2015
    November 2014
    October 2014
    September 2014
    August 2014
    July 2014
    June 2014
    May 2014
    April 2014
    March 2014
    February 2014
    January 2014
    December 2013
    November 2013
    October 2013
    September 2013
    August 2013
    July 2013
    June 2013
    May 2013
    April 2013
    March 2013
    February 2013
    January 2013
    December 2012
    November 2012
    October 2012

Powered by Create your own unique website with customizable templates.