Kit's Crafts
  • Home
  • About
    • Selling Handmade Goods
  • Knitting
  • Crochet
  • Sewing
  • Crafting
    • Just for Fun
    • Wall Decor
    • Christmas Fun
    • Party On
  • From the Kitchen
    • Chocolate
    • Sweet
    • Savory
  • Quiet Book
  • The Shop

Dahlia Stocking

12/26/2012

2 Comments

 
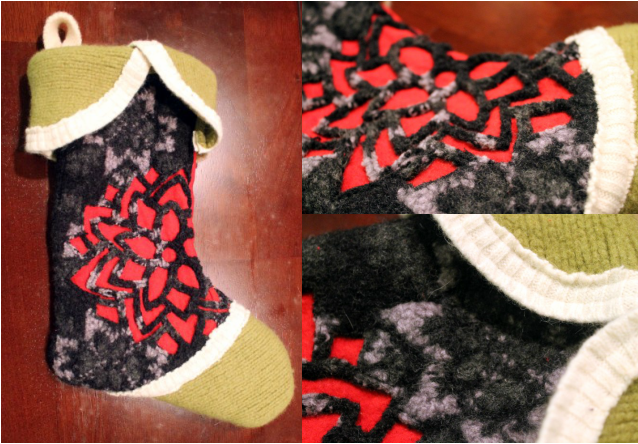
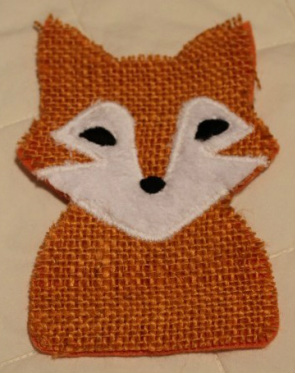
As I predicted, I did not finish the last stocking before Christmas, but since I completely forgot to buy stocking stuffers, I suppose the point is moot. Nevertheless, I finally finished the last stocking this evening. I have to say, it is perhaps my most favorite yet. I used a reverse applique technique. The inspiration for the actual design came from a tee shirt I found on Pinterest.
Picture
Materials:
* Felt
* Thin fabric like muslin if your felt/background fabric is especially stretchy/thin
* Clear thread
* Fusible Webbing
* Pattern UNCHECK the fit to page box (The actual stocking needs to be pieced together)
(Also, both cuffs are included in this pattern)
Picture
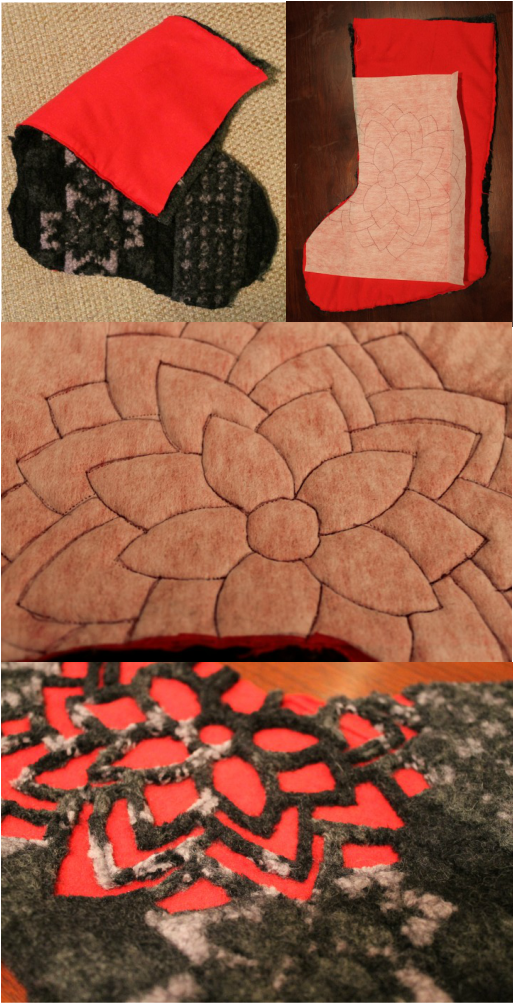
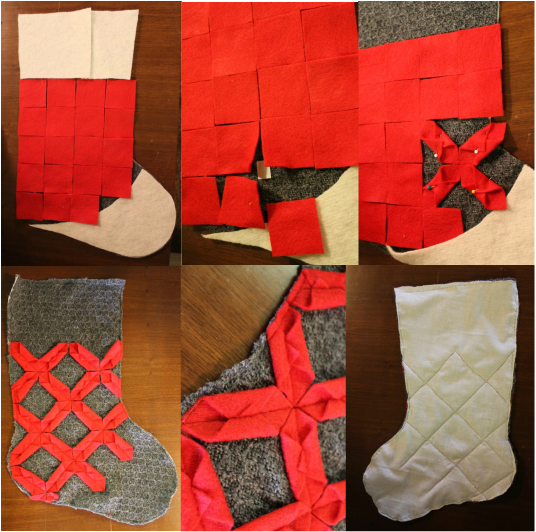
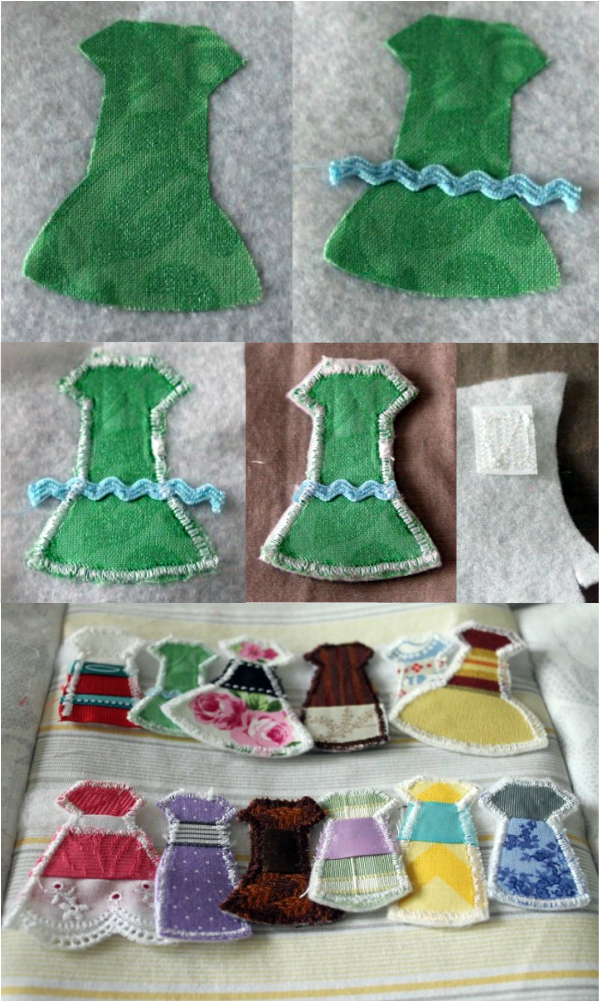
Start by cutting all of the pattern pieces from felt. You will need to cut an extra stocking to serve as the background for reverse applique, so you will have a top and bottom to the front.

Dahlia:
* Sew the top and bottom of the front together
* Transfer the dahlia design to fusible webbing and iron onto bottom of front
* Sew following the lines of the dahlia
* Very carefully, using a seam ripper cut an opening in one of the petals of the dahlia, then use small scissors to cut as close as you can to the sewing lines you just made
* Repeat the previous step for all of the petals

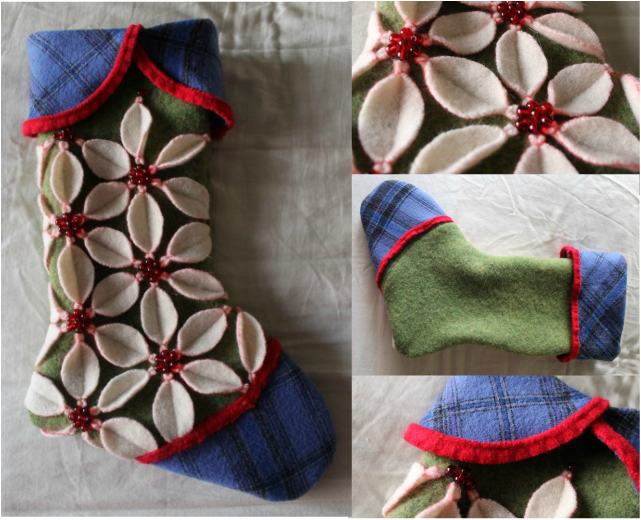
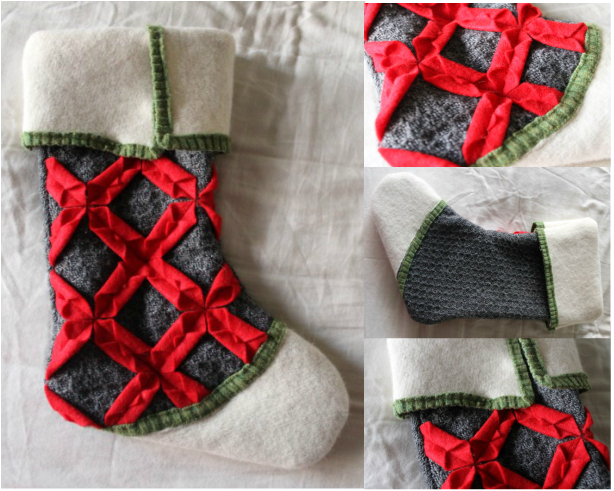
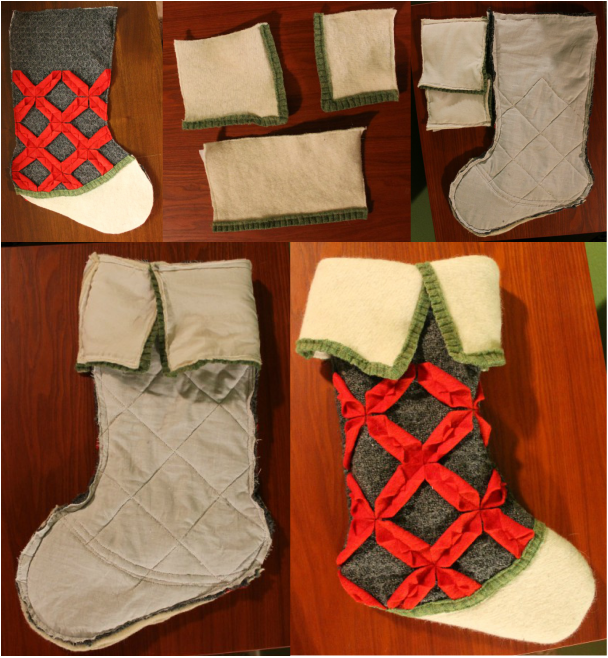
For the remainder of the stocking, follow the directions for the Origami Stocking.
2 Comments

Merry Christmas!

12/25/2012

0 Comments

 
Picture
0 Comments

Poinsettia Stocking

12/23/2012

0 Comments

 
Talk about last minute... here is my stocking and I am currently working on a stocking for my daughter, which I am guessing won't be done until Christmas Eve, if that. It may end up being just the front of the stocking with stuffers around it. Anyway, I would have waited until next year to post these for those of you who want to replicate the idea, but I wanted to get it posted before I forgot the details. Plus, I figured the techniques I employed could be used for other applications.
Picture
Materials:
* Felt
* Thin fabric like muslin if your felt/background fabric is especially stretchy
* Clear thread
* Pattern UNCHECK the fit to page box (The actual stocking needs to be pieced together) (Also, both cuffs are included in this pattern)
* Shiny Red Beads (I found mine at Walmart in a dollar bin)
Picture
Start by cutting all but the poinsettia petals from your fabric

Poinsettias:
* Cut 37 poinsettia petals (I outlined mine with a red ball point pen then cut them out purposely leaving the outline)
* Arrange petals as shown, then using a ruler, line them up and pin to the sock
* Sew straight lines
* By hand, pull a needle and thread up through the back near an end of one petal, in the center as shown
* Go from front to back near where the curve meets the straight part of the petal
* Go from back to front on the other side of the petal in the same place and pull your needle all the way through the other side of the petal
* Pull needle down from topside to underside of sock where you firs came up
* Do this on all petal ends and when traveling to petals ends that are further away, go through the top layer of the fabric so the thread doesn't get caught when you stuff the stocking
* Sew the beads to the ends of the petals, putting one at each end and one in the center

For the remainder of the stocking, follow the directions for the Origami Stocking
0 Comments

Origami Stocking

12/21/2012

0 Comments

 
Every year, right before Christmas I think, "Next year I am going to finally knit stockings for Christmas", then I usually spend some time online looking for a pattern I like enough to make, but eventually Christmas comes and goes without any stockings being hung with care. So, last week this thought came, but instead of looking for patterns I could knit, I remembered a felt origami pillow I saw not long ago and loved. Some of you may remember the felt flowers I made a couple weeks ago from thrift store sweaters I felted. Well, I bought a couple more thrift store finds and went to town replicating that pillow in stocking form. I'm quite pleased with the end result.
Picture
Materials:
* Felt
* Thin fabric like muslin if your felt/background fabric is especially stretchy
* Clear thread
* Pattern UNCHECK the fit to page box (The actual stocking needs to be pieced together)
* Peel n Stick Fabric Fuse
Picture
Start by cutting all pieces from felt. I also cut a lining from muslin for the background because the sweater I used was cotton (which doesn't felt) and stretchy.

Front Pattern:
* Cut 19 2"x2" squares
* Assemble squares as shown
* Lift the corners where 4 squares meet and attach a small piece of fabric fuse to background fabric
* Remove wax paper from fabric fuse and attach the corners, pushing them together before pressing down
* Working in a diagonal line and only doing 2 corners of each square, repeat this method until all of the squares are attched
* Pull up the two unattached corners of one of the squares and pin, overlapping the corners
* Repeat until all squares are elongated 6-sided shapes
* Straight stitch from corner to corner through all applique pieces
* Cut the appliques where they spill over the edge of the sock
* Stitch around the edge of the stocking if you are using muslin
Picture
Cuffs and Toe:
* Cut a 1/2" strip of felt (I used the ribbed bottom of one of the sweaters)
* Pin the toe to the front, then place the strip along the edge of the toe and pin
* Sew strip to front going through all layers
* Repeat for back side
* With right sides together, sew around edge of sock leaving the top open
* Place and pin strip along edge of cuffs then sew strip to cuffs
* Sew 3 cuff pieces together to make one long strip
* While sock is inside out and with right side of cuff facing wrong side of sock, match the seams of the sock to the seams of the cuff and pin, then pin the rest of the cuff to the sock
* Sew along the top
* Turn sock right side out and flip cuff down
* Iron flat if needed
Picture
Loop:
* Cut a 5"x3/4" rectangle of felt
* Fold and pin to stocking as shown near the seam on the left side of the stocking
* Pull the cuff up and zig zag stitch the loop to the body of the stocking
0 Comments

Tales of a Quiet Book, Dress Up

12/19/2012

0 Comments

 
The inspiration for this adorable little page came from my favorite site for quiet book inspiration, Orange Crafts. The blog author, Katarinka, created a quiet book based on Thumbelina that features a little closet with dresses for Thumbelina. I loved the idea and found a way to make it mine. Honestly, I think I had the most fun making this page! (For a mini version of this page, check out this post.)
Picture
Materials Needed:
* Fabric (remember to prewash all fabrics)
* Ribbon and/or lace for embellishment
* Felt for the back of the dresses and inside the doors
* Velcro
* Embroidery floss and needle
* Button for clasp
* Hair tie for clasp
* Duct Tape
* Steam a Seam
* 9"x9" square of reinforcement for the back of the page
* Pattern (UNCHECK the fit to page box when printing)

Page Background:
* Cut 2 strips of velcro 9" long
* Place the soft side of one strip about 2" from the top of the page and sew along the top and bottom going through the reinforcement
* Place the second strip 3" from the bottom and sew in the same fashion as the previous strip

Dolls:
* Cut the back side of each door from fabric
* Cut each doll from felt and steam a seam 
* Cut hair and under dress from fabric and steam a seam
* Using template, position doors on page and place each doll in the center of each door, then iron
* Position and iron hair and under dress
* Using a satin stitch, sew all layers to the fabric; switching thread colors as necessary
* Cut 2 strips of velcro about 1" long to sew to each doll
* Position and pin soft side of 1" strip of velcro, then sew along all edges and make an "X" in center
* Embroider face
* Straight stitch down the middle of the legs to separate them being careful not to go too far
Picture
Doors:
* Cut each door from fabric, felt and reinforcement
* Use the template to figure the inside edge of the right hand door
* Position hair tie in the middle of the reinforcement door and, using a small piece of duct tape, tape hair tie to reinforcement
* Satin stitch the hair tie to the reinforcement making sure that the needle goes through each side of the hair tie
* For each door, place felt on table, then stack back side door (with doll on it) face up, front door face down and reinforcement on top, then sew along inside edge (make sure that the doll is right side up)
* Open the left hand door and place the right hand door where the tie would meet the left hand door then position the button in the middle of the tie and sew the button to the outside fabric and reinforcement
* Sew along the top and bottom of each door
* Iron doors flat and sew close to the edge of the top, inside edge and bottom
* Again using the template, position and pin the doors to the page and sew along the outside edge
Picture
Dresses:
* Cut dress from fabric and steam a seam
* Position dress on felt and iron on
* Sew any embellishments to dress
* Using a satin stitch, sew dress to felt
* Cut dress from felt
* Cut a 1" piece of the rough side of the velcro
* Sew velcro to another piece of felt
* Position dress over back side of felt with the velcro toward the top of the dress
* Straight stitch around dress
* Cut dress from second piece of felt

Add 1 1/2" border to binding side.
0 Comments

Christmas Baking!

12/17/2012

0 Comments

 
Christmas is my favorite time of year and one of my most favorite things about Christmas is baking!. Yesterday, I spent the whole day baking for my neighbors. I made Dorie Greenspan's Chocolate Oatmeal Almost-Candy Bars and her Sadies (which are probably my favorite Christmas treat) as well as my cheesecake cupcakes and the caramel apple tartlets I made a while ago. All in all, those who recieved are quite lucky!
Picture
0 Comments

Girly Girl Hat

12/14/2012

3 Comments

 
I came up with a basic version of this hat a few years ago and wrote down most of the pattern. Recently, I had a friend contact me about making some hats for her kids for Christmas and resurrected this pattern for her daughter. I think it is a better version then the original.
Kit's Crafts - Girly Girl Hat #FreeKnitPattern
This hat is knit from the bottom up and makes use of the mock honeycomb stitch. The earflaps are knit back and forth then the hat is knit in the round. For the crown, decreases are made with cables. A ruffle is added to form a "brim" and adorned with a crocheted scalloped edge. To add charm, pom poms are attached to an 8-stranded square braid. To complete the girliness of this lovely little hat, a flower with a button center is added to the corner.

Gauge:
14 rows = 2"
10.5 STS = 2"

Materials:
* Size 4 Double Point Needles and Circular Needle
* Red Heart Shimmer in Hot Pink and Turquoise
* E Crochet Hook
* Yarn Needle
* Plastic Pom Pom Maker (or one from cardboard)
* 3/4" Button for flower

Gauge:
In Stockinette Stitch

Sizing:
* Child ages 3-10 yrs, (Teen and Adult)

Abbreviations:
MC = Main Color (Hot Pink)
CC = Contrast Color (Turquoise)
CO = Cast On
K = Knit
P = Purl
M1A = Make 1 Away
WYIF = With Yarn In Front
PS = Pick up 2 strands below and knit with the next stitch (Image below)
STS = Stitches
X = Times
PM = Place Marker
K2Tog = Knit 2 Together
SC = Single Crochet
SL = Slip Stitch
SLM = Slip Marker
K2TOG = Knit 2 together
CB8 = SL 4 STS to cable needle, hold in back and K4, [K2TOG, K2] from the cable needle
CB7 = SL 4 STS to cable needle, hold in back and K3, [K2TOG, K2] from the cable needle
CB6 = SL 3 STS to cable needle, hold in back and K2TOG, K1, [K2TOG, K1] from the cable needle
CB4 = SL 2 STS to cable needle, hold in back and K2TOG, K2TOG from the cable needle
PSSO = Pass Slipped Stitch Over
SC = Single Crochet
DC = Double Crochet
TR = Triple Crochet
Picture
PS = Pick up 2 strands below and knit with next stitch
Ear Flaps:
For all sizes

Using the circular needles, with MC, CO 3  STS
All Odd Rows: K1, P to 1 before end, K1Row 2: K1, M1A, K1, M1A, K1 (5 STS)
Row 4: K1, M1A, SL3 WYIF, M1A, K1 (7 STS)
Row 6: K1, M1A, K1, SL3 WYIF, K1, M1A, K1 (9 STS)
Row 8  K1, M1A, K3, PS, K3, M1A, K1 (11 STS)
Row 10: K1, M1A, [K1, SL3 WYIF] twice, K1, M1A, K1 (13 STS)
Row 12: K1, M1A, K1, [K1, SL3 WYIF] twice, K2, M1A, K1 (15 STS)
Row 14: K1, M1A, K4, [PS, K3] twice, K1 M1A, K1 (17 STS)
Row 16: K1, M1A, K1, [K1, SL3 WYIF] 3X, K2, M1A, K1 (19 STS)
Row 18: K1, M1A, K2, [K1, SL3 WYIF] 3X, K3, M1A, K1 (21 STS)
Row 20: K1, M1A, K5, [PS, K3] 3X, K2 M1A, K1 (23 STS)
Row 22: K1, M1A, K2, [K1, SL3 WYIF] 4X, K3, M1A, K1 (25 STS)
Row 24: K1, M1A, K3, [K1, SL3 WYIF] 4X, K4, M1A, K1 (27 STS)
Row 26: K1, M1A, K6, [PS, K3] 4X, K3 M1A, K1 (29 STS)
Row 28: K1, M1A, [SL3 WYIF, K1] 6X, SL3 WYIF, M1A, K1 (31 STS)
Row 30: K1, M1A, K1, [SL3 WYIF, K1] 7X, M1A, K1 (33 STS)

Child:
(You will no longer make increases)
Row 32: K4, [PS, K3] 7X, K1 (33 STS)
Row 34 and 36: [K1, SL3 WYIF] 8X, K1
Row 38: K2, [PS, K3] 7X, PS, K2 

Teen and Adult:
Row 32: K1, M1A, K3, [PS, K3] 7X, M1A, K1 (35 STS)
Row 34: K1, M1A, K1, [SL3 WYIF, K1] 8X, M1A, K1 (37 STS)
Row 36: K1, M1A, K2, [SL3 WYIF, K1] 8X, K1, M1A, K1 (39 STS)
(You will no longer make increases)
Row 38: K5, [PS, K3] 8X, K2 (39 STS)
Row 40 and 42: K2, [SL3 WYIF, K1], K1 9X, K1
Row 44: K3, [PS, K3] 9X

Cut yarn. Push the ear flap out of the way of the needles and hold on the circular part.
For the second ear flap, repeat the same process as for the first, but don't cut the yarn.

Hat Body:
Child:
Using a cable cast on, CO 3 STS, knit across 1st ear flap, again using the cable cast on, CO 27 STS, knit across 2nd ear flap, PM. Being careful not to twist, connect for knitting in the round for the rest of the hat. (96 STS)

Teen and Adult:
Using a cable cast on, CO 5 STS, knit across 1st ear flap, again using the cable cast on, CO 29 STS, knit across 2nd ear flap, PM. Being careful not to twist, connect for knitting in the round for the rest of the hat. (112 STS)

All Sizes:
Rounds 1 and 3: K2, *SL3 WYIF, K1, repeat from * until the last 2 STS, SL2 WYIF
Rounds 2 and 4: SLM WYIF, SL1 WYIF, K around
Round 5: *K3, PS, repeat from * around
Rounds 6, 8, 10, 12: K around
Rounds 7 and 9: *SL3 WYIF, K1, repeat from * around
Round 11: K1, *PS, K3 repeat from * to last 3 STS, PS, K2

Child:
Complete these 12 rows 4 times, then rows 1-6 once more, knit one more round and switch to double point needles.

Teen and Adult:
Complete these 12 rows 5 times, then rows 1-6 once more, knit one more round and switch to double point needles.

Decreases:
Round 1:
CB8 around (84 STS, 98 STS)
Rounds 2 & 3: K around
Round 4: CB7 around (72 STS, 84 STS)
Rounds 5 & 6: K around
Round 7: CB6 around (48 STS, 56 STS)
Round 8: K around
Round 9: CB4 around (24 STS, 28 STS)
Round 10: K2TOG around (12 STS, 14 STS)

Cut yarn leaving a 6" tail, thread tail through STS and pull tight to close hole. Weave in ends.
Using an E crochet hook, with MC, SC around the edge. Using the same hook, with CC, loosely SL into the knit stitches at the base of the SC's just made.

Ruffle:
With CC, CO 87 STS using a long tail cast on.
Row 1: K12, *P3, K9, repeat from * until last 3 STS, K3
Row 2: K3, *K9, P3, repeat from * until last 12 STS, K12
Row 3: Switch to MC, K3, *SSK, K5, K2TOG, P3, repeat from * until last 3 STS, K3 (73 STS)
Row 4: K3, *P7, K3, repeat from * until last 3 STS, K3
Row 5: K3, *SSK, K3, K2TOG, P3, repeat from * until last 3 STS, K3 (59 STS)
Row 6: K3, *P5, K3, repeat from * until last 3 STS, K3
Row 7: K3, *SSK, K1, K2TOG, P3, repeat from * until last 3 STS, K3 (45 STS)
Row 8: K3, *P3, K3, repeat from * until last 3 STS, K3
Row 9: K3, *SL 1, K2TOG, PSSO, P3, repeat from * until last 3 STS, K3 (31 STS)
Row 10: K3, *P1, K3, repeat from * until last 3 STS, K3
Row 11: K3, *P3, K1, repeat from * until last 3 STS, K3
Row 12: K6, *P1, K3, repeat from * until last 3 STS, K3
Row 13: K3, *P3, K1, repeat from * until last 3 STS, K3

Bind off, cut a long tail and, using the tail, sew ruffle to hat just above the SC's

Scalloped Edge:
Using E hook with CC, CH 25, turn, SC in 2nd CH from the hook, SC across
Turn, *Skip SC, 5DC in next SC, skip SC, SL in next SC, repeat from * across
Cut yarn, leaving a long tail, sew to hat with tail

Flower:
Using E hook, with MC, CH 5, SL in 1st CH to join in circle, 
CH4, SC in circle, [CH3, SC in circle] 4X, SL in CH4, CH1, (DC, TR, CH1, TR, DC, SL) in CH4 space, then in each CH3 space, SL into 1st SLCut YarnFrom the back side, w/CC, pull up loop around one of the SC posts, CH1, [CH4, SC] around remaining posts, SL in 1st CH
CH1, turn, [SC, 2DC, TR, CH1, TR, 2DC, SC] in each CH4 space (5X), SL in 1st SC
Cut long enough tail to sew flower to hat
Picture
Finishing:
Cut 4 long strands of MC, fold in half and slip knot through middle of one earflap
Make 8-stranded square braid and tie off at desired length
Repeat for second earflap

Make pom pom using either a plastic pom pom maker or two cardboard rings
After cutting the wrapped strands, but before tying off the pom pom, put braid through center of rings
then tie a tight knot, pull the rings from pom pom and position pom pom at bottom of braid

Cut any long ends
Picture
3 Comments

Tales of a Quiet Book, Woodland Creatures

12/12/2012

2 Comments

 
Last week, I posted a Babushkas page. This woodland creatures page is the male counterpart to that lovely little page. I created it for my friend, Stephanie's book.
Picture
Materials Needed:
* Fabric (remember to prewash all fabrics)
* Faux leather for the moose
* Felt for inside the Bear and Fox
* Various buttons for adornment
* Embroidery floss and needle
* Steam a Seam
* 9"x9" of reinforcement and some for the Bear and Fox
* Pattern, remember to UNCHECK the fit to page box

Pocket:
* Cut pockets from furs/fabrics for the moose and the bear (I used the page material and the back of the bear material for the inside of the pocket so it wasn't so thick)
* With right sides together, sew along the top of the pocket
* Understitch the inside of the pocket
* Iron the pocket

Moose:
* Cut Moose body and head from fur and the steam a seam
* Cut antlers and nose from faux leather and steam a seam
* Using the template, position body and antlers on page and pin
* Flip page over and iron from the back (the fur is too thick from the front and the leather will melt)
* Position and pin Moose pocket to body and
* Using a satin stitch, attach to the page and reinforcement (for the body, start on one side and go to the middle, then go to the other side and meet in the middle, otherwise, your pocket may end up crooked)
* Position head and nose on page, and pin in place (I used double sided tape to help position the ears)
* Again, flip page over and iron from the back to attach
* Using a satin stitch, attach to the page and reinforcement
* Embroider nose holes onto nose and sew eyes (I did the nose before attaching it and that is why it is crooked)
Picture
Bear:
* Cut 1 Bear from front fabric and reinforcement (cut a little bit smaller) and 2 from felt
* Cut 1 Bear snout from back fabric and steam a seam
* Position snout on Bear and iron on
* Stack front fabric Bear on top of one felt and the reinforcement Bear
* Satin stitch snout to fabric, felt and reinforcement
* Sew button eyes and nose to fabric, felt and reinforcement
* With the wrong side up, place back fabric on table, then position remaining felt Bear on top, then stack the sewn Bear on top of that and position the Bear pocket over all pieces and pin through all layers
* Satin stitch through all layers to back fabric
* Cut out Bear from back fabric
Picture
Fox:
* Cut 1 Fox from front fabric and reinforcement (cut a little bit smaller) and 2 from felt
* Cut 1 Fox face from white fur and steam a seam
* Position face on Fox and pin in place, then flip it over and iron on from back side
* Stack front fabric Fox on top of one felt and the reinforcement Fox
* Satin stitch face to fabric, felt and reinforcement
* Embroider eyes and nose
* With the wrong side up, place back fabric on table, then position remaining felt Fox, then stack the sewn Fox on top of that and pin through all layers
* Satin stitch through all layers to back fabric
* Cut out Small from back fabric

All that is left is to sew a 1 1/2" border onto the page.
Picture
2 Comments

Snow is Falling!

12/10/2012

0 Comments

 
I bought these wooden snowflakes last year at Michaels. I have seen them this year at Anthropologie (which of course are much more expensive and beautiful). I pulled them out this year and since we aren't getting a tree I began thinking of other places to spread the holiday cheer. I wanted to somehow incorporate the decor I have up all year into the fun and my mind went to this wall. I got out the glue gun and some ribbon and the picture below is the product of my imagination.
Picture
0 Comments

Baby Bear Hat

12/7/2012

4 Comments

 
I finished this hat a couple days ago for a friend and it was too cute not to post. The inspiration came from this darling hat on etsy.
Kit's Crafts - Baby Bear hat #FreeKnitPattern
This hat is knitted from the bottom up, starting with the ear flaps. The braid attached to the ear flaps is an 8-stranded square braid. The ears and bow are knitted separately and sewn in place. This hat is for a newborn (3-6 months) (6-12 months). If you would like a different size, adjust your needles and/or your yard.

Print the pattern.

Gauge: 
10 rows is 2", 6.5 STS is 2"

Materials:
Size 10 Double Point Needles (DPNs) and Circular Needles
1 skein of Bernat Softee Chunky in Dark Taupe
1 skein of Lion Brand Baby's First in Fairy Tale
Size J Crochet Hook
Yarn Needle

Abbreviations:
MC  = Main Color
CC = Contrast Color
CO = Cast On
K = Knit
M1A = Make 1 Away
STS = Stitches
PM = Place Marker
K2Tog = Knit 2 Together
SC = Single Crochet
SL = Slip Stitch

Ear Flaps:
Using the circular needles, with MC, CO 3 STS
Row 1: K1, P to 1 before end, K1
Row 2: K1, M1A, K to 1 before end, M1A, K1
Repeat Rows 1 and 2 until there are 15 STS (17 STS) (19 STS).
Repeat Row 1 once more. Cut yarn. Push the ear flap out of the way of the needles and hold on the circular part.
For the second ear flap, repeat the same process as for the first, but don't cut the yarn.

Hat Body:
Turn and K across the 2nd ear flap. Using a Cable CO, loosely CO 13 STS (13 STS) (15 STS), K across the 1st ear flap. Again, using the Cable CO, loosely CO 3 STS (3 STS) (3 STS), PM. Total: 44 STS (52 STS) (56 STS)
Being careful not to twist, connect for knitting in the round. Knit all rounds until the hat reaches 5" (5.5") (6") and switch to double point needles for the decreases.

Decreases for all sizes:
Round 1: *K2, K2Tog, K2 repeat from * around (40 STS)
Round 2 and 4: K around
Round 3: *K1, K2Tog, repeat from * around
Round 5: K2Tog around

Cut a 6" tail and using the yarn needle, thread through the remaining STS and pull tight to close up the hole then go through the top of the hat and tie a knot inside of the hat. Weave in loose ends.

Finishing:
SC around the edge of the hat with MC. Weave in ends. Using CC, loosely SL into the knit stitches around the base of the SCs just made. Weave in ends. Using MC, make 4 long strands for the braids (I usually just do the length between my hands outstretched). Fold in half and using the crochet hook, pull about an inch of the middle of the strands through the middle of the ear flap, then pull the ends through the loop just made. Cut the ends to about 3" past how long you want the braid to go, then do the square braid and tie a knot at the end. Trim up the ends if necessary.

Ears:
Using MC with an invisible cast on, CO 12 STS while leaving an 8" tail
Row 1, 3, 5, 7, 9, 11: K across
Row 2, 4, 6, 8, 10, 12: Purl across
DO NOT BIND OFF

Cut an 8" tail and using the yarn needle, thread tail through stitches, sinch together and tie to secure. Use the yarn needle to thread original tail through cast on stitches (removing scrap thread as you go), sinch and tie to secure and cut working yarn.

Repeat the same process for the second ear. Use the tails to secure the ears to the hat.

Bow:
I got the pattern for the bow from Cornflower Blue. I did number 2, but I only cast on 11.

***UPDATE***
So, the blog I refer to for bow pattern that I used originally has been privatized or something, so here is a link to a similar bow, the Not-So-Itty-Bitty Bow by Untangling Knots.
Picture
Oombawka Design
Foodies and Crafties Soiree
4 Comments
<<Previous
    Kit's Crafts
    Hey there! I'm Kristin, aka Kit. Here is just a peek into my crafting mind. I hope you find something to spur your creativity!
    Instagram

    Kit's Crafts Shop

    Popular Posts

    Picture
    Picture
    Picture
    Picture
    Picture
    Picture

    RSS Feed

    Picture
    Kit's Crafts
    Picture
    The Yarn Box

    Featured Here

    Picture
    Moogly
    Picture

    Categories

    All
    About
    Baby
    Baking
    Bio
    Caramel
    Child
    Chocolate
    Christmas
    Cooking
    Crochet
    Decor
    Dessert
    Dress
    Free Knit/crochet Pattern
    Free Sewing Pattern
    Interior Design
    Knitting
    Link Party
    Materials
    Pattern
    Quiet Book
    Quiet Book
    Recipe
    Selling Handmade Goods
    Sewing
    Spats
    T Shirt
    Tutorial

    Archives

    January 2020
    July 2019
    November 2018
    September 2018
    August 2018
    July 2018
    May 2018
    April 2018
    February 2018
    January 2018
    April 2016
    September 2015
    March 2015
    February 2015
    November 2014
    October 2014
    September 2014
    August 2014
    July 2014
    June 2014
    May 2014
    April 2014
    March 2014
    February 2014
    January 2014
    December 2013
    November 2013
    October 2013
    September 2013
    August 2013
    July 2013
    June 2013
    May 2013
    April 2013
    March 2013
    February 2013
    January 2013
    December 2012
    November 2012
    October 2012

Powered by Create your own unique website with customizable templates.