
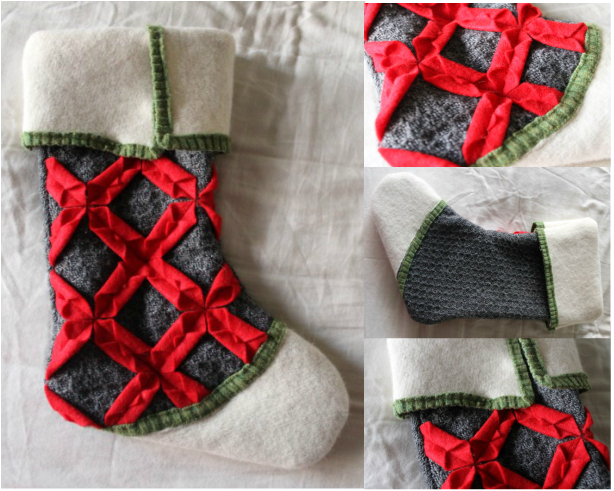
Every year, right before Christmas I think, "Next year I am going to finally knit stockings for Christmas", then I usually spend some time online looking for a pattern I like enough to make, but eventually Christmas comes and goes without any stockings being hung with care. So, last week this thought came, but instead of looking for patterns I could knit, I remembered a felt origami pillow I saw not long ago and loved. Some of you may remember the felt flowers I made a couple weeks ago from thrift store sweaters I felted. Well, I bought a couple more thrift store finds and went to town replicating that pillow in stocking form. I'm quite pleased with the end result.
Materials:
* Felt
* Thin fabric like muslin if your felt/background fabric is especially stretchy
* Clear thread
* Pattern UNCHECK the fit to page box (The actual stocking needs to be pieced together)
* Peel n Stick Fabric Fuse
* Felt
* Thin fabric like muslin if your felt/background fabric is especially stretchy
* Clear thread
* Pattern UNCHECK the fit to page box (The actual stocking needs to be pieced together)
* Peel n Stick Fabric Fuse
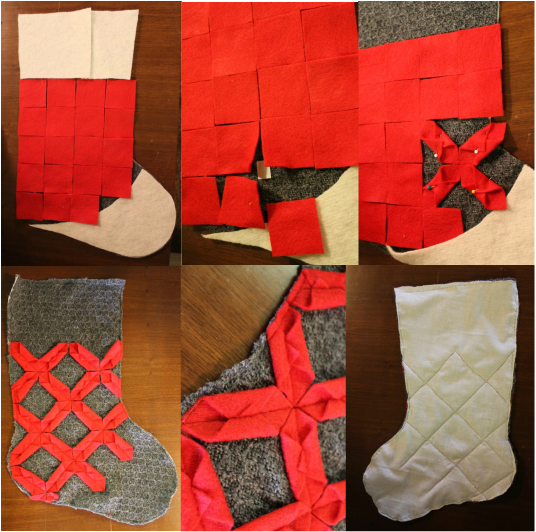
Start by cutting all pieces from felt. I also cut a lining from muslin for the background because the sweater I used was cotton (which doesn't felt) and stretchy.
Front Pattern:
* Cut 19 2"x2" squares
* Assemble squares as shown
* Lift the corners where 4 squares meet and attach a small piece of fabric fuse to background fabric
* Remove wax paper from fabric fuse and attach the corners, pushing them together before pressing down
* Working in a diagonal line and only doing 2 corners of each square, repeat this method until all of the squares are attched
* Pull up the two unattached corners of one of the squares and pin, overlapping the corners
* Repeat until all squares are elongated 6-sided shapes
* Straight stitch from corner to corner through all applique pieces
* Cut the appliques where they spill over the edge of the sock
* Stitch around the edge of the stocking if you are using muslin
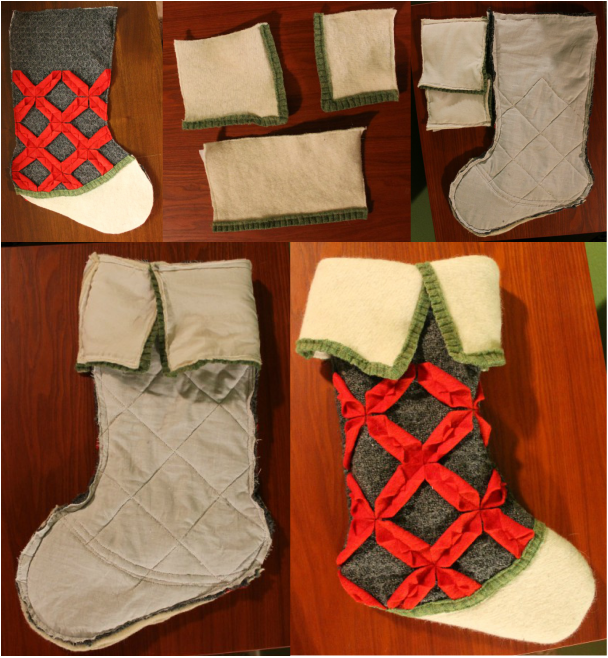
Cuffs and Toe:
* Cut a 1/2" strip of felt (I used the ribbed bottom of one of the sweaters)
* Pin the toe to the front, then place the strip along the edge of the toe and pin
* Sew strip to front going through all layers
* Repeat for back side
* With right sides together, sew around edge of sock leaving the top open
* Place and pin strip along edge of cuffs then sew strip to cuffs
* Sew 3 cuff pieces together to make one long strip
* While sock is inside out and with right side of cuff facing wrong side of sock, match the seams of the sock to the seams of the cuff and pin, then pin the rest of the cuff to the sock
* Sew along the top
* Turn sock right side out and flip cuff down
* Iron flat if needed
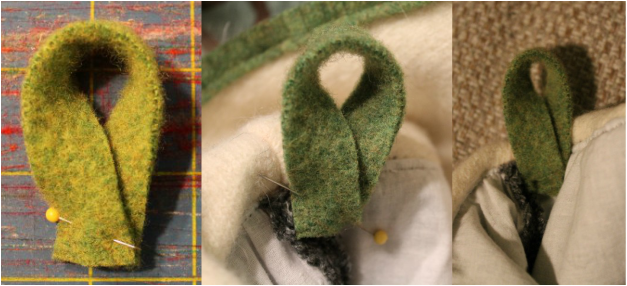
Loop:
* Cut a 5"x3/4" rectangle of felt
* Fold and pin to stocking as shown near the seam on the left side of the stocking
* Pull the cuff up and zig zag stitch the loop to the body of the stocking
* Cut a 5"x3/4" rectangle of felt
* Fold and pin to stocking as shown near the seam on the left side of the stocking
* Pull the cuff up and zig zag stitch the loop to the body of the stocking


 RSS Feed


