Kit's Crafts
  • Home
  • About
    • Selling Handmade Goods
  • Knitting
  • Crochet
  • Sewing
  • Crafting
    • Just for Fun
    • Wall Decor
    • Christmas Fun
    • Party On
  • From the Kitchen
    • Chocolate
    • Sweet
    • Savory
  • Quiet Book
  • The Shop

Happy Thanksgiving!

11/28/2013

0 Comments

 
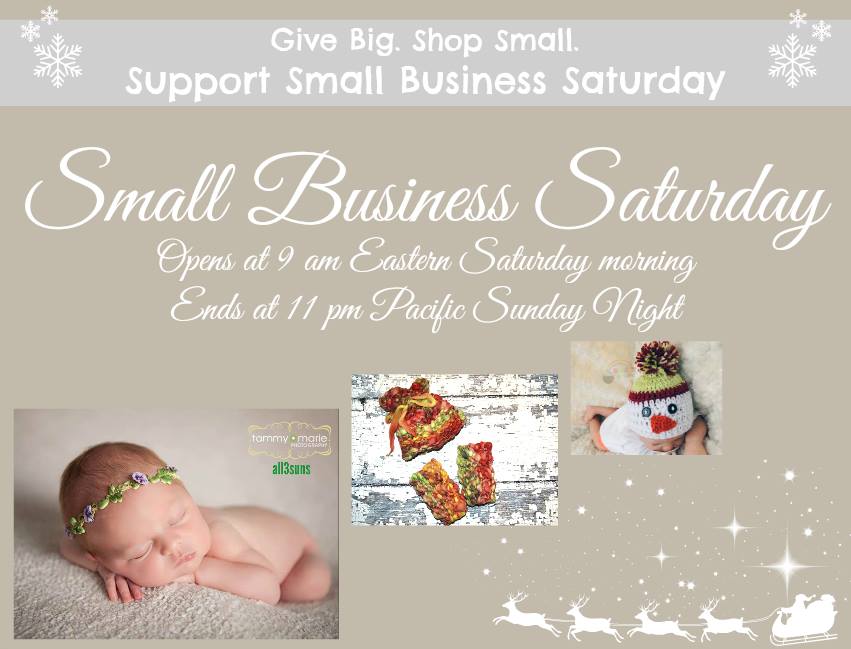
Hope you have a great feast today! Here are few vintage images I found over at Squidoo for your enjoyment. If you get a chance on Saturday, check out the huge sale on baby items and photography props at Give Big. Shop Small. Prop Sales Events. There is a sneak peak at the bottom of the post.
Picture
Picture
0 Comments

Blazing Needles

11/26/2013

4 Comments

 
One of the greatest things about knitting and crochet is the community that this hobby attracts. If you live in Utah, you NEED to check out Blazing Needles, where the knit/crochet community spirit is highly encouraged. This shop is really THE place to get started as they offer free classes and the staff is so welcoming! Blazing Needles is a perfect venue to get to know other knitters and/or crocheters and build a network of fellow yarn enthusiasts. Not to mention the complimentary coffee and tea... This gathering place also carries a wide variety of luscious yarns for all of your knitting and crochet needs, among other knit/crochet novelties. Seriously, even if you are just visiting the Salt Lake City area, make a stop here, you will not be disappointed.
Picture
Beyond sending some love to this knit/crochet paradise I also want to highlight them for their generosity. Every year, Helping Kids With Cancer (a non-profit charity that assists with critical needs for kids and their families) puts on a stocking event and auction with help from the community. Basically, stockings are made and filled then donated to children with cancer (some of which may not see next Christmas). The proceeds from the auction go toward helping with various needs the families may have. I made 4 stockings to go to these children, which I wanted to be filled with yarn and needles so that I can pass on the joy I find in knitting and crochet. Last Saturday, I visited Blazing Needles and spoke with Cynthia, the sweet and generous owner, and she agreed to fill them all for me. My heart was so full of gratitude I felt I might burst! Better yet, we hope to start teaching classes for the teenagers facing this immense challenge in the upcoming year. You know, I have always felt that I would like to give back in some way to my community and I am so grateful that I have been blessed with a talent that is easy to share.

Below are the stockings I made, which Blazing Needles will be filling.
Kit's Crafts - Chipboard #Stocking
I made this first stocking using chipboard, glue, tape and wrapping paper. I had originally planned to do a tutorial, but it got too complicated and I had to depart a bit from my original plan. For the most part, I constructed it using the same method outlined in this tutorial on You Tube by Christyj1977. If you are interested in the template I used, email me and I will send it to you.
Kit's Crafts - #FeltStocking Reindeer
The body of this stocking is from a wool skirt I found at a thrift store. The reindeer is just a silhouette I found online when I did an image search. The lace applique was cut from fabric I bought at JoAnns.
Kit's Crafts - #FeltedStocking
The stockings above and below were created using 2 sweaters I found at a thrift store, then felted. The trees on the bottom one were from scraps of the stocking above. I didn't originally plan on doing the border, but the stockings were looking more skeewampus without it. For the borders, I made bias tape. For the border on the top stocking, I used another thrift store sweater. I used some scrap fabric for the border on the bottom stocking. 
Kit's Crafts - #FeltedStocking Trees
By the way, if you would like to donate to Helping Kids with Cancer or you would like to send in some unused yarn or needles for the kids to learn, please email me at [email protected].

You might also like:

Picture
Picture
Picture
Picture
4 Comments

Peanut Butter Cookie Balls

11/21/2013

0 Comments

 
Move over cake balls/pops and make room for the cookie ball! That's right people, the cookie ball. Funny thing, this recipe came about as a result of not having to gone shopping, but needing to make a dessert. I knew I had vanilla pudding in my cupboard and peanut butter cookies in my freezer. At first I was thinking of making some kind of cookie custard, but then I discovered a round up of cookie ball recipes over at Snack Works and my decision was made!
Kit's Crafts - Peanut Butter #CookieBalls
Ingredients:
1 package Instant Vanilla Pudding
Pinch of Chili Powder
3/4 cup Milk
12 - 14 Crushed Peanut Butter Cookies (Nutter Butters would be awesome!)
1 package Semi Sweet Chocolate Chips
Plastic fork with two middle tines removed

Directions:
Combine milk, pudding and chili powder. Stir in crushed cookies. You should have a very sticky dough. Roll dough into about 20 balls. Place balls on a cookie sheet lined with wax paper. Place balls in the freezer for 1 hour.

Melt chocolate in the microwave or over a double boiler. Place 6 - 8 balls in the chocolate and carefully stir until balls are covered. Use the 2-tined fork to remove each ball and place back on the wax paper. Continue the last step until all balls are covered. Let chocolate set. You can put the balls in the fridge to speed up the process.

You might also like

Picture
Picture
Picture
Picture
Foodies and Crafties Soiree
0 Comments

Handmade Christmas Ideas

11/19/2013

0 Comments

 
Lets get real, the holiday season is upon us and Christmas isn't really that far away. If you have high hopes for a handmade Christmas, now is the time to get started on those one of a kind gifts. The great news is that there are a LOT of gift ideas out there that really don't take much time. Today, I am going to highlight some from this very website to get you jump-started.
Kit's Crafts - #HandmadeChristmas Knitting
This first group is for all of the knitters out there.
1. T-Shirt Yarn Star Bracelet - The great thing about this gift is that you don't even have to make a trip to the craft store, just make your own tarn from your closet!
2. Fancy Spats - Liana - Use some left over yarn from your stash for this adorable fashion statement.
3. Baby Bear Hat - Made with chunky yarn and few embellishments, this darling hat is incredibly quick and easy to make.
4. Tractor Hat - This is a great hat for the boys in your life. Plus, it is a great base for an earflap hat, just swap out the chart.
Kit's Crafts - #HandmadeChristmas Crochet
Now to some lovely crochet projects.
1. Fancy Spats - Cathedral - These little shoe collars are the perfect gift for that person with a unique style.
2. T-Shirt Yarn Cluster Bracelet - If you are low on cash, then this is the item to give to your friends. Not only is it adorable, but you can make it from t-shirts in your closet.
3. Ruffle Wreath - Perhaps you would like to add to your decor stash or maybe you just aren't sure what to buy for someone on your list. This gorgeous wreath is easy to make and fairly inexpensive too. (You can make the flowers from old sweaters!)
4. Broomstick Lace Headband - Really, does it get any easier?! Make these as stocking stuffers and use up some of your left over yarn or even make some tarn to create this headband with.
Kit's Crafts - #HandmadeChristmas Sewing
Ok Sewers, here are some ideas for you. 
1. Poinsettia Stocking - So, the stocking itself is pretty cool, but you could use the same technique for a pillow, which would also be adorable.
2. DIY Library Bag - This bag is so easy and doesn't take much material. It would make a great gift for friends and family. You could make it on a smaller scale and fill it with homemade soaps and scrubs.
3. Custom Stuffie - Here is an outline for how to make your own custom little stuffed animal for the little cutie in your life.
4. Men's Dress Shirt to Baby Dress - This would be awesome out of a great red or green plaid shirt!
Kit's Crafts - #HandmadeChristmas
Here are some random crafts that don't necessarily fall under a specific category.
1. Pallet Growth Chart - This would be a great gift for someone with growing children or grand children
2. DIY Bath Crayons - Can we say stocking stuffers?
3. Olliblocks - So fun, so quick, so easy.
4. Nativity Puppets - Switch up the telling of Jesus' birth with some simple felt puppets

If you are not so much into making things, but want the look of handmade, check out my Etsy Shop.

You might also like:

Picture
Picture
Picture
Picture
Gina's Craft Corner
0 Comments

Paper Bag Poppies

11/14/2013

3 Comments

 
Last Saturday, I guest posted on Chaos with a Curve, where I did a tutorial for a Thanksgiving banner that included printables. To display this banner, I decorated my sister-in-law's mantle. You may remember the Gold-Dipped Pumpkins from last week that were on this mantle, well here is another piece of that puzzle. Today, I bring you Paper Bag Poppies. These little beauties became the anchor for the decor along with a frame I found at a thrift store and some left over fabric. Hope you enjoy this tutorial!
Kit's Crafts - Paper Bag Poppies #PaperFlowerTutorial
Materials:
Paper Lunch Bags
Poppy Template
Acrylic Paint/Paint Brush (Optional)
Gold Marker (Optional)
Stapler/Staples
Glue Gun/Glue Sticks

Directions:
1. Lay out the bag with the folded flap up.
2. Fold the flap down
3. Trace the template onto the bag as shown
4. Cut out 7 petals for each flower, find the center of the straight edge, then make a 1" cut
Kit's Crafts - Paper Bag Poppies #PaperFlowerTutorial
Painting:
1. Water down your paint (equal parts water and paint), then dampen one of the petals with a brush and water, then brush the watered down paint onto the petal. Repeat with remaining petals.
2. Once the petals have all dried, use the gold marker to create an outline along the edges of each petal.
3. The petals tend to curl from the paint. Use the marker to straighten them out or, if you want them to curl a bit in the other direction, use the blade of open scissors to curl the edges as you would for curling ribbon.
Kit's Crafts - Paper Bag Poppies #PaperFlowerTutorial
Finishing:
1. Overlap and staple each petal at the 1" cut.
2. On the backside of one petal, place some glue along the stapled edge, then overlap another petal and attach the two. Continue gluing and placing the remaining petals in the same fashion.
3. Cut a 6" square of paper and scribble on one side with the gold marker. Crumple the paper, then unfold and crumple again, this time tucking the edges under and toward the middle. Glue to the center of the flower.
Kit's Crafts - Paper Bag Poppies #PaperFlowerTutorial
By the way, here is the completed mantle (the Be Thankful banner is over at Chaos with a Curve):
Kit's Crafts - Paper Bag Poppies #PaperFlowerTutorial

You might also like

Picture
Picture
Picture
Picture

Where I partied

Foodies and Crafties Soiree
3 Comments

Pear Surprise Mini Pies

11/12/2013

2 Comments

 
Last week, I made some really yummy veggie potstickers I found over at the Food Network, which used wonton wrappers (as most pot sticker recipes do). The problem with any recipe that involves wonton wrappers is that you rarely use all of the wrappers that come in the package. I hate to waste anything, so I went in search for a recipe to use up these little squares of dough. There are TONS of ideas out there; everything from lasagna cupcakes (very good) to deep fried pillows (sounds amazing!) to just simply buttering and sprinkling with cinnamon and sugar then baking. While many of the ideas sounded enticing, I kept thinking about a pear I didn't want to go bad as well as some leftover white chocolate (from the cake pops a few weeks ago) and some crushed pecans (also a left over). This brought to mind my Caramel Apple Tartlets from a year ago and with all of that in mind, I came up with the following recipe. Let me just tell you, I ate about 3/4 of them without even thinking they are so good!
Kit's Crafts - Pear Surprise #MiniPies
Ingredients:
24 Wonton Wrappers
1 Pear, diced (I didn't peel it, but you can)
1/2 cup White Chocolate Chips
3 tablespoons sugar
1 teaspoon Cinnamon
dash of Ginger
1/4 cup crushed Pecans
12 Caramels, unwrapped and cut into 4 pieces each (48 pieces)
Spray Oil
Coarse Sea Salt

Directions:
Preheat oven to 350 degrees. Grease a 12 cup muffin tin with spray oil.
Press 1 wrapper into each cup. Divide pear and white chocolate chips into each cup evenly. Combine sugar, cinnamon and ginger in a small bowl. Sprinkle half of the sugar mixture over the pears and chocolate. Press another wrapper into each cup. Put 4 pieces of caramel in each cup. Sprinkle with the pecans and remaining sugar mixture. Spray with oil. Sprinkle VERY LIGHTLY with salt (between 3-5 crystals per cup)
Bake for 10 minutes or until edges are browned and crispy. 

The only change I might make the next time I make these is to leave the caramel out and melt it instead, then, once baked, top each cup with a scoop of ice cream and drizzle with the caramel. Mmmmmmmm.....

So, do share, what have you made with wonton wrappers?

You might also like

Picture
Picture
Picture
Picture

Where I partied:

Picture
2 Comments

Gold Dipped Pumpkins DIY

11/7/2013

3 Comments

 
Great news! I was asked to guest post over at Chaos with a Curve! For the event, I decided it would be fun to decorate my sister-in-law's mantle for Thanksgiving. On Saturday, you will find a great tutorial for a Thanksgiving Banner, along with printables, over at Chaos with a Curve. There were quite a few other things that I made for this mantle as I was trying to spend as little money as possible. Today, I am going to show you how I made some gold dipped pumpkins.
Kit's Crafts - #GoldDipped Pumpkins DIY
My initial inspiration for these little lovelies, were some gold dipped fruit by Chatelaine I found on Pinterest. I headed to Michaels and was lucky to find some paper mache pumpkins on sale. Only problem was that I couldn't stomach wasting that much paint, plus it seemed like such a ridiculous mess. I went back to the internet to find a better way and was lucky to find a wonderful tutorial by Homey Oh My! for a gold dipped pumpkin vase. Essentially, you fake the dip and spray paint the pumpkin instead. Simply put, BRILLIANT! Anyway, here is the process to recreate my pumpkins.

Materials:
Paper mache pumpkins
Torn up pages from a book
Modpodge
Foam Brush
Tin Foil
Gold Spray Paint (mine was a primer and paint in one)

Directions:
1. If you would like the book page effect, start by modpodging the torn book pages to each of the pumpkins and set aside to dry.
2. Once dried, wrap tin foil around the top 2/3 of your pumpkin. Make sure to use only one sheet of foil, as it is pretty difficult to hold the pumpkin when you piece sheets together. Then, in a well ventilated area, spray the pumpkins. The key here is to start spraying on the tin foil then sweep your arm toward the base of the pumpkin and stop spraying (refer to photos). Also, tilt the spray tip in that direction. Set aside to dry for about 30 minutes.
Kit's Crafts - #GoldDipped Pumpkins DIY

You might also like

Picture
Picture
Picture
Picture
3 Comments

Light Hawaiian Haystacks

11/5/2013

3 Comments

 
Back when I was in grade school, I remember there regularly being Hawaiian Haystacks on the lunch menu. Generally this consisted of rice, chow mein noodles, pineapple chunks and some kind of really thick gravy. Once I reached adulthood, I basically put this high calorie, semi-good meal behind me. Well, not long ago, I came across a recipe for the stacks by The Pearl Owl that intrigued me. Basically, this recipe uses a coconut gravy that is much lighter than the goop shoveled onto my grade school tray. When I first tried the recipe, I was watching my calories to loose some pregnancy weight, so, although the Pearl Owl version is pretty light, I took it a step further and cut out the roux. Honestly, I LOVE this meal. It fills you up, is tasty and you don't feel bad eating dessert! Give it a try, tell me what you think!
Kit's Crafts - Light Hawaiian Haystacks
Ingredients:
2 tablespoons Corn Starch
2 tablespoons Water
1 cup Low Fat Coconut Milk
1 cup Chicken Broth3 tablespoons Juice from a can of Mandarine Oranges
3 - 4 teaspoons Red Pepper FlakesSalt and Pepper
Cooked Rice

Add Ons:
Shredded Chicken
Sliced Celery
Mandarine Oranges
Toasted Coconut
Toasted Almonds
Chow Mein Noodles

Directions:
Start by combining the corn starch and water in a small bowl. Combine this with the coconut milk, broth, juice, red pepper flakes, salt and pepper in a medium saucepan over medium heat. Warm until the sauce reaches your desired consistency. (The longer it is on the heat, the thicker it will get, it will also thicken a bit when it cools).

Put a scoop of rice on your plate, top with desired add ons, then drizzle the gravy over the top.

Serves 4.

You might also like

Picture
Picture
Picture
Picture

I partied here

Foodies and Crafties Soiree
3 Comments
    Kit's Crafts
    Hey there! I'm Kristin, aka Kit. Here is just a peek into my crafting mind. I hope you find something to spur your creativity!
    Instagram

    Kit's Crafts Shop

    Popular Posts

    Picture
    Picture
    Picture
    Picture
    Picture
    Picture

    RSS Feed

    Picture
    Kit's Crafts
    Picture
    The Yarn Box

    Featured Here

    Picture
    Moogly
    Picture

    Categories

    All
    About
    Baby
    Baking
    Bio
    Caramel
    Child
    Chocolate
    Christmas
    Cooking
    Crochet
    Decor
    Dessert
    Dress
    Free Knit/crochet Pattern
    Free Sewing Pattern
    Interior Design
    Knitting
    Link Party
    Materials
    Pattern
    Quiet Book
    Quiet Book
    Recipe
    Selling Handmade Goods
    Sewing
    Spats
    T Shirt
    Tutorial

    Archives

    July 2020
    January 2020
    July 2019
    November 2018
    September 2018
    August 2018
    July 2018
    May 2018
    April 2018
    February 2018
    January 2018
    April 2016
    September 2015
    March 2015
    February 2015
    November 2014
    October 2014
    September 2014
    August 2014
    July 2014
    June 2014
    May 2014
    April 2014
    March 2014
    February 2014
    January 2014
    December 2013
    November 2013
    October 2013
    September 2013
    August 2013
    July 2013
    June 2013
    May 2013
    April 2013
    March 2013
    February 2013
    January 2013
    December 2012
    November 2012
    October 2012

Powered by Create your own unique website with customizable templates.