Kit's Crafts
  • Home
  • About
    • Selling Handmade Goods
  • Knitting
  • Crochet
  • Sewing
  • Crafting
    • Just for Fun
    • Wall Decor
    • Christmas Fun
    • Party On
  • From the Kitchen
    • Chocolate
    • Sweet
    • Savory
  • Quiet Book
  • The Shop

Basket of Sheets

7/22/2014

5 Comments

 
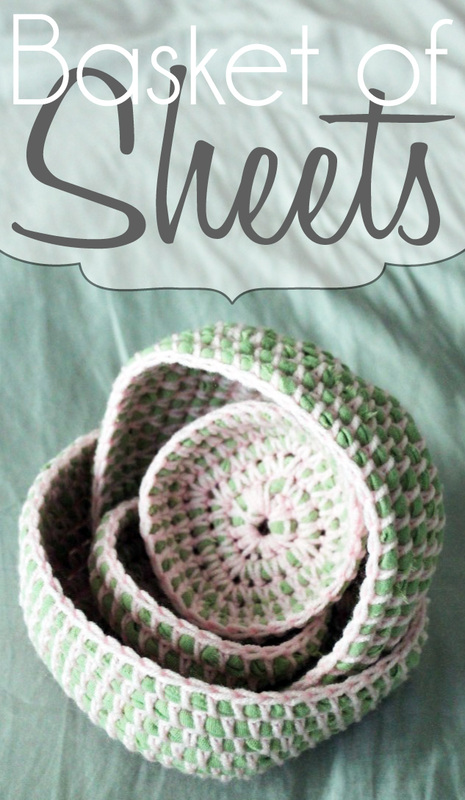
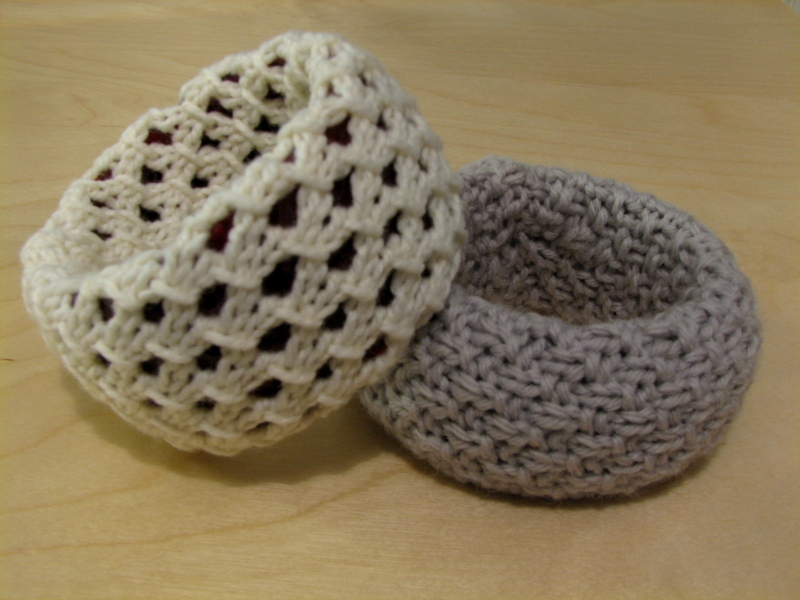
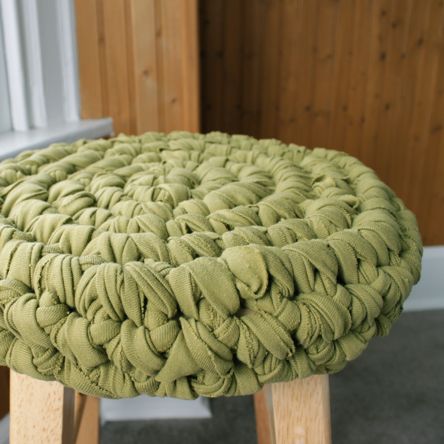
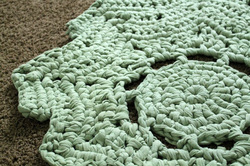
Last year, I used an old sheet to make a doily rug for my daughter's room. In an effort to use up the left over fabric as well as some yarn that isn't too soft, I started making these little containers. The inspiration for this project came from a "recipe" for a crochet rug using t-shirts. Today's post shares the technique, but doesn't necessarily provide a pattern.
Kit's Crafts - Basket of Sheets #Upcycle

Read More
5 Comments

Fabric Storage Bin

6/3/2014

0 Comments

 
Nothing is more essential for a child's room than storage and it is always helpful to find an adorable solution. I was on Pinterest a few weeks ago and stumbled upon the perfect tutorial by Make It and Love It. I used a basic gray duck cloth because that is what I had around, but how cute would this be in a bright pattern?! Anyway, today is a shout out to the tutorial for this lovely little bin.
Kit's Crafts - Fabric Storage Bin

Read More
0 Comments

Screen Backdrop Tutorial

5/20/2014

0 Comments

 
I meant to post this last week, but I got distracted... Anyway, here is a tutorial of the screen I made to go behind my table at the Beehive Bazaar. I mostly followed the tutorial over at Handmade Beautiful. However, I did make some significant changes, namely, I made the middle panel bigger so that the side panels fold flat and I added a cross bar to hang a frame from.
Kit's Crafts - Screen Backdrop Tutorial
Materials:
6 pieces of 2"x2"x8' furring strips*
2 packs of 2" hinges (4 hinges total)
3 packs of 2" flat corner braces (1 more if you want to make the cross bar to hang a frame from)
about a yard of 48" fabric (I used duck cloth)
Sand Paper (if you don't want to get a SERIOUS workout, use an orbit sander)
Paint or stain (optional)
Drill
Staple guns/staples

*When picking out your wood, make sure that there aren't any large chips or natural dis-figurations. Also, check to make sure non of them are bowing (the two on my front panel do at the bottom...not so great...), by putting each side of each piece on the floor.

Directions:
Cut your wood. You will need the following pieces:
four 8" pieces
six 72" pieces
two 24" pieces (one more 24" piece to hang the frame from). 

The diagram shows how you can most effectively cut your pieces of wood. Also, if you don't have access to a saw, no fear, Home Depot will usually cut them for a small fee per cut. Sand and paint these pieces.
Kit's Crafts - Screen Backdrop Tutorial
Assemble the pieces using the diagram above for reference. Square up the corners, then using the flat corner braces and a drill, attach each of the pieces to create the panels. Line the small panels on either side of the large panel and, using the hinges and a drill, attach a small panel to either side of the large panel. If you are going to make the cross bar to hang the frame, position the cross bar about 9" from the top then attach, using the extra braces and a drill, to the large panel. Hammer a hook into the middle of the cross bar.

Cut the fabric into two 10" pieces and one 26" piece. Using a staple gun, staple the pieces of fabric to their respective panels. Then stand it up, step back and admire your work!
Kit's Crafts - Screen Backdrop Tutorial

You might also like:

Picture
Picture
Picture
Picture
0 Comments

Yarn Storage Ideas

4/29/2014

1 Comment

 
It goes without saying that anyone with any kind of hobby is likely to have a large amount of supplies on hand, such is true about yarn for those of us that knit and crochet. Problem is, that, if you are like me, the primary place for storing these goods is in large plastic tubs in a closet. The interior designer in me screams to display those unique things that make me who I am, as in that huge stash hiding in the closet, so of course, one needs to get creative.
Kit's Crafts - Yarn Storage Ideas
Today's post is all about inspiring the interior designer in all of you with some ideas I found around the web of how others display their passion for yarn. 
Morrgan's Creatures - A Teetering Tower of Yarn
Who uses CDs any more? Why not fill those storage towers with yarn like this one by Morrgan's Creatures
Knits for Life - The World's Best Yarn Storage Idea
I know I probably shouldn't show partiality, but this yarn display by Knits for Life is by far and away my favorite idea. I am planning to one day do something similar in my home, but perhaps add a frame or some molding around the perimeter.
Tudo Junto & Misturado - Bags with Art
Ok, so this yarn storage idea featured on Tudo Junto & Misturado is more of a travel solution, but what a great idea for a small vintage suitcase! It would also make a great gift to a fellow yarn lover...
Picture
I love these chevron shelves by Preita. Wouldn't this look great above a sofa?!
Harvest Workroom - Popcraft Goes Live
These little wooden boxes
by Harvest Workroom are my second favorite idea. What a stylish way to tuck your stash away.
Easy Makes Me Happy - My Handyman
Easy Makes Me Happy shares this great idea of these diamond shaped shelves. So, this might be tied for second with the wooden boxes...
Now that you have some ideas of how to make that large pile of yarn beautiful, head over to Lion Brand for a really great blog post, 12 Tips on How to Organize Your Yarn Stash. Please share links about organizing yarn that you have found (or even your own) in the comments!

You might also like:

Picture
Picture
Picture
Picture
1 Comment

Decor Kids Can Make

4/10/2014

0 Comments

 
In my last post, on Tuesday, I shared some tutorials of crafts that kids can help make. Today's post is in the same thread as I am sharing some decor items that kids can help make. Any of these would be great as holiday or permanent accents in the home.
Kit's Crafts - Beaded Macrame Garland
Beaded Macrame Garland
Kit's Crafts - Cute Frame Option
Cute Frame Option
Kit's Crafts - Simple Tulle Wreath
Simple Tulle Wreath
Kit's Crafts - The Doily Trend
The Doily Trend
Kit's Crafts - Paper Bag Poppies
Paper Bag Poppies
Kit's Crafts - Simple Circle Garland
Simple Circle Garland

You might also like:

Picture
Picture
Picture
Picture
0 Comments

Layered Memories Frame

4/3/2014

0 Comments

 
As part of my Interior Design degree, I did an internship in New York City at Aero Studios. I have been wanting to display some of the mementos I kept and came up with this idea of layering a few of the ticket stubs and business cards I collected. I bought the frame years ago at Michael's, so I am not sure if they carry it any more, however, I did find it online for all of you.
Kit's Crafts - Layered Memories Frame
To give you a better idea of how this frame works, below is a close up of the bottom.
Kit's Crafts - Layered Memories Frame

You might also like:

Picture
Picture
Picture
Picture
0 Comments

Guest Post: Kaelie Nielsen

3/27/2014

2 Comments

 
Well hello readers of Kit's Crafts, I'm Kaelie Nielsen, Kit's sister from kaenie.com. While Kit is getting ready for the Beehive Bazaar, one of the best craft fairs around, I thought I would talk to you about my love of paper. 

Sounds boring, but hear me out. I love paper almost as much as Kit loves yarn, so you can imagine I've made some fun things with it. 

About a month ago, I purchased a Silhouette Cameo, nope, I'm not cool enough to be sent one to blog about, I am writing about it because I genuinely think it's awesome. It's like a cricut except instead of having to buy a bunch of cartridges, it will cut whatever you create. Being a graphic designer with a love of paper who just got a pretty good tax return, I almost heard the machine calling my name. 

So, what have I created?

The things I'm most excited about are shadow boxes. Here's my basement wall:
Picture
I also created some that stand on their own:
Picture
I'm thinking to try to make a circular one with the following design, but I still need to work out some kinks:
Picture
More than one person has told me I should sell these. I haven't asked how much they would pay because that's an awkward question to ask of a close friend or family member and I honestly wouldn't believe their answer anyway. 

So, since you are all mostly anonymous to me, I have no reserves. Would you buy these? If so, for how much? I would probably charge $3 shipping and have the buyer assemble them so I ship them flat.

Also, no pressure if you decide to comment. If I do sell them, it won't be until a while after I've had my second daughter in May and I won't be contacting you unless by request. Your honest opinion is much appreciated.

Thanks! 

Kaelie Nielsen
kaenie.com
Facebook
Pinterest

You might also like:

Picture
Picture
Picture
Picture
2 Comments

DIY Cake Stand

3/20/2014

0 Comments

 
In prepping for the Beehive Bazaar, I began looking for inexpensive ways to display my products. I had remembered seeing a lot of tutorials on Pinterest for cake stands and thought that would be a good idea to try out. I went a little nuts and made about 7 or 8 stands because they are so easy and each plate/vase only cost about $1 at my local thrift store. Can't go wrong there! Anyway, here is a quick tutorial of how I made mine.
Kit's Crafts - DIY Cake Stand
Materials:
Plates
Candle Holders or Vases
E6000 Glue
Ruler (optional)
Scrap Cardboard (to protect your work surface)

Directions:
Wash your plates and vases and dry completely. Place two plates upside down. Squirt some glue around the rim of each of vase, then place the vase as close to the center as you can. Use your ruler to double check, however you don't need to be exact. Let these dry upside down for 24 hours.

Next, place your remaining plate right side up, then squirt some glue on the bottom of one of your vases that is already attached to a plate. Place the vase in the center of the plate that is right side up using the same method as above to center the vase. Wait 24 hours, then attach the remaining plate on top of the other two. Wait at least 24 hours before using.
Kit's Crafts - DIY Cake Stand

You might also like:

Picture
Picture
Picture
Picture

Where I partied:

Foodies and Crafties Soiree
0 Comments

Unique Knit and Crochet Ideas

3/18/2014

0 Comments

 
A couple days ago, I found out that one of my friends knits. In talking to her about it, she said she had just learned, but didn't think you could knit much beyond hats, scarves and blankets. I honestly didn't answer right away because my mind was buzzing with so many ideas of things you could make with your needles. Finally, I said, "When you knit you are making a fabric, so basically anything you could make with fabric you could knit". Of course, this is true for crochet, too. A wonderful thing these days is that you can find many knit and crochet doilies and tablecloths at thrift stores, so even if you don't have the skill, you can still partake in the fun by upcycling a secondhand find.

Anyway, as I was deciding what to post about today, I thought I would share some ideas, many of which contain patterns/tutorials for you to re create the inspiration. Click on the picture to go to the link. Enjoy!
A-Frame Tent with Crochet Beadspread
Do you remember the A-Frame Play Tent I posted in January? This is the same concept, just use a crocheted bedspread instead of a sheet.
Knit Swatch Bracelet
You will find a tutorial at the link for these bangles.
Crochet Bicycle Guard
Here is a fun way to personalize your bike. This item is for purchase.
Knit Swatch Wall Hangings
The link here provides a basic guideline. I have also seen this done by stretching the swatch over a canvas and attaching it to the back.
Crochet Shoes
You will find a tutorial for this, however, the website is in Spanish, but google translate helps.
Knit Floor Pouf
These little ottomans are hand knitted by Christien Meindertsma.
Crochet Stool Cover
A wonderful tutorial is provided at the link.
Crochet Frames
A guideline is provided at this link for how to make these little frames.
Crochet Pendant Lampshades
This picture is the inspiration for the tutorial found at this link. If you don't know how to crochet, buy up some doilies and connect them for a similar effect.
Crochet Chair Cover
This lovely chair cover was created with a glue gun and a tablecloth. There is no tutorial, but I am sure it wouldn't be hard to figure out.

You might also like:

Picture
Picture
Picture
Picture
0 Comments

Double Pointed Needle Holder

3/4/2014

5 Comments

 
For some time now, I have been trying to organize my craft materials and tools. Only problem, is that I want the tools I use most often to be readily available, so that means they need to look nice too. I searched the internet to come up with some way of organizing my double pointed needles and crochet hooks. Primarily, what I saw was antique pipe holders upcycled as knitting needle holders. So, I went looking at some local antique shops. Unfortunately, I didn't quite find what I was looking for until I stopped by Lost and Found Thrift in Bountiful, Utah. First off, I must do a shout out to this glorious place. Not only do they have great items, but they have pictures all over the store to give you ideas of what some of their products could be turned into with a little DIY. The greatest part are the friendly, helpful owners. After browsing for a bit, I wasn't coming across any pipe holders, so I described what I was needing to Cheryl, one of the owners. She thought for a moment then I saw the light bulb go off and she asked if I had thought of using a floral frog. She went in the back and brought out exactly what I was needing. All that was left was to put it in a container. I remembered a milk glass trifle bowl I bought a while back and, lucky for me, they were a perfect fit! I didn't have to do any adjusting or jimmy rigging at all!
Kit's Crafts - Double Pointed Needle Holder
Now you tell me, isn't that perfect?! It is like my own little bouquet of knitting needles and crochet hooks. I love it! I know that this is a pretty serendipitous find, so if you are looking to organize your needles/hooks, you could also try an old test tube holder or a test tube vase. 
Picture

You might also like:

Picture
Picture
Picture
Picture
5 Comments
<<Previous
    Kit's Crafts
    Hey there! I'm Kristin, aka Kit. Here is just a peek into my crafting mind. I hope you find something to spur your creativity!
    Instagram

    Kit's Crafts Shop

    Popular Posts

    Picture
    Picture
    Picture
    Picture
    Picture
    Picture

    RSS Feed

    Picture
    Kit's Crafts
    Picture
    The Yarn Box

    Featured Here

    Picture
    Moogly
    Picture

    Categories

    All
    About
    Baby
    Baking
    Bio
    Caramel
    Child
    Chocolate
    Christmas
    Cooking
    Crochet
    Decor
    Dessert
    Dress
    Free Knit/crochet Pattern
    Free Sewing Pattern
    Interior Design
    Knitting
    Link Party
    Materials
    Pattern
    Quiet Book
    Quiet Book
    Recipe
    Selling Handmade Goods
    Sewing
    Spats
    T Shirt
    Tutorial

    Archives

    July 2020
    January 2020
    July 2019
    November 2018
    September 2018
    August 2018
    July 2018
    May 2018
    April 2018
    February 2018
    January 2018
    April 2016
    September 2015
    March 2015
    February 2015
    November 2014
    October 2014
    September 2014
    August 2014
    July 2014
    June 2014
    May 2014
    April 2014
    March 2014
    February 2014
    January 2014
    December 2013
    November 2013
    October 2013
    September 2013
    August 2013
    July 2013
    June 2013
    May 2013
    April 2013
    March 2013
    February 2013
    January 2013
    December 2012
    November 2012
    October 2012

Powered by Create your own unique website with customizable templates.