
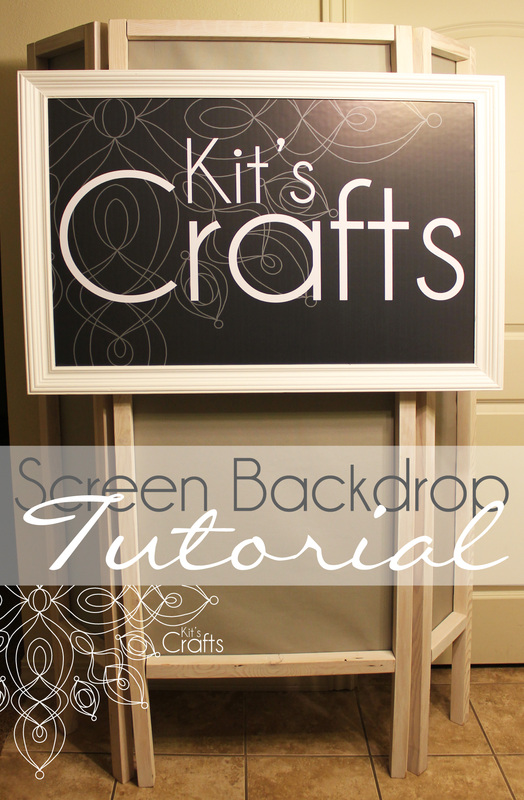
I meant to post this last week, but I got distracted... Anyway, here is a tutorial of the screen I made to go behind my table at the Beehive Bazaar. I mostly followed the tutorial over at Handmade Beautiful. However, I did make some significant changes, namely, I made the middle panel bigger so that the side panels fold flat and I added a cross bar to hang a frame from.
Materials:
6 pieces of 2"x2"x8' furring strips*
2 packs of 2" hinges (4 hinges total)
3 packs of 2" flat corner braces (1 more if you want to make the cross bar to hang a frame from)
about a yard of 48" fabric (I used duck cloth)
Sand Paper (if you don't want to get a SERIOUS workout, use an orbit sander)
Paint or stain (optional)
Drill
Staple guns/staples
*When picking out your wood, make sure that there aren't any large chips or natural dis-figurations. Also, check to make sure non of them are bowing (the two on my front panel do at the bottom...not so great...), by putting each side of each piece on the floor.
Directions:
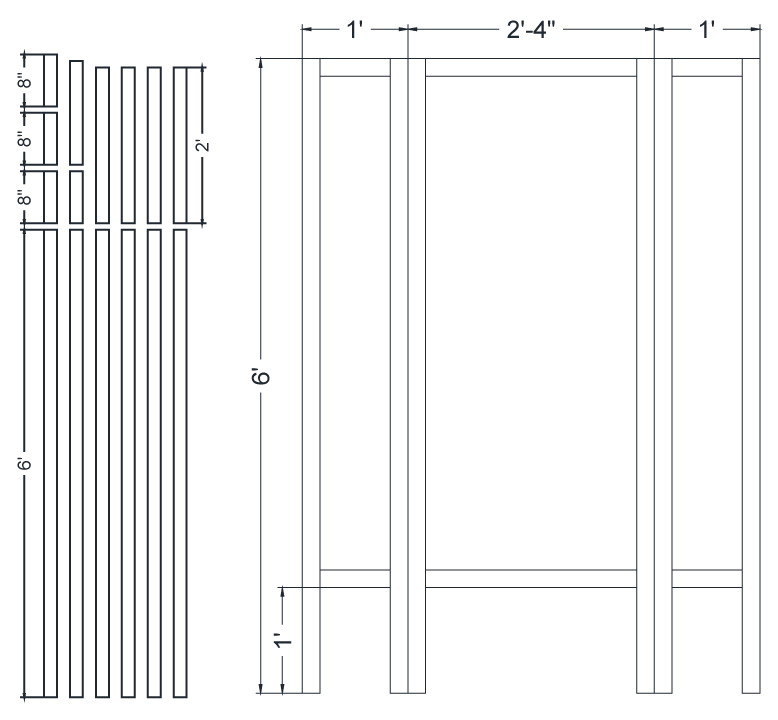
Cut your wood. You will need the following pieces:
four 8" pieces
six 72" pieces
two 24" pieces (one more 24" piece to hang the frame from).
The diagram shows how you can most effectively cut your pieces of wood. Also, if you don't have access to a saw, no fear, Home Depot will usually cut them for a small fee per cut. Sand and paint these pieces.
6 pieces of 2"x2"x8' furring strips*
2 packs of 2" hinges (4 hinges total)
3 packs of 2" flat corner braces (1 more if you want to make the cross bar to hang a frame from)
about a yard of 48" fabric (I used duck cloth)
Sand Paper (if you don't want to get a SERIOUS workout, use an orbit sander)
Paint or stain (optional)
Drill
Staple guns/staples
*When picking out your wood, make sure that there aren't any large chips or natural dis-figurations. Also, check to make sure non of them are bowing (the two on my front panel do at the bottom...not so great...), by putting each side of each piece on the floor.
Directions:
Cut your wood. You will need the following pieces:
four 8" pieces
six 72" pieces
two 24" pieces (one more 24" piece to hang the frame from).
The diagram shows how you can most effectively cut your pieces of wood. Also, if you don't have access to a saw, no fear, Home Depot will usually cut them for a small fee per cut. Sand and paint these pieces.
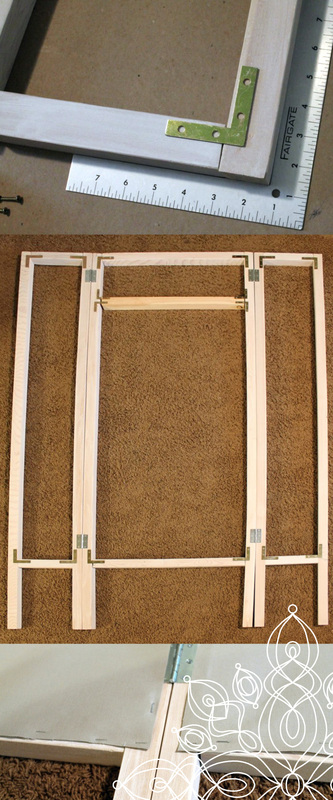
Assemble the pieces using the diagram above for reference. Square up the corners, then using the flat corner braces and a drill, attach each of the pieces to create the panels. Line the small panels on either side of the large panel and, using the hinges and a drill, attach a small panel to either side of the large panel. If you are going to make the cross bar to hang the frame, position the cross bar about 9" from the top then attach, using the extra braces and a drill, to the large panel. Hammer a hook into the middle of the cross bar.
Cut the fabric into two 10" pieces and one 26" piece. Using a staple gun, staple the pieces of fabric to their respective panels. Then stand it up, step back and admire your work!
Cut the fabric into two 10" pieces and one 26" piece. Using a staple gun, staple the pieces of fabric to their respective panels. Then stand it up, step back and admire your work!

You might also like:
 |  |  |  |


 RSS Feed


