Kit's Crafts
  • Home
  • About
    • Selling Handmade Goods
  • Knitting
  • Crochet
  • Sewing
  • Crafting
    • Just for Fun
    • Wall Decor
    • Christmas Fun
    • Party On
  • From the Kitchen
    • Chocolate
    • Sweet
    • Savory
  • Quiet Book
  • The Shop

Wall Garden

1/31/2013

0 Comments

 
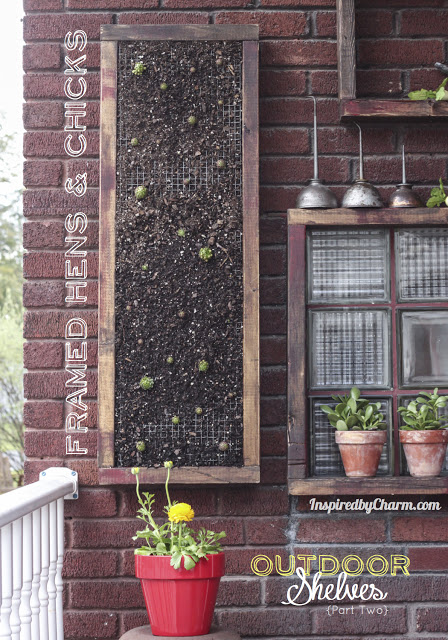
It seems like everyday I am coming across another way that people are integrating plants into their lives. It has become a common trend to have a roof garden, which I love, but the new thing is to go vertical. The first time I saw someone making use of their wall as a garden was, oddly enough, on a Home Depot commercial. Since then, I have seen some ready made wall gardens that I am sure, one day when I no longer live in a condo, I will make use of, but for now, I will stick to growing things on my balcony.
Picture
Here is a ready made version
Picture
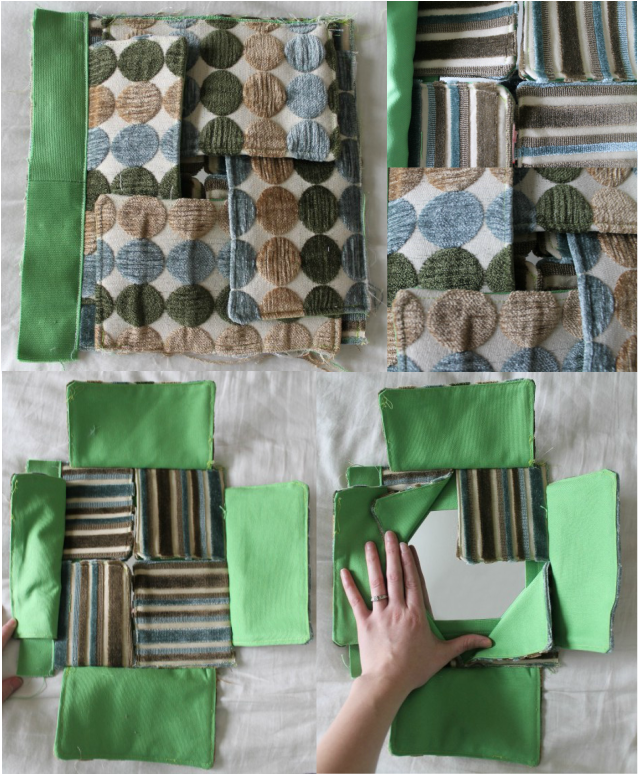
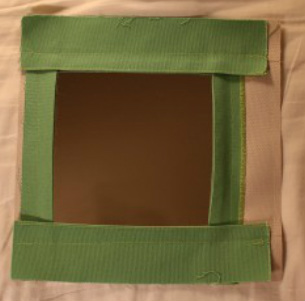
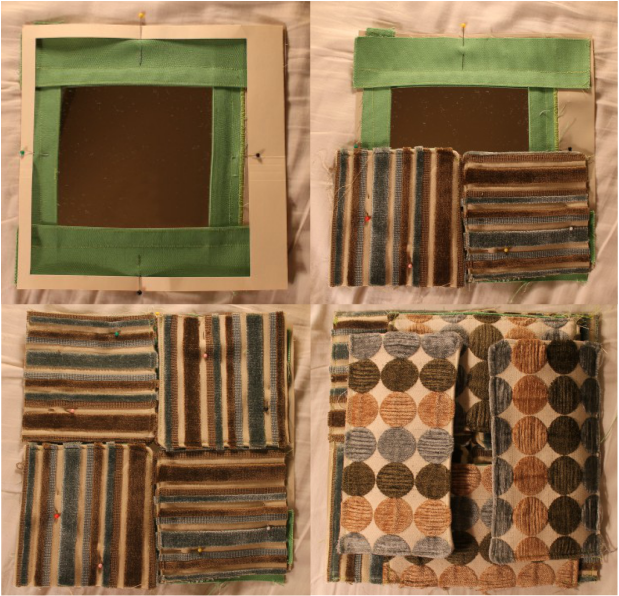
Here is a DIY tutorial
0 Comments

Tales of a Quiet Book, Mirror Page

1/29/2013

1 Comment

 
This is yet another rather simple page. The inspiration for this page came from Orange Crafts. The author created a page with flaps that folded back to reveal a smiling monster. I loved the idea but decided to have a mirror instead of a monster. I had some trouble at first locating a plastic mirror but alas, one day while looking for something entirely different on the Joann's webpage, I found it. I went that day and picked it up.
Picture
Materials Needed:
* Fabric (remember to prewash all fabrics)
* 9"x9" of reinforcement 
* Plastic Mirror
* Glue gun and glue stick
Picture
Flaps:
* Cut four rectangles of fabric (two of the front fabric and two of the back fabric) with the following dimensions: 4 3/4" x 5 1/8", 4 3/4" x 4 3/8", 4 1/2" x 7 1/4" (You should have 12 rectangles)
* Cut two rectangles of fabric (one of the front fabric and one of the back fabric) with the following dimensions: 4 7/8" x 8", 4 1/8" x 8"
* Using the template, with the smaller rectangles first, place the front fabric right side up on the page and place a pin on the sides that need to be sewn
* Place the back fabric of the rectangles over the fronts with right sides together and pin the sides that need to be sewn, then sew the two layers together with a 3/8" seam allowance
* Do the previous two steps for the larger rectangles
* Turn the rectangles right side out and iron
* Sew around the edge for a finished look
Picture
Mirror:
* Cut your mirror into a 6" square
* On your 9" square of reinforcement, measure and mark 1 7/8" from one side (this will be the
binding side), then from the opposite side, measure and mark 1 1/8", from the top and bottom, measure and mark 1.5"
* Put a few lines of glue in the middle of the square you just made then center your mirror and press on to attach
Picture
I was trying to salvage a scrap of fabric which is why the right side doesn't extend to the edge of the reinforcement.
Mirror Frame:
* Cut two 9" x 4" strips, one 9" x 4 3/4" strip and one 9" x 3 1/4" strip
* Fold each of these strips in half lengthwise and iron
* Sew along the fold for a finished look
* Place each strip on the page in the appropriate spot (there should be a half inch overlap of the mirror), then pin and sew to page
Picture
Finishing:
* Using the template, find the centers of the opening
* Line up the small squares on the page according to these centers then pin and sew around the edge of the page
* Again, using the template, center the large rectangles in the opening, then pin and sew around the edge of the page (Once again, I was trying to salvage a scrap which is why there is such a big gap in the center, yours should meet both the edge of the page and at the fold side)
* Attach the binding to the appropriate side
1 Comment

Ricky's Blanket

1/24/2013

0 Comments

 
When my husband and I bought our condo I told him that I really wanted to tile the backsplash in our kitchen. I found out that every May, Contempo Tile has a psycho sale to get rid of discontinued tile and tile from deals that went south. We went last May and found the most beautiful travertine tiles. We walked away with 50 square feet and supplies for installation spending only $80. The only problem is that we do not own a tile saw. So, we contacted a guy my husband works with, Ricky and not only did he let my husband borrow it, but he showed up to help. Below is a picture of the end product, which I must say turned out even better than I had hoped!
Picture
Anyway, as a thank you to Ricky, I made him an afghan. I really don't like to make blankets because it seems to take forever, but Ricky had mentioned he was looking to get one (his house is REALLY cold). My inspiration for the general design of the blanket came from a bathroom mat by Thomas O'brien. I kept the stripe pattern, but changed the colors to go with Ricky's house, then added a wide binding. The final measurements are 72" x 64", so really I guess it is more of a blanket than an afghan. Originally, I had planned on just knitting the blanket, but it was taking forever, so I ended the madness and attached a fabric binding to get the final size.
Kit's Crafts - Ricky's Blanket #FreeKnitPattern
Materials:
* 2-3 Skeins Lion Brand Vanna's Choice in Charcoal Gray
* 2-3 Skeins Lion Brand Vanna's Choice in Fern
* 2-3 Skeins Lion Brand Vanna's Choice in Beige
* 2-3 Skeins Loops and Threads, Impeccable in True Gray
* Size 13 Needles
* Blue Courderoy, two strips measuring 76" x 30" each and two strips measuring 44" x 18" each (Prewash before using)
* Sewing machine and thread

Abbreviations:
CG = Charcoal Grey
CO = Cast On
K = Knit
STS = Stitches

Gauge:
8 Rows and 5.5 Stitches = 2" in Stockinette Stitch

Instructions:
* With a double strand of CH and using a long tail cast on, CO 180 STS. Follow stripe pattern knitting every row with a double strand. Bind off and weave in ends.
* Fold each fabric strip in half lengthwise and iron (two 15" x 76" strips and two 9" x 44" strips)
* Open the fold, then fold up each long side 3" and iron (two 12" x 76" strips and two 6" x 44" strips)
Picture
Complete the following steps fully with each strip one at a time, it will be MUCH easier.
* Pin along the fold  and every so often in the middle to secure the binding folds while you attach the bindings to the blanket
* Lay the blanket out on the floor, it will have some stretch, start with the short sides and adjust the blanket to match 2" shy of the 6" x 44" strip on each side, then pin with long pins being careful to get
through all layers
* Take it to the sewing maching and do a straight stitch with a 3/8" seam allowance

For the long strips:
* Fold over and iron 2" on each of the short sides of the long strips
* Roughly, line up the centers of the stip and the blanket and pin from the center to the ends, adjusting the blanket as you go, matching up the edge of the blanket to the fold just made
* Tuck the short strips into the 2" fold of the long strip ends
* Sew the strip to the blanket
* Repeat with remaining strip

Finishing:
* Sew along the folds/edges of the strips
0 Comments

Tales of a Quiet Book, Birds on a Wire

1/22/2013

1 Comment

 
This is your basic counting page using an abacus. I got the idea from Made by Molly, except that she did a page with birds on a fence. Although the construction of this page is somewhat time consuming because of the birds, overall, this page is fairly easy.
Picture
Materials Needed:
* Fabric (remember to prewash all fabrics)
* Felt for the numbers
* Leather for the "wire" (I found mine in the dollar bin at Walmart)
* Embroidery floss and needle
* 15 wooden beads
* Steam a Seam
* 9"x9" of reinforcement 
* Pattern, remember to UNCHECK the fit to page box
* Duct tape

Assembly:
* Cut a 3" by 9" rectangle for the telephone pole and iron in half lengthwise
* Cut 15 birds from fabric and fron steam a seam
* Cut 5 strips of leather 9" long
* Using template, place pole and leather strips on page, then place and iron birds to page
* Satin stitch around the edge of the birds
* Embroider eyes and beaks
* Place the leather strips again, then, using a zigzag stitch with the length very close together, zigzag through the leather on the side opposite the binding, repeat for all strips
* Thread the beads onto the leather
* One at a time, pull each leather strip taut and use a small piece of duct tape to hold it in place, then repeat the zigzag stitch, being careful to penetrate the leather
* Attach the pole to the page
* Cut the numbers from felt and steam a seam, then iron into place
* Satin stitch around the edge of the numbers
* Attach a 1 1/2" binding
1 Comment

Men's Dress Shirt to Baby Dress

1/17/2013

3 Comments

 
I love the idea of taking something unwanted and making something very much wanted. Such is the case with my latest creation. My sister's husband was getting rid of some dress shirts and instead of donating them, I took two to make the Metro Dress from the blog Shwin & Shwin. It is easily one of the cutest upcycles on the web and stems from a darling dress by J Crew.
Picture
I only made a few changes. I added lace to the bottom and to the tie to play down the masculinity of the pattern. Also, I made the sleeves a little less capped because I want to get a onesie with puff sleeves to put underneath. A change that, in hindsight, I wish I made is to have the buttons extend into the skirt so that the dress would fit her longer, but overall, I am quite pleased with the results.
Picture
So, after looking through the racks at a few different stores I came to the conclusion that finding a puff sleeved onesie would be more challenging than just adding puff sleeves to the dress. I found a great tutorial for puff sleeves and went to town. However, I did depart from the tutorial in that I made my sleeves more of a cap then an actual sleeve.
Picture
3 Comments

3form

1/10/2013

0 Comments

 
Perhaps my all time favorite product as an interior designer is 3form. Is the greatest stuff and it is made right here in Salt Lake City. Basically, they sandwich materials (anything from lace to grass to photos, you name it) between two sheets of resin to create beautiful panels that can be molded into anything imaginable. It is wonderful because it can be used as is or shaped into anything imaginable and it is durable. Not to mention the fact that the company is on a plan to have zero waste. Recently 3form came out with a few additions to their Varia collection and I have to say, I am in love!
Picture
They also have some Ready to Go options, including everything from Ceiling Features to Seating to Column Features and many more.
Picture
The 100 Percent collection displays that something made from recycled materials doesn't need to look recycled.
Picture
3form's LightArt is simply exquisite.
Picture
Needless to say, I LOVE 3form and for those of you who desire this awesome product but are low on budget, check out their Cool Stuff, you can get a bowl (I have one and it is pretty sweet). 
0 Comments

Tales of a Quiet Book, Monsters

1/8/2013

0 Comments

 
On Etsy, you can find several quiet books to gain inspiration, one such book, Monster Album, was the inspiration for this page. I knew I wanted to incorporate a lace up page as well as a weaving page, but nothing was quite hitting the right spot. I saw this page and a couple days later it hit me; monsters under the bed! 
Picture
Materials Needed:
* Fabric (remember to prewash all fabrics)
* Shoelace/ribbon for weaving and lacing (1/4" or bigger, I think mine are too small)
* Felt for the back of the lace up monster
* Buttons for eyes
* 2 Magnets 1/2" in diameter
* (6) 1/4" Eyelets and tools to install (more info below)
* Embroidery thread and needle
* Scotch Tape
* Fray Check
* Steam a Seam
* 9"x9" square of reinforcement for the back of the page, plus extra for lace up monster and magnet
* Pattern

Bedroom:
* Cut window, sky, headboard and pillow from fabric and steam a seam
* Cut 2 beds from fabric
* Using template and bed, position sky, window, headboard and pillow on page and iron
* Satin stitch into place
Picture
Weave Monster:
* Cut monster from fabric and steam a seam
* Position on page using the template and bed, then iron in place
* Cut ribbons to desired length and apply Fray Check to cut side that will not be sewn
* Place a piece of scotch tape sticky side up across the top of the monster
* Place the ribbon where you want it and stick it to the tape
* Flip tape over and stick ribbon to page
* Straight stitch through ribbon then carefully tear away the scotch tape
* Satin stitch across top (I went back over a few times to make sure it was secure)
* Repeat the scotch tape process with the ribbons on the side
* Sew button eyes in place
Picture
Lace Up Monster:
* Cut monster from fabric, reinforcement and steam a seam
* Cut off about 1/8"-1/4" around the edge of the reinforcement monster
* Place reinforcement on felt, then steam a seam, the fabric, face up, and iron in place
* Satin stitch into place, cut from felt
* Place buttons for eyes and sew in place
* Position eyelets around body and mark centers
* Punch holes for eyelets, set eyelets

Ok, so here is the deal with the eyelets. There are two ways you can install them. The typical craft store carries eyelet pliers, which I have and tried but 9 times out of 10, the eyelet would not catch all of the fabric around the hole and/or would just smoosh and look very ugly. So, I headed to Tandy Leather, where I picked up a 1/4" punch, eyelet setter and anvil and the eyelets themselves. I also got a scrap of extra thick leather to protect my table when I was punching the holes and setting the eyelets. The smallest pack of eyelets I could find had 100 eyelets, but no worries, this is how you will bind the pages to each other. P.S. If it isn't obvious, I used a hammer to punch the holes and set the eyelets

* Using the template, position the monster on the page and pin
* Satin stitch the center (as shown in the bottom left picture) to attach to page
* Place a button nose so it covers the satin stitch you just made and sew to the page
* Lace with shoelace
Picture
Bed:
* Cut 4 circles of reinforcement about 2 1/2" to 3" in diameter
* Place one of the magnets in between the two circles
* Satin stitch around the magnet getting as close as possible
* As you are stitching, you will notice that the bottom circle will remain flat while the top one rouches around the magnet, this will be the side that you want to match up with the other magnet
* Find the side of the remaining magnet that attracts to the flat side of the previous magnet and repeat the previous two steps, with the attracted side facing down
* Double check that the flat sides are attracted to one another
* Place the flat side of one magnet against the back of the page roughly where the bed will hit when lifted up (mine overlaps the far left of the window and one of the panes)
* Hand stitch this to the reinforcement being careful not to penetrate the front of the page
* Cut 2 beds from felt, then stack the beds as such: felt, fabric right side up, fabric right side down, felt and sew, using a 3/8" seam allowance, around the sides and bottom
* Turn bed right side out, iron and sew around the sides and bottom as close to the edge as you can
* Place the bed on the page and holding the top in place, fold up the bed and place a pin where the magnets will meet
* Turn bed wrong side out and place magnet flat side down where the pin marks then hand sew to the felt being careful not to catch any fabric
* Turn bed right side out again and place on page then fold up to double check that the magnet is sewn in correctly
* Pin bed to page and satin stitch along the top to attach (I went over this seam a couple times too)

Bear:
* Cut bear from fabric and steam a seam
* Place and iron bear on page
* Satin stitch around edges
* Embroider eyes and nose

Being extra careful not to catch the bed, sew a 1 1/2" binding to the page
0 Comments

Bucking Bronco Hat

1/3/2013

4 Comments

 
Some of you may remember the tractor hat I posted not too long ago. This is essentially the same hat, with the exception of the color work pattern.
Kit's Crafts - Bucking Bronco Hat #FreeKnitPattern
This hat is knitted from the bottom up, starting with the ear flaps. For the body of the hat, I start out knitting in the round then switch to the intarsia in the round method for the Tractor Chart (it could be stranded if the intarsia method is too confusing, but make sure to keep the strands loose as the hat WILL NOT be stretchy) and I finish off the hat by knitting in the round. Also, the braid attached to the ear flaps is an 8-stranded square braid.

This hat is for a child, 4-12 years old. If you would like a different size, adjust your needles and/or your yard.

Print the pattern.

Gauge: 
7 rows is 1", 5.5 STS is 1"

Materials:
Size 4 Double
Point Needles (DPNs) and Circular Needles
1 skein of Caron Simply Soft in Bone and Chocolate
Size E Crochet Hook
Yarn Needle
Bronco Chart

Abbreviations:
MC = Main Color (Chocolate)
CC = Contrast Color (Bone)
CO = Cast On
K = Knit
M1A = Make 1 Away
STS = Stitches
PM = Place Marker
K2Tog = Knit 2 Together
SC = Single Crochet
SL = Slip Stitch

Ear Flaps:
Using the circular needles, with MC, CO 3 STS
Row 1: K1, P to 1 before end, K1
Row 2: K1, M1A, K to 1 before end, M1A, K1
Repeat Rows 1 and 2 until there are 33 STS (30 rows total). Repeat Row 1 once more. Cut yarn. Push the ear flap out of the way of the needles and hold on the circular part.
For the second ear flap, repeat the same process as for the first, but don't cut the yarn.

Hat Body:
Turn and K across the 2nd ear flap. Using a Cable CO, loosely CO 27 STS, K across the 1st ear flap. Again, using the Cable CO, loosely CO 3 STS, PM. (96 STS)
Being careful not to twist, connect for knitting in the round. Knit 2 rows in MC then start Bronco Chart.
Switch to DPNs in the last row of the Bronco Chart.
The rest of the hat will be knitted in the CC.

Decreases:
Round 1: *K10, K2Tog, repeat from * around (88 STS)
Round 2, 4, 6, 8, 10: K around
Round 3: *K9, K2Tog, repeat from * around (80 STS)
Round 5: *K8, K2Tog, repeat from * around (72 STS)
Round 7: *K7, K2Tog, repeat from * around (64 STS)
Round 9: *K6, K2Tog, repeat from * around (56 STS)
Round 11: *K5, K2Tog, repeat from * around (48 STS)
Round 12: *K2, K2Tog, K2 repeat from * around (40 STS)
Round 13: *K3, K2Tog, repeat from * around (32 STS)
Round 14: *K1, K2Tog, K1 repeat from * around (24 STS)
Round 15: *K1, K2Tog, repeat from * around (16 STS)
Round 16: K2Tog around (8 STS)
Cut a 6" tail and using the yarn needle, thread through the remaining STS and pull tight to close up the hole then go through the top of the hat and tie a knot inside of the hat. Weave in loose ends.

Finishing:
SC around the edge of the hat with MC. Weave in ends.
Using CC, loosely SL into the knit stitches around the base of the SCs just made. Weave in ends.
Using MC, make 4 long strands for the braids (I usually just do the length between my hands outstretched). Fold in half and using the crochet hook, pull about an inch of the middle of the strands through the middle of the ear flap, then pull the ends through the loop just made. Cut the ends to about 3" past how long you want the braid to go, then do the square braid and tie a knot at the end. Trim up
the ends if necessary.
4 Comments

Tales of a Quiet Book, Stars

1/1/2013

0 Comments

 
When deciding what I wanted in my daughter's quiet book, I had determined that I wanted a page displaying emotions. I wasn't very successful in finding something that would work, however, I did find a clown page, but I'm not really a fan of clowns.... So, I came up with this super cute little star page.
Picture
Materials Needed:
* Fabric (remember to prewash all fabrics)
* Fuzzy material for cloud pocket
* Felt for the stars on the page, back of the pocket and back of the stars
* Embroidery floss and needle
* 4 buttons (that match your background) with a 3/4" diameter
* Blue mini rope (I found mine in the dollar bin at Walmart in the sewing section)
* Duct tape
* Reinforcement material for the middle of the stars
* Steam a Seam
* 9"x9" square of reinforcement for the back of the page
* Pattern 
Picture
Pocket:
* Cut big Cloud from felt and fuzzy material and small cloud from the fuzzy material and steam a seam (Keep in mind what side you want the binding to be on)
* Position small cloud on large cloud and iron in place (you may need to iron from the back side if fabric is really fuzzy
* Satin stitch along the top of the small cloud to attach
* Position the large fuzzy cloud face down on the large felt cloud and sew along the top
* Understitch the felt side of the pocket, flip right side out and iron
* Line up the pocket with the bottom of the page and baste along the sides and bottom
Picture
Stars:
(This is done in the same fashion as the cupcake tops, just with mini rope loops instead of snaps)
* Cut 4 stars from felt and fabric
* Cut 8 stars from the steam a seam
* Cut 4 strips of the mini rope 3 1/2" long
* Print the words using your choice of font
* Using one of the techniques from this website, transfer the faces and the words to the appropriate stars
* Embroider words and faces (I used a back stitch for the words and any lines, and an embroidery satin stitch for anything that needed to be filled in)
* Using the template, position the word stars and iron to page
* One at a time, iron a fabric star to a strip of felt and satin stitch around the edge then cut the star from the strip
* Fold each mini rope in half and attach to a scrape of reinforcement with duct tape
* Using a zigzag stitch with the length very close together, zigzag through the mini rope loop to attach (the same method used for the clasp on the door of the Dress Up page)
* Cut the scrap of reinforcement around the mini rope loop, being careful not to cut the loop
* Place the mini rope loop on a strip of felt, then place and pin the fabric star over the top
* Straight stitch on the inside of the satin stitch, making sure to sew through the loop
* Cut star from felt being careful not to cut the loop
* Position each face star on the matching word star and place a button where it would need to be for the loop to catch it and the face star to cover the word star, then sew the button in place

Add a 1 1/2" binding to the appropriate side.
0 Comments
    Kit's Crafts
    Hey there! I'm Kristin, aka Kit. Here is just a peek into my crafting mind. I hope you find something to spur your creativity!
    Instagram

    Kit's Crafts Shop

    Popular Posts

    Picture
    Picture
    Picture
    Picture
    Picture
    Picture

    RSS Feed

    Picture
    Kit's Crafts
    Picture
    The Yarn Box

    Featured Here

    Picture
    Moogly
    Picture

    Categories

    All
    About
    Baby
    Baking
    Bio
    Caramel
    Child
    Chocolate
    Christmas
    Cooking
    Crochet
    Decor
    Dessert
    Dress
    Free Knit/crochet Pattern
    Free Sewing Pattern
    Interior Design
    Knitting
    Link Party
    Materials
    Pattern
    Quiet Book
    Quiet Book
    Recipe
    Selling Handmade Goods
    Sewing
    Spats
    T Shirt
    Tutorial

    Archives

    July 2020
    January 2020
    July 2019
    November 2018
    September 2018
    August 2018
    July 2018
    May 2018
    April 2018
    February 2018
    January 2018
    April 2016
    September 2015
    March 2015
    February 2015
    November 2014
    October 2014
    September 2014
    August 2014
    July 2014
    June 2014
    May 2014
    April 2014
    March 2014
    February 2014
    January 2014
    December 2013
    November 2013
    October 2013
    September 2013
    August 2013
    July 2013
    June 2013
    May 2013
    April 2013
    March 2013
    February 2013
    January 2013
    December 2012
    November 2012
    October 2012

Powered by Create your own unique website with customizable templates.