Kit's Crafts
  • Home
  • About
    • Selling Handmade Goods
  • Knitting
  • Crochet
  • Sewing
  • Crafting
    • Just for Fun
    • Wall Decor
    • Christmas Fun
    • Party On
  • From the Kitchen
    • Chocolate
    • Sweet
    • Savory
  • Quiet Book
  • The Shop

U R My Sunshine

5/29/2014

0 Comments

 
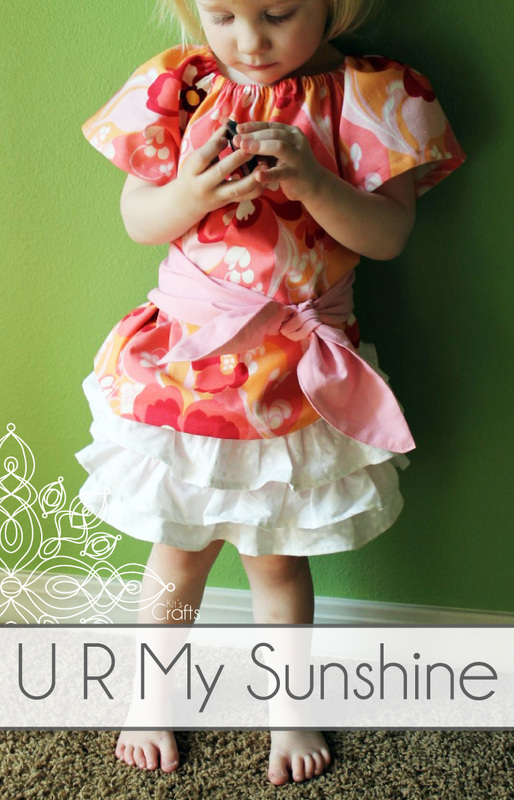
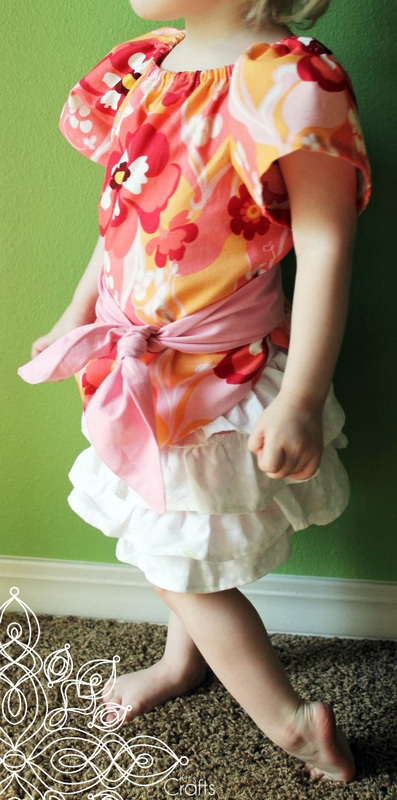
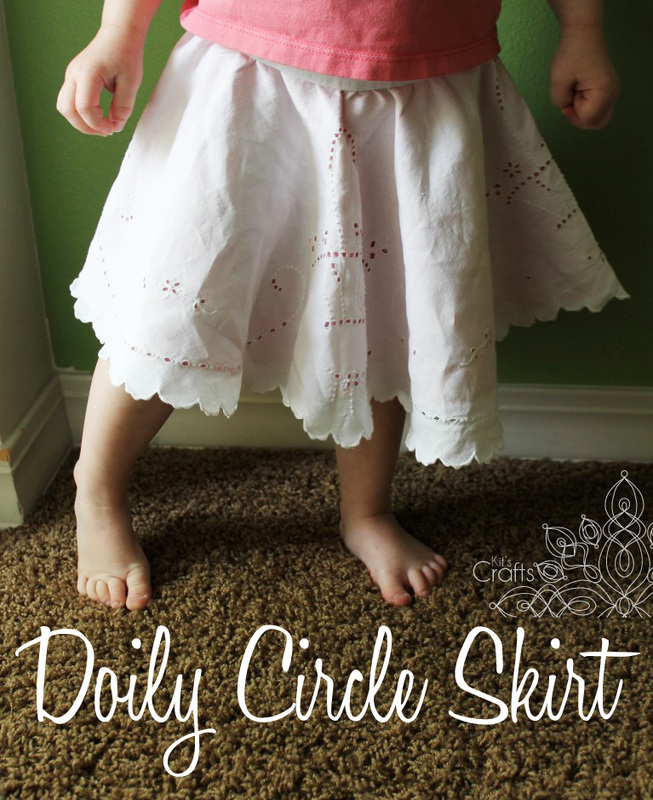
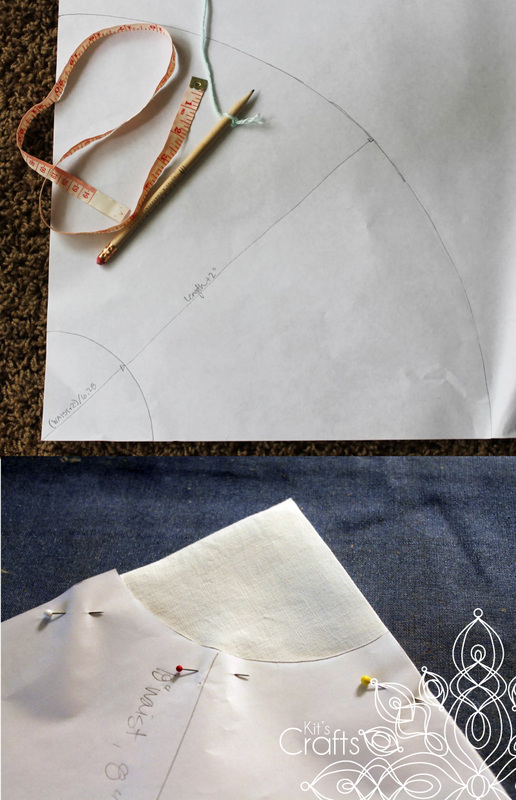
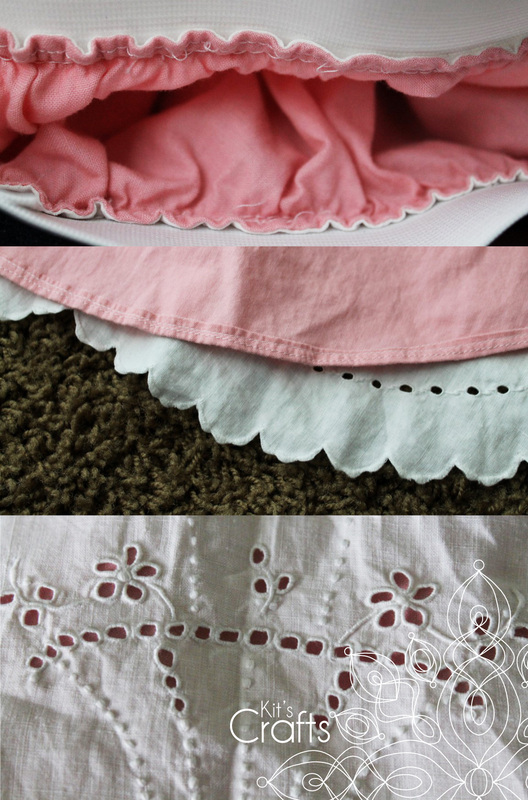
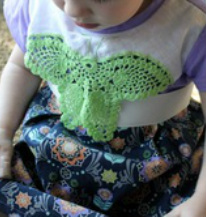
Today's post is a shout out to a wonderful pattern and tutorial by Sewing in No Mans Land. I found this lovely little dress on Pinterest a few months ago and knew it had to happen. Below is my version in which I used fabric remnants.
Kit's Crafts - U R My Sunshine

You might also like:

Picture
Picture
Picture
Picture
0 Comments

Doily Circle Skirt

5/28/2014

0 Comments

 
There are so many crafting mediums I enjoy, but I tend to always go back to a few trusty standbys; namely, knitting, crochet and sewing. Generally, I tend to rotate through the different techniques about every month and a half. However, when I found out last February that I was going to do the Beehive Bazaar, I went into production mode with knit and crochet, so my sewing machine did not leave its' case for quite a while. Apparently, my crafting addiction needed to make up for lost time because in the last two weeks, I sewed this skirt, a dress, a canvas container, a frilly apron and a large tote. Not to mention the 3 projects I have in mind that I still want to sew up. Don't, worry, I will blog about them all and share links to tutorials.
Kit's Crafts - Doily Circle Skirt
This large doily was part of a stack of doilies and lace trims my grandmother gave me about a year ago. To make the pattern for this skirt I primarily followed a tutorial over at Made, which was so great, I didn't feel that it was worth re-doing. The only deviation from the tutorial is to add the doily on top.

Materials:
Large piece of paper (or a few letter sized taped together)
Pencil
Ruler
About 1 yard of fabric (depending on how large the skirt will be)
Sewing machine/thread/pins/scissors
Large Doily
Wide Elastic

Directions:
To make the pattern, go to this tutorial over at Made. Keep in mind how long the doily is and whether you want the skirt to extend past the bottom, just reach it or not hit the hem at all (like I did). Once you have the pattern drawn up, cut it from your fabric as described in the tutorial, then create a rolled hem along the bottom edge of your fabric.
Kit's Crafts - Doily Circle Skirt
Fold your doily in half and iron the fold, then fold it in half again and iron the fold. Now, line up your pattern to the folded edge of the doily and cut the hole for the waist. Unfold the doily and lay it right side up on the table, then place your fabric skirt on top of the doily, right side up as well. Pin around the waist, then sew at your determined seam allowance. Then bring the doily through the waist hole and on top of the fabric skirt and iron along the seam. Lastly, go back to the tutorial to add in the waist band.
Kit's Crafts - Doily Circle Skirt
I forgot to take progress pictures as I was sewing, so here are some close ups of the skirt.

You might also like:

Picture
Picture
Picture
Picture
0 Comments

Behind the Scenes

5/22/2014

0 Comments

 
I have been meaning to create this post for a while. I live in a tiny two bedroom condo and I have a child, which means a room dedicated to crafting is a lofty dream. I have had to get creative on where to store all of my materials as well as when and where I craft. Last summer I hit a breaking point when one of my crochet hooks was lost in an effort to clear the kitchen table. I NEEDED my own space where I could put my projects that the toddler couldn't reach and that wouldn't be in the way of every day life. I found my solution online at IKEA, however, I had a very small budget to work with, so I turned to the online classifieds of a local newspaper. To my great surprise, I found the exact desk I was looking for unused and put together for a lot less. Of course I immediately called and left messages on both phone numbers listed, then agonizingly waited 2 whole days before I heard back that I could come get the desk. To my surprise, I wasn't the first person to call, however I was the first message the seller listened to. This desk has truly saved my sanity as I can now stop in the middle of a project and know that it will remain untouched until I am ready to get back into the zone.
Kit's Crafts - Behind the Scenes
I figured it was worthwhile to also show where I store/hide my supplies, despite the fact that it is not nearly as pretty or well organized as the craft spaces I have seen on Pinterest. First off is one side of our TV stand.
Picture
Next up a corner of my daughter's closet.
Picture
Lastly, a bit of space in our walk-in closet.
Picture

You might also like:

Picture
Picture
Picture
Picture
0 Comments

Screen Backdrop Tutorial

5/20/2014

0 Comments

 
I meant to post this last week, but I got distracted... Anyway, here is a tutorial of the screen I made to go behind my table at the Beehive Bazaar. I mostly followed the tutorial over at Handmade Beautiful. However, I did make some significant changes, namely, I made the middle panel bigger so that the side panels fold flat and I added a cross bar to hang a frame from.
Kit's Crafts - Screen Backdrop Tutorial
Materials:
6 pieces of 2"x2"x8' furring strips*
2 packs of 2" hinges (4 hinges total)
3 packs of 2" flat corner braces (1 more if you want to make the cross bar to hang a frame from)
about a yard of 48" fabric (I used duck cloth)
Sand Paper (if you don't want to get a SERIOUS workout, use an orbit sander)
Paint or stain (optional)
Drill
Staple guns/staples

*When picking out your wood, make sure that there aren't any large chips or natural dis-figurations. Also, check to make sure non of them are bowing (the two on my front panel do at the bottom...not so great...), by putting each side of each piece on the floor.

Directions:
Cut your wood. You will need the following pieces:
four 8" pieces
six 72" pieces
two 24" pieces (one more 24" piece to hang the frame from). 

The diagram shows how you can most effectively cut your pieces of wood. Also, if you don't have access to a saw, no fear, Home Depot will usually cut them for a small fee per cut. Sand and paint these pieces.
Kit's Crafts - Screen Backdrop Tutorial
Assemble the pieces using the diagram above for reference. Square up the corners, then using the flat corner braces and a drill, attach each of the pieces to create the panels. Line the small panels on either side of the large panel and, using the hinges and a drill, attach a small panel to either side of the large panel. If you are going to make the cross bar to hang the frame, position the cross bar about 9" from the top then attach, using the extra braces and a drill, to the large panel. Hammer a hook into the middle of the cross bar.

Cut the fabric into two 10" pieces and one 26" piece. Using a staple gun, staple the pieces of fabric to their respective panels. Then stand it up, step back and admire your work!
Kit's Crafts - Screen Backdrop Tutorial

You might also like:

Picture
Picture
Picture
Picture
0 Comments

Almond Meringue Kisses

5/15/2014

0 Comments

 
Last week I made some strawberry bars, which use 4 egg yolks and I just couldn't bring myself to throw the whites away. So, I made these meringue kisses and dipped them in chocolate. They are soooo good!
Kit's Crafts - Almond Meringue Kisses dipped in chocolate
Makes about 48 kisses.

Ingredients:
4 large Egg Whites
1 teaspoon Cream of Tarter
1/2 cup Powdered Sugar
1/2 cup plus 2 tablespoons Granulated Sugar
1 teaspoon Almond Extract
1/2 teaspoon Vanilla Extract
2 cups Chocolate Chips

Directions:
Preheat oven to 225 degrees. Line 2 baking sheets with parchment paper.

In a metal bowl, either in a stand mixer with a whisk attachment or hand-held beaters, whisk the egg whites until foamy, then add in the cream of tarter and mix until fluffy. Very slowly pour in the sugars while beating the whites then the almond and vanilla extracts. Continue beating until firm, glossy peaks form.

Using a rubber spatula, gently spoon the meringue into a pastry bag with a large star tip (Wilton 2D or 1M) or a ziplock bag with the tip cut off one corner. Pipe little kisses onto the prepared baking sheets about 1/2" apart. They can be closer, because they don't rise much, but you don't want them to touch because they will stick to each other.

Carefully place the baking sheets in the oven and bake for 1 hour, then, without opening the oven, turn off the heat and let the cookies cool over night in the oven.

Melt the chocolate chips in the microwave or in a double boiler. Once all of the chips have melted, dip half of each of the kisses in the chocolate and place on a baking sheet lined with wax paper. DO NOT put the kisses in the fridge. Once the chocolate has cooled, store in an air tight container for up to 3 days (although they are best eaten the day they are made).

You might also like:

Picture
Picture
Picture
Picture
0 Comments

DIY Crayons

5/13/2014

0 Comments

 
I'm not entirely sure how it happened, but my daughter acquired a TON of crayons over the last year or so. This wouldn't be that big of a deal except that every time she got the crayons out she had to dump them all onto the table so they rolled all over. Granted, she would eventually line them up then tell me she put them to bed (picture at the end), still, clean up was a pain. To solve this, I decided we would melt them down into larger crayons.
Kit's Crafts - DIY Crayons
You can use various molds to make these crayons. Most people I have seen online used old muffin tins. I used an ice cube tray I found at IKEA for $1. Whatever you use, the crayons will ruin it, unless you line the mold with foil or something. The picture below is of my mold after removing the crayons.
Kit's Crafts - DIY Crayons
Materials:
Mold (see paragraph/picture above)
Crayons, unwrapped and broken into pieces no larger than 1"
Baking tray lined with foil

Directions:
Preheat oven to 225 degrees. Place crayons in the mold then put the mold on top of the foil lined tray, then put in the oven. "Bake" the crayons until fully melted, about 20 minutes. Remove from oven and allow to cool to room temperature. Place the mold in the freezer for about 10 minutes then remove the crayons from the mold.
Kit's Crafts - DIY Crayons

You might also like:

Picture
Picture
Picture
Picture
0 Comments

The Beehive Bazaar is On!

5/8/2014

0 Comments

 
The day has finally come! I set up my booth last night for the Beehive Bazaar!
Kit's Crafts - The Beehive Bazaar is On!

You might also like:

Picture
Picture
Picture
Picture
0 Comments

Beehive Bazaar Sneak Peeks

5/6/2014

0 Comments

 
I am so excited! Set up is tomorrow for the Beehive Bazaar! It started last weekend, but I only signed up for this weekend. I have been so busy tying loose ends (literally) and getting things ready I haven't had time to really put together a proper post for today. So, I will share some sneak peeks of the products I will be selling.
Kit's Crafts - Beehive Bazaar Sneak Peeks
These are close up of some of the shoe collars pre-buttons. Most of the designs are new for this event.
Kit's Crafts - Beehive Bazaar Sneak Peeks
I blocked some doilies that I crocheted up and attached them to chains. They turned out so great!
Kit's Crafts - Beehive Bazaar Sneak Peeks
I made a bunch of different hair clips. I think I like the little buttons best...

You might also like:

Picture
Picture
Picture
Picture
0 Comments

Carbonara

5/1/2014

0 Comments

 
My husband lived in Italy for a couple of years before we were married and this is a dish he learned to make while he was living there. I have tweaked it a bit to enhance some of the flavors along with adding left over ham. It is easily one of my favorite dishes to make because it is so easy and so delicious!
Kit's Crafts - Carbonara
Ingredients:
1 tablespoon Olive Oil
1 Medium Onion, chopped
Pepper
4-5 strips of Bacon, chopped
1 cup Honey Glazed Ham, cut to about 1/2" cubes
2 - 3 teaspoons Dark Brown Sugar (optional, just adds a bit of sweet to the savory)
2 - 3 cloves Garlic, minced
6 Eggs
2 teaspoons Italian Seasonings
1/4 cup Milk
1 pound dry spaghetti
1/2 - 1 cup Shredded Parmesan Cheese

Directions:
Cook the spaghetti according to package directions, reserving about 1/4 cup of the cooking liquid. Put the spaghetti back into the cooking pot, once drained, along with the reserved cooking liquid.

In a large frying pan, heat the oil over medium heat. Once the pan is hot, add the onions and sprinkle with pepper. Fry until the onions just start becoming translucent, about 5 minutes, then add the bacon, stirring occasionally until bacon gets crispy, about 8 minutes. Add the ham, brown sugar and garlic. Saute until mixture is well coated with the brown sugar and caramelized a bit.

In a medium bowl, combine eggs, milk and seasonings. Add the egg mixture, bacon mixture and all but about 1/4 cup of the Parmesan cheese to the noodles and stir until eggs scramble. You may need to turn the burner on depending on how hot your noodles are. Garnish with remaining Parmesan cheese and serve.

You might also like:

Picture
Picture
Picture
Picture
0 Comments
    Kit's Crafts
    Hey there! I'm Kristin, aka Kit. Here is just a peek into my crafting mind. I hope you find something to spur your creativity!
    Instagram

    Kit's Crafts Shop

    Popular Posts

    Picture
    Picture
    Picture
    Picture
    Picture
    Picture

    RSS Feed

    Picture
    Kit's Crafts
    Picture
    The Yarn Box

    Featured Here

    Picture
    Moogly
    Picture

    Categories

    All
    About
    Baby
    Baking
    Bio
    Caramel
    Child
    Chocolate
    Christmas
    Cooking
    Crochet
    Decor
    Dessert
    Dress
    Free Knit/crochet Pattern
    Free Sewing Pattern
    Interior Design
    Knitting
    Link Party
    Materials
    Pattern
    Quiet Book
    Quiet Book
    Recipe
    Selling Handmade Goods
    Sewing
    Spats
    T Shirt
    Tutorial

    Archives

    January 2020
    July 2019
    November 2018
    September 2018
    August 2018
    July 2018
    May 2018
    April 2018
    February 2018
    January 2018
    April 2016
    September 2015
    March 2015
    February 2015
    November 2014
    October 2014
    September 2014
    August 2014
    July 2014
    June 2014
    May 2014
    April 2014
    March 2014
    February 2014
    January 2014
    December 2013
    November 2013
    October 2013
    September 2013
    August 2013
    July 2013
    June 2013
    May 2013
    April 2013
    March 2013
    February 2013
    January 2013
    December 2012
    November 2012
    October 2012

Powered by Create your own unique website with customizable templates.