
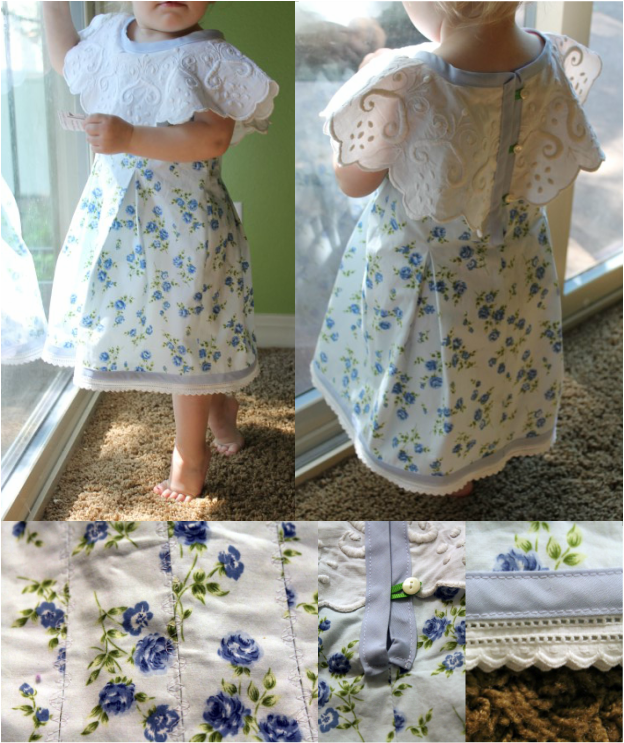
A few weeks back, I visited my grandma with my sister. My grandma is an AVID garage saler. Most weekends are planned around at least a few sales, which means that she has some really great stuff. Luckily for me, she decided it was time to go through some of the doilies and lace trims that she has been hanging onto for years and give them away. She had a large stack of beautiful doilies that she parted with, half went to my sister, half to me. I knew that at least a couple of them needed to become clothing for my daughter. Well, last week, I used a lovely fabric remnant I had in my stash to create a dress using the #doily as a collar. Below are the results.
Just as a heads up, this tutorial is not intended for a beginner. I am assuming that you have some knowledge of making clothes and using your sewing machine. However, I am happy to answer any questions you may have about my process. I don't claim to be a trained seamstress and there are most likely ways of doing things that I haven't thought of, I am just outlining what I did. As always, constructive suggestions are welcome.
Materials:
Large fabric doily
At least 20" of fabric (for an 18 month old)
Thin cardboard or cardstock
3 yards double fold 1/2" bias tape
3 yards lace trim
3 buttons
1/4" ribbon to make button loops
A dress that already fits well
Sewing machine/thread/pins
Iron/Ironing board
Rotary cutter/Mat/Straight edge
Prepping the fabric:
Pre-wash and iron all of your fabrics. If you have never made your own pattern before, you may want to get a brush up from the Shwin Sisters. They have some really great sewing tutorials in general, however, I will show you some basics in this tutorial.
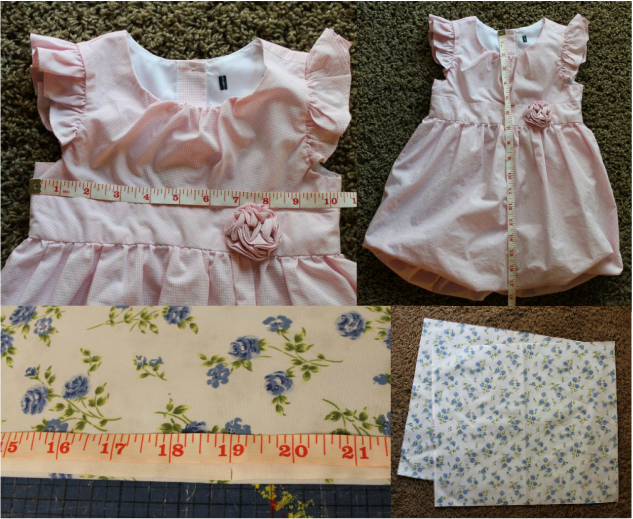
I started by taking a dress that fits my daughter well and measured the waist and the length. I added 10" to the waist (to account for the pleats and seam allowance) and an inch for the length because I had originally planned to do a rolled hem. Then I straightened out the edges of my fabric (Seven Alive has a good tutorial on this) and ironed my folds to make sure they stayed put. From there, I measured 19" (my length) from the edge I just straightened and used my rotary cutter and a straight edge to make this cut. Then I cut my waist width to create two squares of fabric, one for the front and one for the back.
Materials:
Large fabric doily
At least 20" of fabric (for an 18 month old)
Thin cardboard or cardstock
3 yards double fold 1/2" bias tape
3 yards lace trim
3 buttons
1/4" ribbon to make button loops
A dress that already fits well
Sewing machine/thread/pins
Iron/Ironing board
Rotary cutter/Mat/Straight edge
Prepping the fabric:
Pre-wash and iron all of your fabrics. If you have never made your own pattern before, you may want to get a brush up from the Shwin Sisters. They have some really great sewing tutorials in general, however, I will show you some basics in this tutorial.
I started by taking a dress that fits my daughter well and measured the waist and the length. I added 10" to the waist (to account for the pleats and seam allowance) and an inch for the length because I had originally planned to do a rolled hem. Then I straightened out the edges of my fabric (Seven Alive has a good tutorial on this) and ironed my folds to make sure they stayed put. From there, I measured 19" (my length) from the edge I just straightened and used my rotary cutter and a straight edge to make this cut. Then I cut my waist width to create two squares of fabric, one for the front and one for the back.
Pleats:
To make the bodice portion, I did three pleats in the front and 2 pleats on the back. (If my outline isn't enough, Tumbling Blocks has a more detailed tutorial for Honeycomb Smocking that uses this same method). For my pleats, I cut two strips of thin cardboard (a cereal box works great), one at 3/4" wide and the other at 1 1/2" wide. With my fabric face up, I found the center of my front rectangle and lined up the smaller strip with the center, then I folded my fabric over the strip and ironed it. Then I lined up the same strip with the edge of the fold and folded the fabric back over the strip and ironed again. I took the same strip and lined it up to the left of the center line, then folded my fabric over the strip and ironed it. Then, once again, I lined up the strip with the fold I just created, folded my fabric back over the strip and ironed it. That created my first box pleat. I pinned these folds, then flipped my fabric over and removed the pins.
For the remaining pleats, I first placed the 1 1/2" strip under the pleat and folded the fabric over the strip and ironed it. Then I lined up the smaller strip with the edge of the fold, folded the fabric back over and ironed it. Then I pinned all of the pleats, and flipped the fabric back to being face up and repeated the same process to create the other side of the pleat. I repeated these steps again for the final pleat. Then I pinned all of the pleats at the top and about 10" down to hold them in place.
To make the pleats on the back side, I folded the back rectangle in half and cut along this fold, making 2 back panels. Then I followed the process outlined in the first paragraph to create one box pleat in the middle of each back panel.
Next, I took my doily and folded it in half and ironed it. I lined this fold up with the top edge of my pleats and measured to about 1" below the pleat. I then sewed the pleats shut with a decorative stitch.

Creating the pattern:
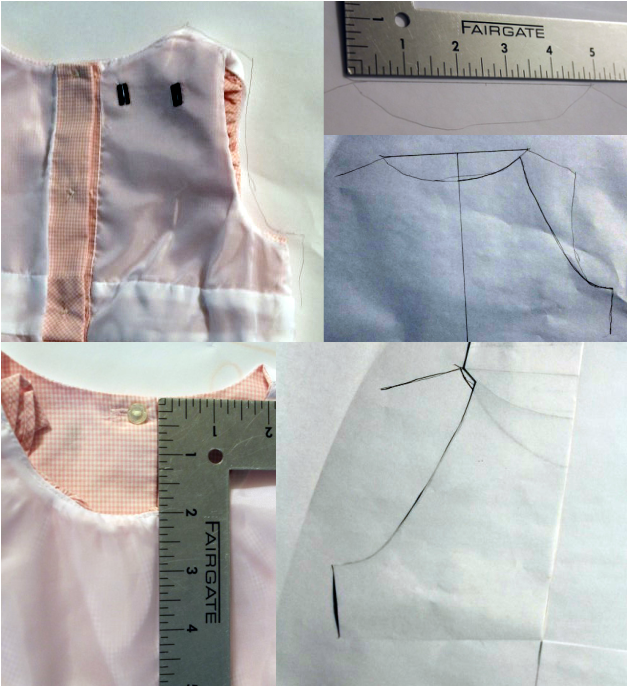
Once again, I referred back to the dress I had that fits well. I used this to create a base for the pattern I wanted for the doily dress. I really only need to see how the neck line and the arms worked because I already had my dress length, so I started by tracing the neck and one of the arms. Then I measured the neck to find the middle and drew a line from this point as a center reference. I then drew how I wanted the arms of the doily dress to go. I cut the arm portion of this, keeping the neck line in tact. Then, I measured the distance in height between the front and back neckline on the dress I already had. I transferred this measurement to the pattern and drew in a neckline on the other half. Then, I folded the arm hole I had already drawn and traced it for the front piece. I cut all of my pieces out and kept the neck line pieces for the doily and to position the arm holes.
As a side-note, I am planning on using bias tape to finish the edges, which is why I didn't account for a hem. Also, I used the edge of the armhole, but did not cut the side of the dress as I didn't account for the seam allowance in the pattern. You will see what I did there later.
Cutting the fabric/doily:
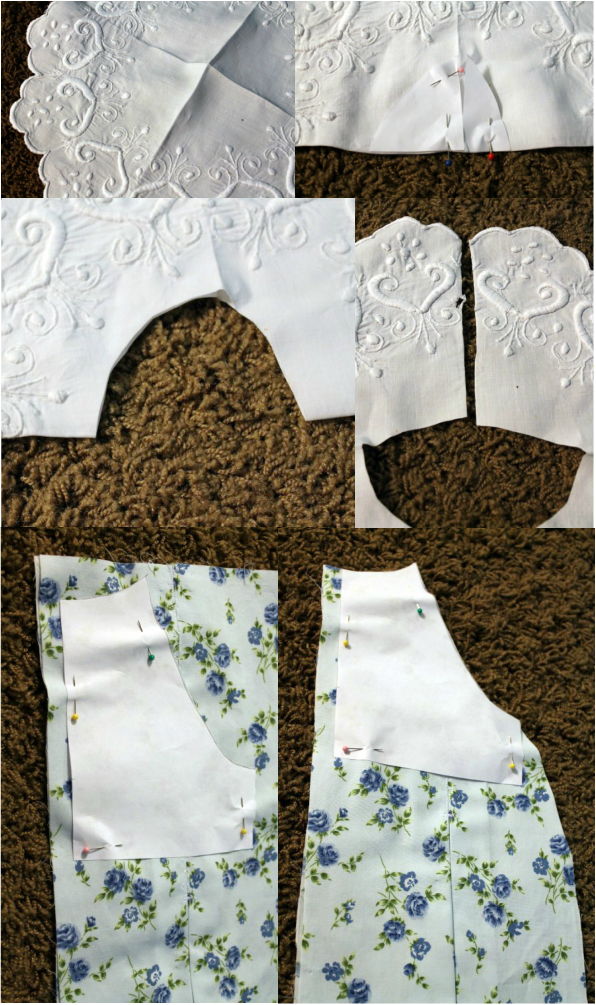
I started with the doily, by first scouting out any imperfections. Mine had a small hold in the decoration on one side. I knew I could hide this with the bias tape, so I strategically decided that it would be in the back. Then, I ironed the doily in half along this hole and flipped it 90 degrees and ironed the doily in half again. Then, I folded my doily so that the arm sides were unfolded. I then took my neckline pieces and lined them up and pinned them in place. I cut the neck line, then I cut along the fold for the back side (where the hole was) to account for the buttoned edge. Then I grabbed my pleated fabric and, starting with the back side, I placed my armholes 1/2" from the inside edge for the seam allowance. Then I used the neckline pattern piece to determine how far from the top the arms needed to sit. Once in place, I cut the arms and neck out. For the front, I folded my pleated fabric in half to find the center and lined up my armhole with the center fold, again using the neckline piece to determine how far from the top it needed to be and cut the armholes for this. I cut a diagonal out from the armhole edge along the side so that the sides would taper out once they were sewn together.
I started with the doily, by first scouting out any imperfections. Mine had a small hold in the decoration on one side. I knew I could hide this with the bias tape, so I strategically decided that it would be in the back. Then, I ironed the doily in half along this hole and flipped it 90 degrees and ironed the doily in half again. Then, I folded my doily so that the arm sides were unfolded. I then took my neckline pieces and lined them up and pinned them in place. I cut the neck line, then I cut along the fold for the back side (where the hole was) to account for the buttoned edge. Then I grabbed my pleated fabric and, starting with the back side, I placed my armholes 1/2" from the inside edge for the seam allowance. Then I used the neckline pattern piece to determine how far from the top the arms needed to sit. Once in place, I cut the arms and neck out. For the front, I folded my pleated fabric in half to find the center and lined up my armhole with the center fold, again using the neckline piece to determine how far from the top it needed to be and cut the armholes for this. I cut a diagonal out from the armhole edge along the side so that the sides would taper out once they were sewn together.
Sewing the pieces together:
Now comes the fun part! I sewed the two back panels together first, leaving about 8" of the top open for the buttons. Then I cut from the top down to where I had stopped sewing. From here, I pinned the back to the front (right sides together, of course) and sewed the sides using a 1/2" seam allowance. Then I pressed the seams open.
With the dress basically sewn together, its time to finish the edges, which is a bit tricky. You will notice that with store bought double fold bias tape, one side is a little bit shorter than the other. This goes on the inside. Begin with the armholes first. Open up the bias tape and line up the edge of the shorter side with the edge of the wrong side of the fabric while pinning the tape in place. Sew along the fold closest to the edge. Next, fold the tape back and it will automatically go over the unfinished edge. The fold on the longer side should fall just below the seam you just sewed. Now, sew the other fold to the dress to finish up the edge. Repeat this for the remaining armhole.
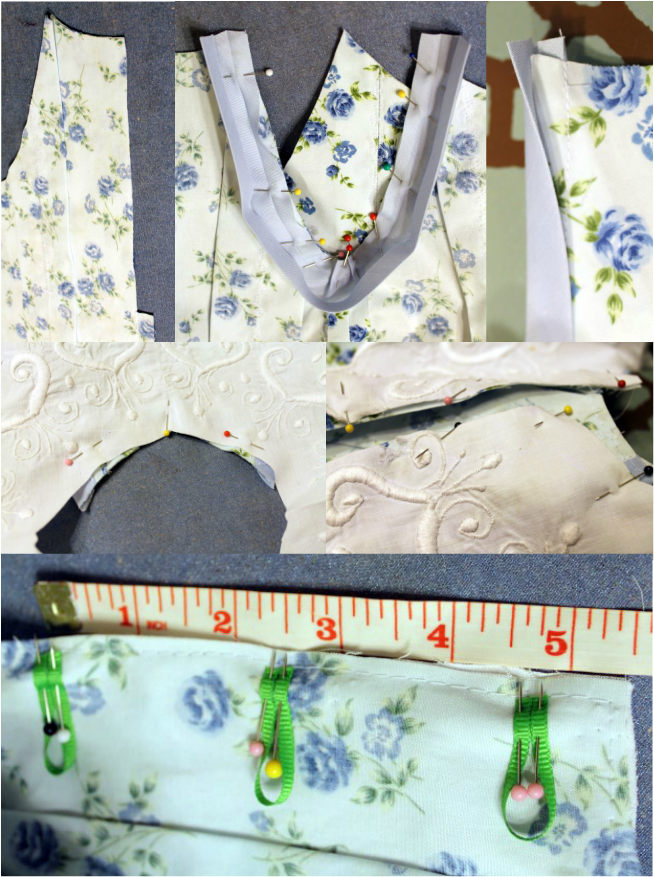
Line up the doily neckline with the dress neckline and baste them together using about 1/4" seam allowance. For the button loops, line up the edge of your ribbon with the inside of the dress, then place the bias tape on top, fold the ribbon over that and go to where you want your button to be. This should be half of the length you need, so fold the ribbon at this point and cut to match the end. Cut as many of these lengths of ribbon as you want buttons. Next, fold these lengths of ribbon in half and line them up with the inside edge of one back panel on the wrong side of the fabric and pin (as shown in the picture). Then, follow the same procedure for attaching the bias tape as you did for the arm holes, taking care when going over the button loops. Before sewing the front side of the bias tape, flip and pin the button loops so they are facing the right direction.
All that remains is the bottom. Again, follow the same process for attaching the bias tape as the armholes, but before sewing the front, pin in a lace trim.
Now comes the fun part! I sewed the two back panels together first, leaving about 8" of the top open for the buttons. Then I cut from the top down to where I had stopped sewing. From here, I pinned the back to the front (right sides together, of course) and sewed the sides using a 1/2" seam allowance. Then I pressed the seams open.
With the dress basically sewn together, its time to finish the edges, which is a bit tricky. You will notice that with store bought double fold bias tape, one side is a little bit shorter than the other. This goes on the inside. Begin with the armholes first. Open up the bias tape and line up the edge of the shorter side with the edge of the wrong side of the fabric while pinning the tape in place. Sew along the fold closest to the edge. Next, fold the tape back and it will automatically go over the unfinished edge. The fold on the longer side should fall just below the seam you just sewed. Now, sew the other fold to the dress to finish up the edge. Repeat this for the remaining armhole.
Line up the doily neckline with the dress neckline and baste them together using about 1/4" seam allowance. For the button loops, line up the edge of your ribbon with the inside of the dress, then place the bias tape on top, fold the ribbon over that and go to where you want your button to be. This should be half of the length you need, so fold the ribbon at this point and cut to match the end. Cut as many of these lengths of ribbon as you want buttons. Next, fold these lengths of ribbon in half and line them up with the inside edge of one back panel on the wrong side of the fabric and pin (as shown in the picture). Then, follow the same procedure for attaching the bias tape as you did for the arm holes, taking care when going over the button loops. Before sewing the front side of the bias tape, flip and pin the button loops so they are facing the right direction.
All that remains is the bottom. Again, follow the same process for attaching the bias tape as the armholes, but before sewing the front, pin in a lace trim.


 RSS Feed


