Kit's Crafts
  • Home
  • About
    • Selling Handmade Goods
  • Knitting
  • Crochet
  • Sewing
  • Crafting
    • Just for Fun
    • Wall Decor
    • Christmas Fun
    • Party On
  • From the Kitchen
    • Chocolate
    • Sweet
    • Savory
  • Quiet Book
  • The Shop

DIY Bracelet Pegs

4/25/2013

0 Comments

 
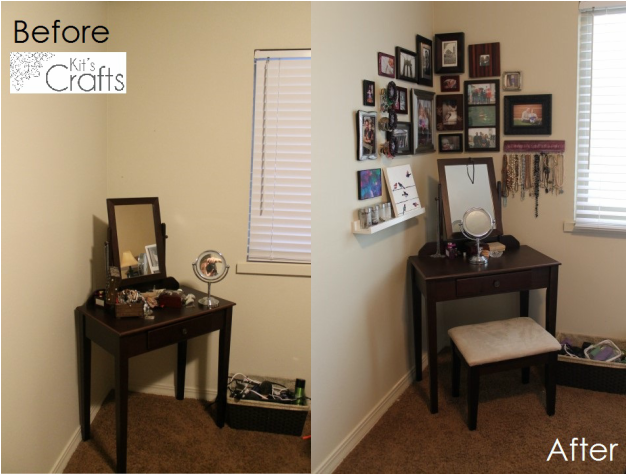
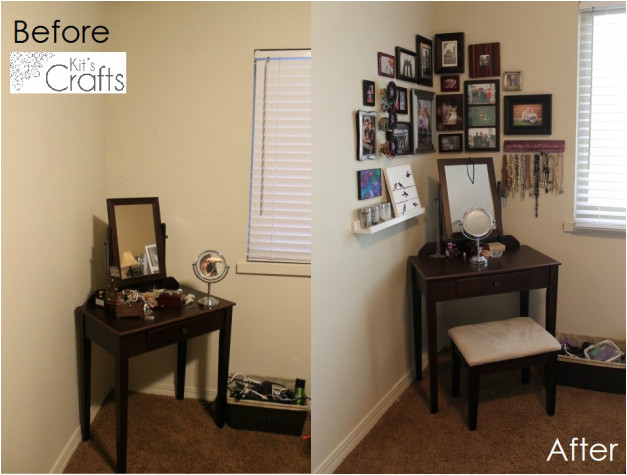
If you remember from my last post, I redid my "getting ready" corner, as evidenced below.
Picture
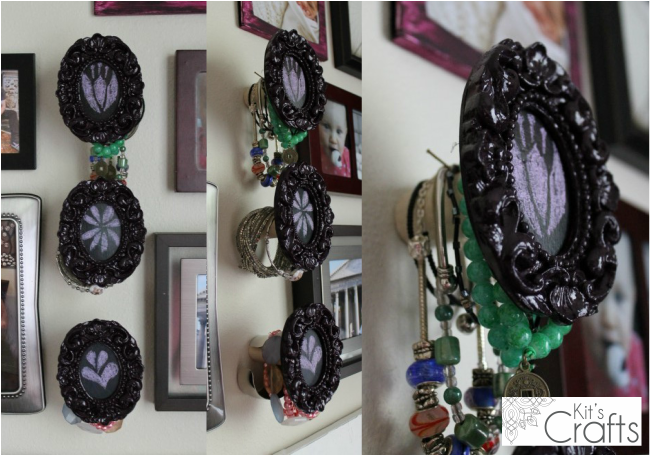
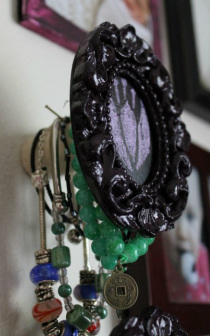
After finishing my Necklace Hooks, I realized I needed somewhere to put my bracelets and my hair things. Originally, I was planning on keeping these things in the jewelry box I already had, but it was still just a jumbled mess, so again, I looked to the internet for inspiration and came across some DIY wall pegs for a child's room from Dot Coms For Moms. I used the basic construction, but I wanted to cap it with something clever. After racking my brain for a couple weeks and remaining stumped, I was standing in line at Michael's and looked down at the dollar bin to find some really cute, intricate little frames in neon hues. I grabbed a few and some chalkboard paint and headed home. (The tutorial for this is at the bottom)
Kit's Crafts - Bracelet Pegs
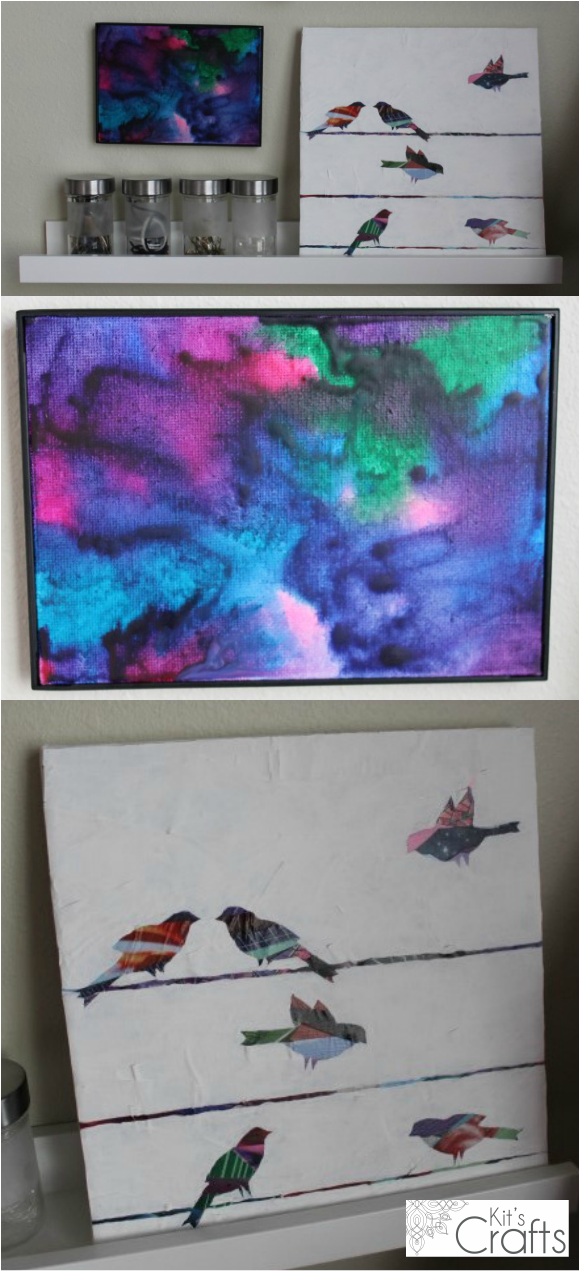
So, the only issue remaining for this make-over was what to do with my hair ties and bobby pins. I figured that I could solve this through some finds at Ikea so off I went. In the kitchen section, I was lured by the Droppar Spice jars, but was unsuccessful in finding something cheap to attach them to the wall, until I hit the As-Is section. It was there that I discovered the Ribba Picture ledge, which worked out beautifully! I added a couple projects I found online (Crayon Melting from Her Campus and Mod Podge Silhouette from Tatertots and Jello) to complete the look and the make-over was done!
Kit's Crafts - Picture Ledge
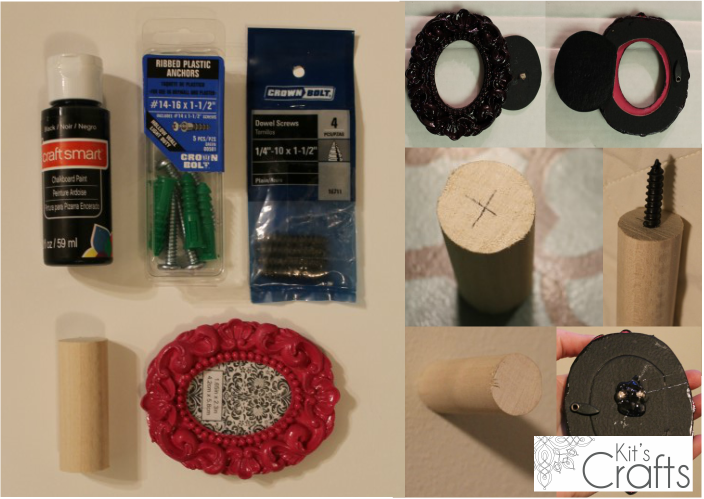
Bracelet Pegs Materials:
* 3 Small frames (about 3")
* Craft Knife
* Chalkboard Paint
* Foam Brush
* Chalk
* 1" Dowl cut into 3 2" sections (you can have this done at Home Depot)
* Drill
* (3) 1/4" Dowl Screws
* Pliers
* (3) #14 Plastic anchors
* Glue Gun and Glue Sticks

Start by opening up the frame and carefully cutting out the plastic with the craft knife and paint the frame if you so choose. Then paint the cardboard back with the chalkboard paint. (Make sure to shake the bottle really well, if it comes out watery, shake it up more. It should be similar to acrylic paint in consistency.) Draw pictures in the frames with chalk.

Next, if needed, sand the edges of the dowels, then find the center and mark. Drill a hole here, then with pliers, turn the dowel screws into each hole. Mark on the wall where you want the pegs to go, then drill a hole. Hammer in plastic anchors then screw each dowel into wall.

Put a large dollop of hot glue on the back of each frame and push onto the end of each dowel; holding for about a minute to set.
Kit's Crafts - Bracelet Pegs Process
0 Comments

DIY Jewelry Hooks

4/23/2013

0 Comments

 
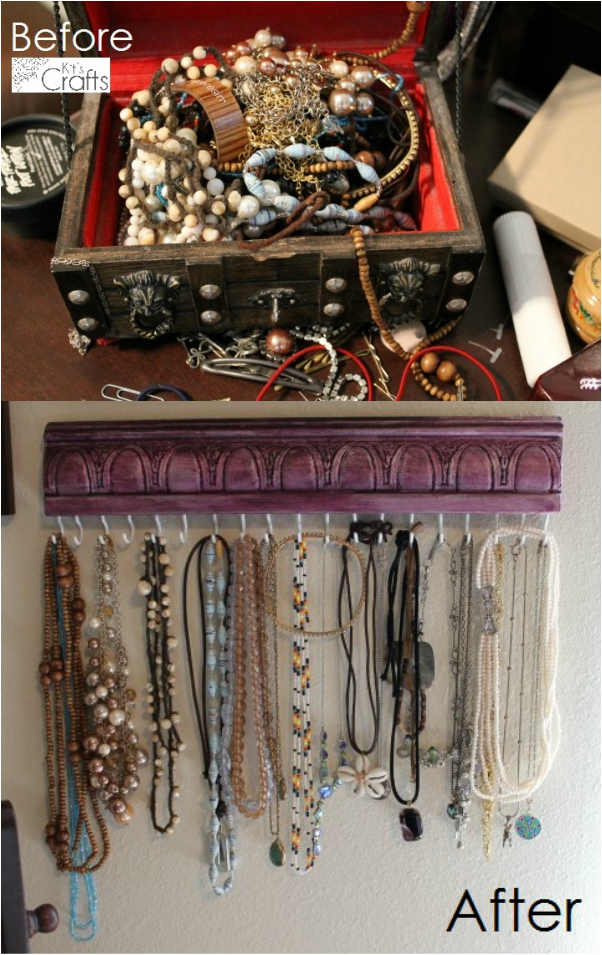
It wasn't long after we moved into our "quaint" condo that I bought this little vanity to make a space for me to get ready. It has been almost two years since and the tiny corner of our bedroom has sat looking pretty bland the entire time. A while back, I decided I was sick of trying to find my jewelry amidst the tangled pile in my jewelry box, which sparked a make over of the entire corner. I have to say, I am pretty happy with the results.
Kit's Crafts - Vanity Area
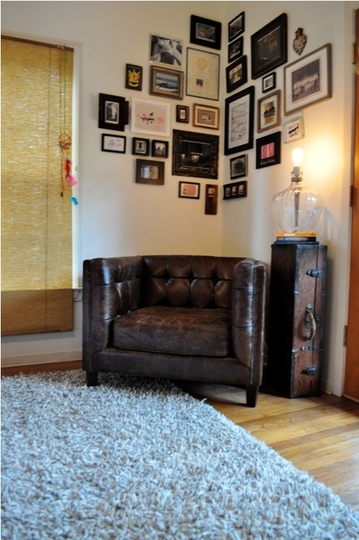
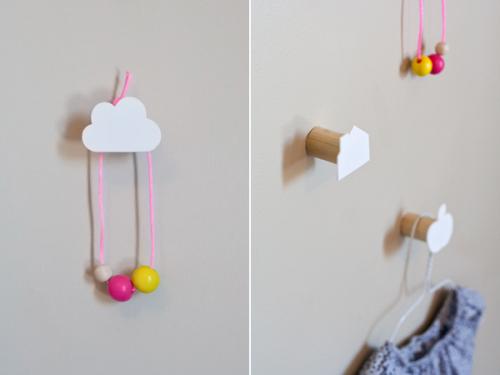
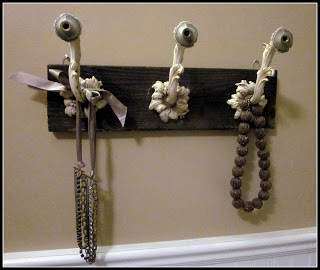
As usual, I started my quest by looking to the internet (specifically, Pinterest), and found some great ideas to pull from. Below are the inspiration photos:
Inspiration from Sally's Sight Unseen Fresh Start
Photo from Apartment Therapy
DIY Decorative Children's Wall Hooks
Photo from Dot Coms For Moms
Jewelry Hooks from Homeroad
Photo from Homeroad
So, today, I will post the tutorial from my Jewelry Hooks and on Thursday I will post the tutorial for the Bracelet Pegs. As for the wall itself, I found a tutorial with tips for picture groupings at Tipnut that you can check out.
Kit's Crafts - Jewelry Hooks
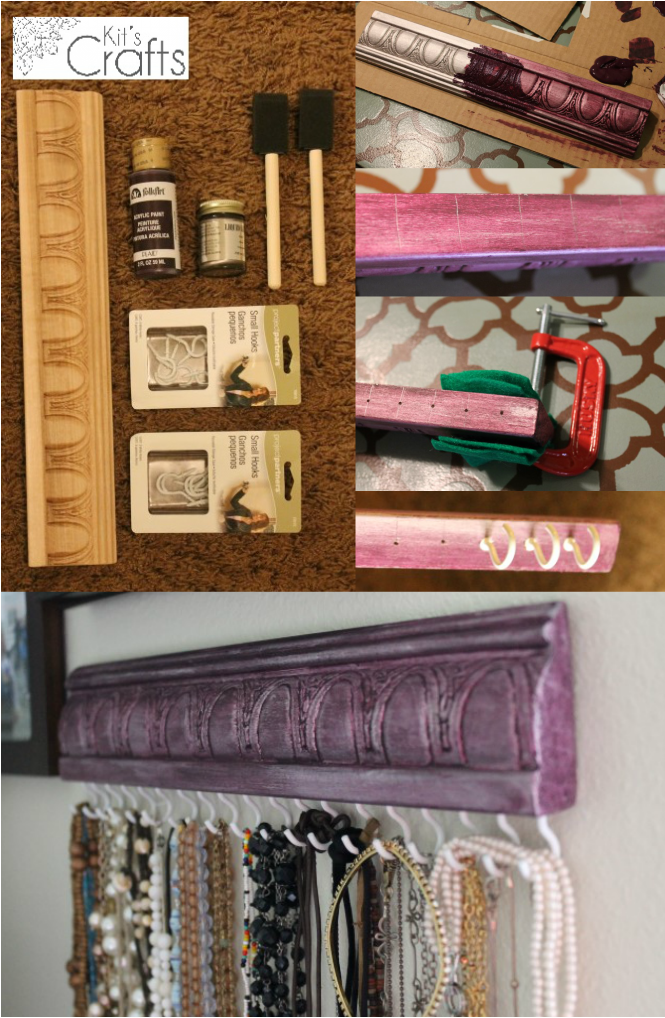
Jewelry Hooks Materials:
* 13" of decorative moulding, preferably chair rail (you can buy this by the foot at Home Depot)
* Fine grit sand paper
* Acrylic paint
* Liquid silver leaf
* At least 2 foam brushes
* Lint free rag
* Nail and hammer
* 16-18 teacup hooks
* (2) 2" clamps (really cheap at Home Depot)
* Scraps of felt or thick fabric
* 2 Saw tooth picture hanger
Kit's Crafts - DIY Jewelry Hooks
Method:
* Start by sanding the edges of your moulding, then paint one coat of acrylic paint as a base, then let it dry and paint a coat of the liquid silver leaf and let that dry. Blotch on another coat of the acrylic paint and rub it off with the rag as you go.
* Divide the length of your moulding by the number of hooks you have and mark with a pencil Mark the center of the moulding on each line, then set up the moulding on the table with a clamp on each side to steady it and felt protecting the moulding from the clamps (as in the picture). Nail a hole at each of your marks.
* I found that it was easiest to take the clamps off and hold the moulding between my knees to screw in the hooks. Also, I used one of the pieces of felt to protect my fingers as I turned the hook.
* Turn the moulding so the backside is facing up. Divide the length into thirds and mark, then mark about 1/4" from the top. Center 2 saw tooth picture hangers on these marks and attach.

Attach it to the wall and you are ready to untangle your necklaces!

You might also like:

Picture
Picture
Picture
Picture
Picture
Foodies and Crafties Soiree
0 Comments

DIY Library Bag

4/18/2013

6 Comments

 
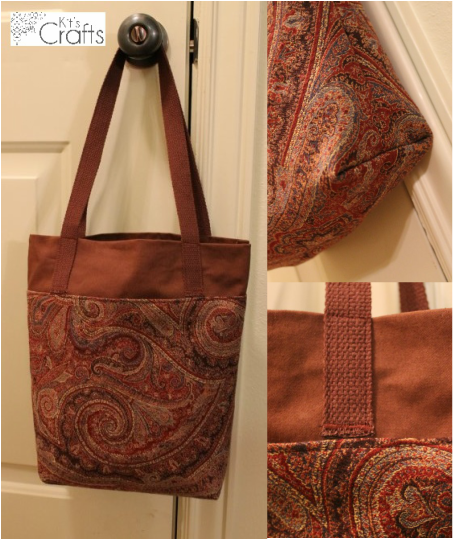
Today's post is perhaps the best project for someone just starting out with a sewing machine. In fact, it was sewn by a beginning sewer, who had never even touched a machine before! That being said, I hope to make the instructions as clear as possible and would love feedback where needed.
Picture
Materials:
* 20" of a durable fabric, 44" wide, canvas is preferable, but you can do outdoor fabric or upholstery fabric; try to get a cotton or polyester so it is easy to clean
* 10" of a complimentary fabric, 44" wide (the stripe around the top of the bag)
* 56" of straps by the yard (there are a few places this could be, ask a salesperson, they are usually helpful)
* Spool of matching thread
* Fabric marking pen/pencil
* Fabric shears
* Sewing machine, thread and pins
* Iron and ironing board
* Fray Check

To start with, ALWAYS wash and iron your fabric before you start any sewing project. This pre shrinks it and ironing ensures you are cutting straight.

Now, straighten out the long sides of both fabrics. Here is a link to How to Quilt, which tells you how to make sure you edges are straight. As you will not be cutting strips, stop at the step before she tells you to cut strips.

Parallel to the long side of your complimentary fabric, mark and cut a strip 8" wide, fold in half length wise and cut the center, so you have two strips measuring 22" x 8".

Fold your strap in half and cut on the fold. Put fray check on all ends to prevent fraying.

Fold your 8" strips in half to make them 4" strips. Place your durable fabric on the table with the right side up. Line up each of your 4" strips, right side down, with the ends of your durable fabric and pin. (The 20" side and the 22"side should be touching.) Sew the two pieces of fabric together using a 1/2" seam allowance. Cut off the extra 2" from the 4" strip. Iron the seam toward the durable fabric and iron the fold of 4" strips. 

Find the center of each short end of the bag and place a pin. For the placement of the straps, you are going to line up the bottom edges of each strap with the seam for the 4" strip and the inside edge 3" from the center and pin in place. Now you will sew along the edge of the strap about 1/8" from the edge and make a rectangle where the strap touches the bag. Then, go back and satin stitch the bottom edges of each strap.

Fold your fabric in half so the folds of 4" strips line up with right sides together. Pin the sides of the bag and sew with a 1/2" seam allowance. Iron the bottom fold to make a fold line and cut the fold ONLY in the seam allowance. Now, for the bottom corners of the bag. This is a little tricky, but go slow and you will get it right. At the bottom corners, match up the side seam and the bottom fold you just ironed to create a triangle (with right sides together), and iron the folds of the triangle. Then, mark 2" from the peak of the triangle along the seam and draw a line perpendicular to the seam (refer to picture below), pin and sew along the line, then cut the  excess fabric about 1/4" from the seam just made.

And that's it! Not too hard, all you need to do now is hit the library and fill it up with books!
Creating the flat bottom corner of a bag
6 Comments

Fox Hat

4/16/2013

4 Comments

 
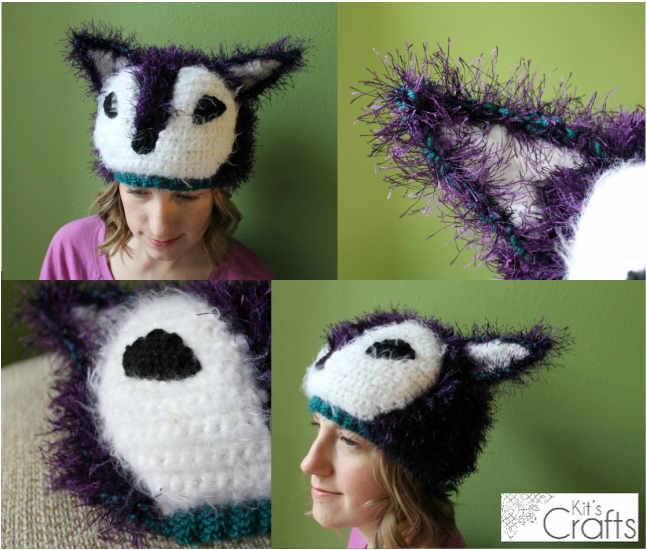
In general, I don't really like eyelash yarn, but I was perusing the yarn isle at Joanns and this purple stuff was on close out for only 97¢, which I couldn't pass up. I figured I could make a little bear or something from it. When I got home, I remembered that I was planning on making character hats for my daughter to play dress up with, so I thought I would make a purple fox. I went through my stash and I didn't have a purple yarn that would match to double up the eyelash, but I did have a full skein of Caron Simply Soft in a peacock blue color. I figured you wouldn't be able to really see the blue, so I got started. After creating the base hat, I thought, this really looks like it should be a peacock, so I looked to Facebook and Google+ for a weigh in. After a few days, it was close, but the fox won out by 2 votes. So, here is a fox hat. (I have enough yarn, I may go back and make a peacock too!)
Kits Crafts - Crochet Fox Hat #FreeCrochetPattern
The sizing is a bit big for a child. It fits my head and kind of drowns my toddler, but you can adjust the sizing by using a smaller hook, or take out a row of increases and one of the rows on the length. Or you could skip more stitches when you are adding the band at the bottom.

Gauge: 2 1/2 rows x 6 stitches = 2" in double crochet of A & B
Size: Small Adult or teen

Materials:
Sizes I and G Hook
(A) 1/2 Skein (or less) Caron Simply Soft in Ocean (I think... It was a peacock blue)
(B) 1 1/4 Skein Lion Brand Fun Fur in Dark Violet
Fuzzy white worsted weight yarn and basic black worsted weight black for the face and ears
Yarn Needle
Long Pins
Safety Pins

Abbreviations:
CH = Chain
SC = Single Crochet
DC = Double Crochet
ST = Stitch
SK = Skip Stitch
SL = Slip Stitch
DC2tog = Double Crochet 2 stitches together
SC2tog = Single Crochet 2 stitches together

Hat:
Using the I hook and a strand of A and B, create a magic loop using 2 fingers, CH 2, 11 DC in loop, close loop and place a marker
Row 1: 2 DC in second CH, 2DC around
Row 2: (2 DC next DC, DC in next DC) around (36 STS)
Row 3: (2 DC next DC, DC in next 2 DC) around (48 STS)
Row 4: DC around
Row 5: (2 DC next DC, DC in next 3 DC) around (60 STS)
Leave marker in the next row to make counting rows easier, DC around for 7 rows, then do one row of SC, SL, Bind off and remove marker.

Now for the band, like I said previously, if you want it to be a bigger size, then catch every SC on the hat, or you could make it smaller by skipping more SCs on the hat.
Using the G Hook and only yarn A, pick up a loop through one of the SC in the last row, CH 5, SC in second CH from the hook, SC 3x
Rows: *SK the next SC on the hat, SL in the next SC on the hat, turn with the yarn in back (DON'T CH 1), SC in back loops only, CH 1, SC in back loops only, repeat from * around the hat and bind off, leaving a long enough tail to whip stitch the two ends together.

Weave in loose ends.

Outer Ear:
Using the I hook and a strand of A and B, CH 16, DC in third CH from hook, DC across, CH 2, turn
Rows: *SK first ST, DC in next, DC to last two STS, DC2tog, CH2, turn, repeat from * until only three STS remain, SK first ST, DC2tog and bind off
Repeat for second ear.

Inner Ear:
Using the I hook and the fuzzy white yarn, CH 12, DC in third CH from hook, DC across, CH 2, turn
Rows: *SK first ST, DC in next, DC to last two STS, DC2tog, CH2, turn, repeat from * until only three STS remain, SK first ST, DC2tog and bind off
Repeat for second ear.

Face:
*As a side note, I tried to leave enough of a tail when I started and at each of the bind offs to sew the face to the hat
Using the I hook and the fuzzy white yarn, CH20, 2 SC in second CH from hook, SC to last CH, 2 SC, CH 1, turn
Rows 1 - 5: 2 Sc in first SC, SC to last ST, 2 SC in last ST, CH 1, turn (28STS)
Row 6: 2 SC in first ST, SC in next 12 STS, CH 1, turn
Row 7: SC across, CH 1, turn
Rows 8, 10, & 12: 2 SC in first ST, SC in next 13 STS, CH 1, turn
Rows 9, 11, & 13: SK first ST, SC across, CH 1, turn
Rows 14 - 16: SC in next 14 STS, CH 1, turn
Rows 17, 19, 21, 23, & 25: SK first ST, SC to last 2 STS, SC2tog, CH 1, turn
Row 18: SC in next 12 STS, CH 1, turn
Row 20: SC in next 10 STS, CH 1, turn
Row 22: SC in next 8 STS, CH 1, turn
Row 24: SC in next 6 STS, CH 1, turn
Row 26: SC in next 4 STS,  Bind off

Pull a loop one SC from the peak just made, SC to last ST, 2SC in last ST, CH 1, turn
Row 7: SC across, CH 1, turn
Rows 8, 10, & 12: SC in next 13 STS, 2 SC in last ST, CH 1, turn
Rows 9, 11, & 13: SC in next 11 STS, SC2tog, CH 1, turn
Rows 14 - 16: SC in next 14 STS, CH 1, turn
Rows 17, 19, 21, 23, & 25: SK first ST, SC to last 2 STS, SC2tog, CH 1, turn
Row 18, 20, 22, 24: SC across, CH 1, turn
Row 26: SC across,  Bind off

Eyes:
Using the G hook and the black yarn, CH 10, SC in second CH from the hook, SC across, CH 1, turn
Rows 1 - 3: SK first ST, SC to last 2 STS, SC2tog, CH 1, turn
Rows 4: SK first ST, SC2tog, bind off, leaving a tail long enough to sew eyes to face
Repeat for the second eye

Nose:
Using the G hook and the black yarn, create a magic loop, 8 SC in the loop, close loop, SL to join
Row 1: CH 1, 2 SC around, SL into CH to join, bind off leaving a long enough tail to sew to hat

Assemble:
Start by placing the face on the hat where you would like it, then pin it to the hat using long pins. Begin at the bottom of the face with the tail from your original chains and begin to whip stitch around the hat. I tied my yarn when I reach a bind off or cast on, then continued with that tail. 

Place and pin the eyes and nose to the face, then whip stitch in place.

Line up the bottom of each inner ear with each outer ear and use the tail of the inner ear to attach, taking care not to go completely through the outer ear.

Place the ears about 1" from the side of the face, with one corner following the angle of the eyes and the other corner lined up with the corner of each peak of the face. You will need to curve the ear a bit, which gives it more of a natural look, then safety pins to attach each ear to the hat and use the tail to whip stitch the ears on, making long stitches to prevent the ears from flopping around.

Weave in any loose ends.
4 Comments

Whoopie Cake

4/11/2013

0 Comments

 
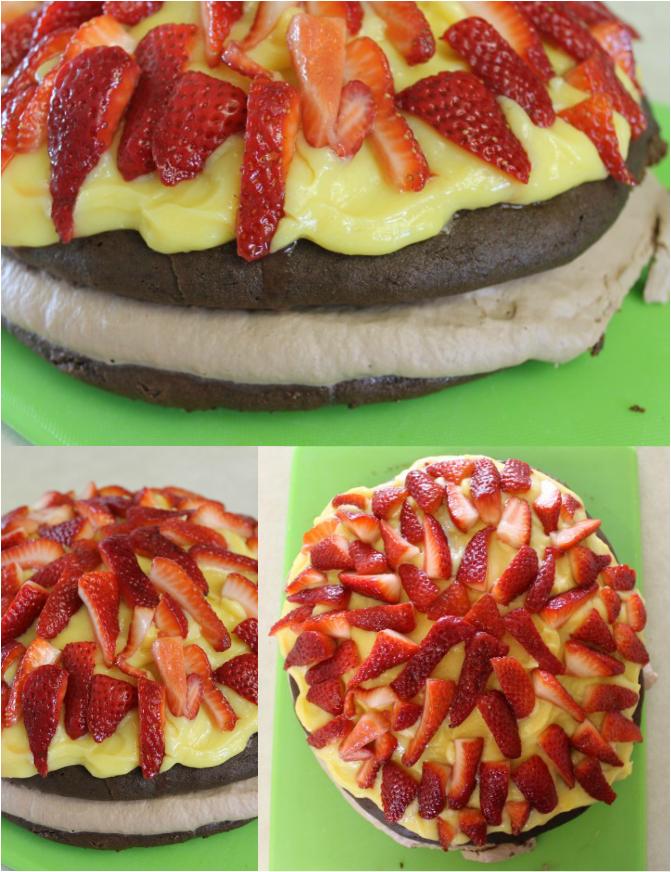
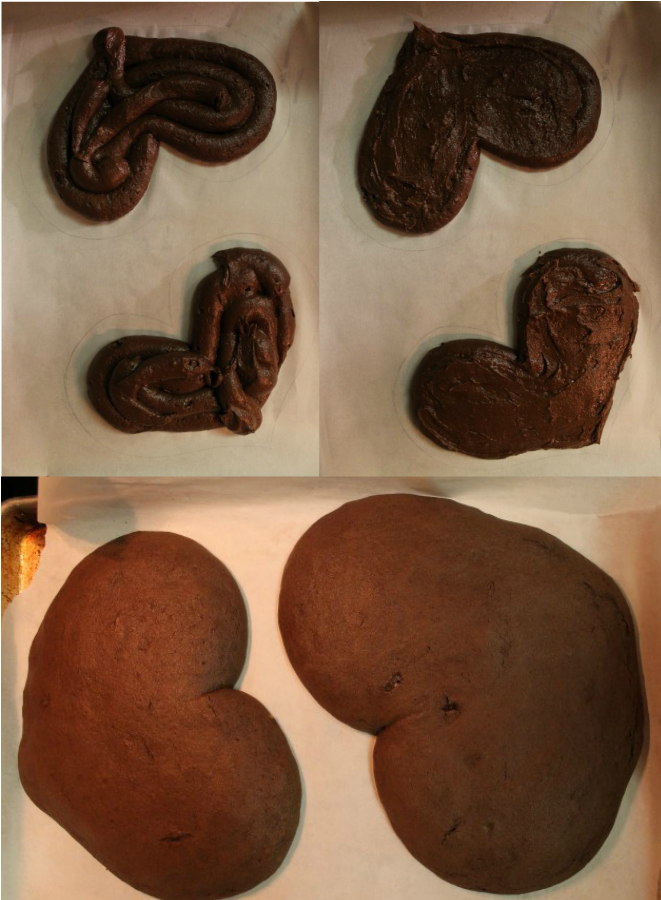
A while back I was watching The Chew and they made a Whoopie Pie Cake. It looked so good that I made it the next day to share with friends. The cake itself was delightful, but the frosting inside was way too rich, so I decided to improvise. I made it for Valentine's day and replaced to frosting with pudding, which was a much better improvement. I cut the recipe in half because it was just so much cake and I tweaked the pudding a bit to make it more flavorful and added berries. Also, I did a layer of Nutella whipped cream frosting. My progress pictures are of the Valentine's cake in the shape of a heart, but the finished product is of the one I made this weekend for my husband's family. You can really make this into any shape you like, I think the next time I may try making a star...
Whoopie Cake Recipe
Cake Ingredients:
1 ½ cups All-Purpose Flour
½ cup Unsweetened Cocoa Powder
½ teaspoon Baking Soda
½ teaspoon Salt
6 tablespoons Butter (room temperature)
¾ cup Granulated Sugar
1 Large Egg
¾ cup Milk

Preheat oven to 425 degrees. Trace two 8” circles (or hearts or stars or whatever shape you like) onto parchment paper. Flip the parchment paper over and place on a baking sheet.

In a medium bowl, whisk together the flour, cocoa powder, baking soda and salt and set aside.

In a stand mixer fixed with a whisk attachment or in a large bowl with a hand mixer, combine the butter and the sugar until fluffy. Mix in the egg then the milk. In two batches, hand mix in the flour combination. It should resemble frosting. 

Spoon batter into a piping bag (you don’t need a frosting tip) and pipe into the shapes on the parchment paper about ½” shy of the border, then smooth out the batter. Bake on the middle rack for 8 – 10 minutes or until spongy. Let cool on pan for 5 minutes then transfer the cakes and the parchment paper to a cooling rack to cool to room temperature.

White Chocolate Ingredients:
1 3.5 oz Vanilla Pudding and Pie Filling Mix
1 cup White Chocolate
1 ½ cups Milk
1 cup Berries (Blueberries, Raspberries, Cut Strawberries)
 
Place the white chocolate and ½ cup of the milk in a microwave safe bowl and heat for 1 minute, stirring after 30 seconds. Stir well after the 1 minute, the chocolate won’t be completely melted, but as you stir it should become smooth. In a medium bowl, combine the pudding mix and the remaining  cup of milk. Whisk in the white chocolate mix. Place in fridge for at least ½ hour.
 
Whipped Cream Nutella Frosting:
½ teaspoon Unflavored Gelatin Powder
2 tablespoons Cold Water
1 cup Whipping Cream
2 tablespoons Confectioner’s Sugar
2 tablespoons Cream Cheese (room temperature)
3 heaping tablespoons Nutella
 
In a small bowl, sprinkle the gelatin powder over the cold water. Put 2 tablespoons of cream in the microwave for 30 seconds to scald, then whisk into the gelatin powder and water until the gelatin is completely dissolved. Place in the fridge for 10 – 15 minutes; until it is the consistency of egg whites. Meanwhile, beat the remaining whipping cream and sugar until soft peaks form. Whisk in the cream cheese and nutella, then whisk in the gelatin mixture. 
  
Assemble cake:
Place one cake on plate, layer the Nutella frosting then place the remaining cake on top. Loosen up the pudding with a whisk and layer on the cake. Arrange berries in the pudding layer. Refrigerate until ready to serve.
Piping the Whoopie Cake
0 Comments

Cable Star Hat

4/9/2013

2 Comments

 
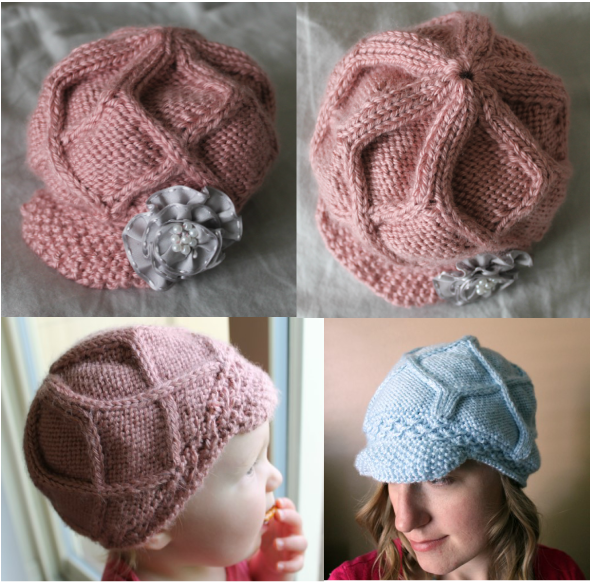
About a month ago, I attended a baby shower and I came up with the following pattern for a little hat to give to the new baby. It was too cute not to share, so I have posted the pattern for sell through Ravelry. If you are not familiar with Ravelry, you are seriously missing out. It is a data base full of all kinds of patterns for pretty much all things knit and crochet. I generally go there first when I decide I am going to knit or crochet something. You can friend me there, if you like. Anyway, the pattern for this hat is pretty easy and the sizing covers from a newborn up to an adult. It is very stretchy so it will last a while despite fast growing children.

Materials:
* Size 4 (US) Circular Needles
* Size 4 (US) Double Point Needles
* Cable Needle
* Yarn Needle
* ½ skein Caron Simply Soft Yarn (Victorian Rose)
* Ribbon or flower to adorn

Only $4.00 for a PDF download.
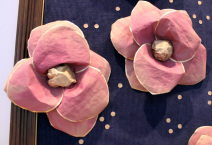
Since my original post for this hat, I have added length to sizes Toddler – Adult at row 9, which is right after the star stitch band. I also added an extra row of star stitches to sizes Child – Adult. The bottom right photo displays the changes.
Picture
2 Comments

DIY Lace Skirt

4/4/2013

0 Comments

 
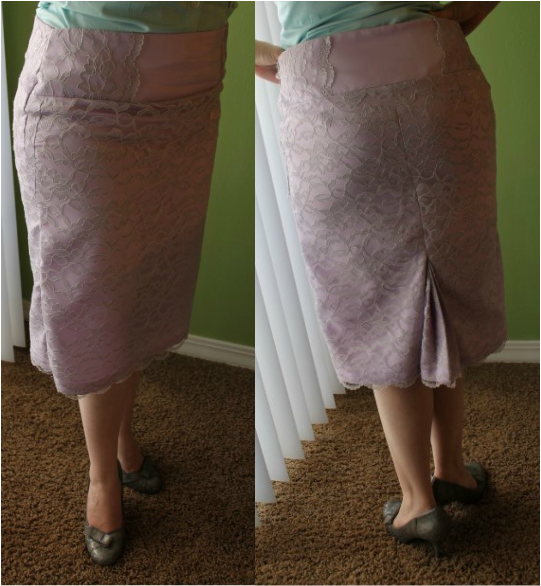
I am loving the lace that I have been seeing pop up in the stores! I have been eyeing the darling lace skirts for quite some time and as luck would have it, I came across a yard of gray lace in the fabric remnants bin at Joanns. I was pretty excited also when I found a tutorial by Merricks Art for a Jersey Pencil Skirt. I knew I would need to modify the tutorial a bit to work the lace in and, since I was using a polyester satin (which I used the back side of so it wasn't quite so shiny) that doesn't stretch, but, no worries, I posted my adventure for you!
Kits Crafts - Lace Skirt Tutorial
This skirt comes together pretty quick, I did add a little pleated detail in lue of a slit in the back, which takes some time. If my explanation is confusing, please email me with questions ([email protected]). Thanks!

Materials:
* 1 yard of lace (more for larger sizes)
* 1 yard of material, preferably something that is only as stretchy as the lace you buy (more for larger sizes)
* 1 matching 7" invisible zipper refer to Needlecrafts instructions to shorten it if necessary
* Sewing gauge or ruler
* Thread, pins, sewing machine
* Pencil skirt that fits nicely
* Iron and ironing board

If you are using a stretchy fabric, please refer to the tutorial for the Jersey Pencil Skirt, just add the extra step of cutting out the lace and layering it before sewing the skirt together.

Create a Pattern:
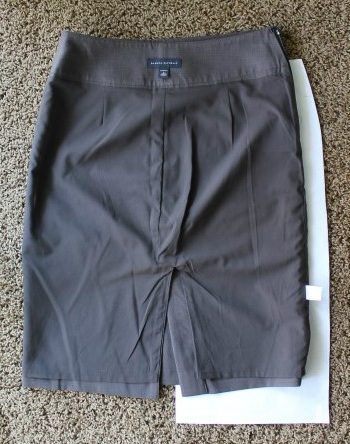
* Start by turning the skirt that you are mimicking inside out, then place it on a large sheet of paper (or several small pieces taped together) with the center of the skirt lined up with the edge of the paper
* You will create two pattern pieces, one for the front and one for the back
* For the front piece, draw a line around the outside of the skirt about 1"-2" away from the  side of the skirt (be generous here, because you can always cut back, but it is harder to add on) and 2" from the bottom
* For the top of the pattern, stop at the seam that connects the skirt to the waist and add 1/2" for the seam allowance
* For the backside pattern piece follow the previous steps, but, place the middle of the skirt about 1/2" inside the edge of the paper and, at the hip of the skirt, where there is a  curve in toward the waist, just go straight up
Creating a pattern from an existing skirt
Cutting the Pattern:
* Fold the fabric in half and line up the edge of the front piece with the fold and put the back piece
next to it so you end up with one front piece and two back pieces
* Cut a fabric rectangle that is 9" x 10"
* Measure the height of the waist band of the skirt you are mimicking and the width of the top of your front piece; add 1" to the height then cut 4 rectangles at those measurements, for example, my skirt waist height is 4" and the width of my front piece is 20", so I cut 4 rectangles at 5" x 20"
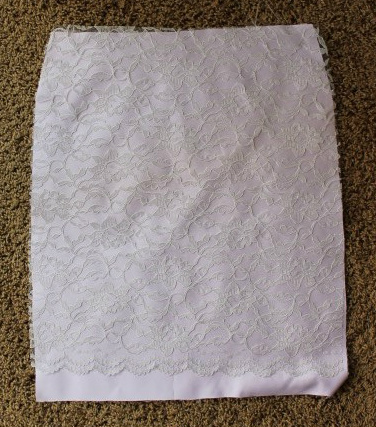
* For the lace, repeat the first step, but line the scalloped edge to about 1.5" above the bottom of your skirt pattern pieces
* Cut a rectangle of the lace at 9" x 8.5", with the scalloped edge on the 9" side
* For the waist cut 4 rectangles at the height of your waist plus 1" and 8" wide (wider if you want them to be closer together
Cut the lace pieces about 1.5
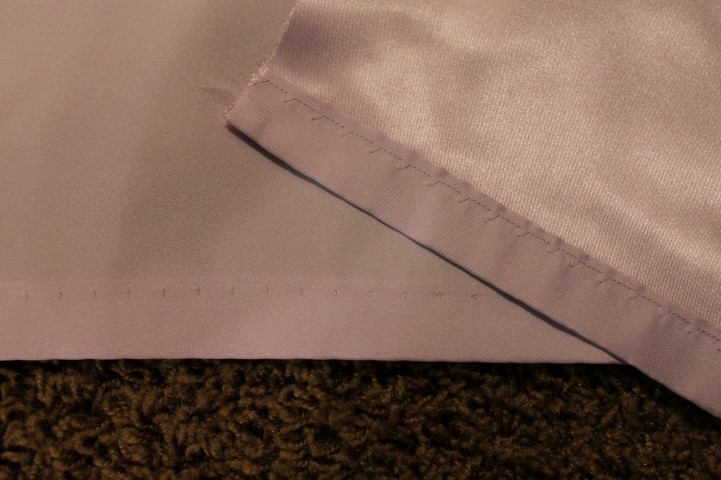
Blind Hem:
* Start by folding the bottom of each of your fabric skirt pieces and one of the 9" edges of the fabric 9" x 10" rectangle 1" to the back and iron, then fold again 1" and iron
* Sew a blind hem, if you don't know how to do this, refer to this tutorial by CraftStylish
Blind Hem
Ironing the Pleat Detail:
* Line up the lace 9" x 8.5" square with the fabric 9" x 10" square, the scallop edge should fall about
1/2" below the hem
* Fold over the sides 1/2" and iron, then pin (you may want to lightly spray with starch to solidify the pleats a little better)
* Fold the square in half lengthwise, wrong sides together and iron
* Unfold and place on the table with the wrong side facing you, fold each side into the center and iron
* For each side, match up the edge fold with the fold created in the previous step and iron
* Unfold, leaving the pins in the sides
Pleat Detail
Sewing the Pleat Detail in Place:
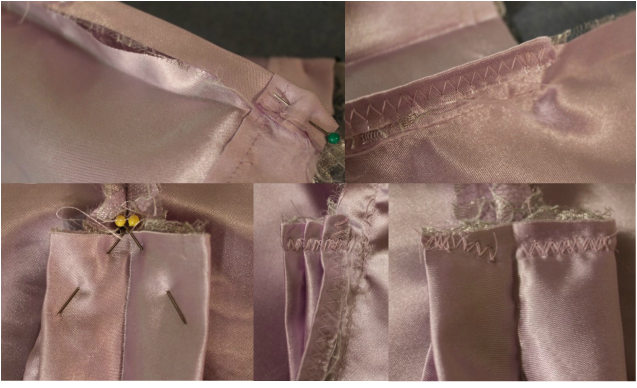
* Line up each lace back piece with the coordinating fabric back piece and pin around the edges, the scallop of the lace should fall roughly 1/2" below the hem
* Fold and iron 1/2" of the center edges of the back pieces to the wrong side
* With the right sides facing down, fit the 1/2" fold made in the previous step into the 1/2" folded edge of the pleat detail sides and pin
* Zigzag stitch the 1/2" folds together
* Match up the center edges of the back pieces, right sides together and sew with a 1/2" seam allowance until you reach the pleat detail, back stitch and clip the thread
* Fold the pleats down and pin as shown in the picture, but do not go through the skirt pieces, this is a bit tricky and you may need to "fudge" it a bit, then zig zag stitch along the top of each side of the pleat detail
Sewing the pleat detail in
Darts:
A note about darts: Don't let them scare you. Yes, they can be tricky, but take your time and you will get it right. If you need a little extra help, here is a video from the Craft Channel that will walk you through how to sew a dart

* Measure the top of the front piece and the top of the back piece then divide the difference in half and this will be how wide your pleats will need to be on the back side, for example, the difference on my skirt was 2", so my darts were 1" wide
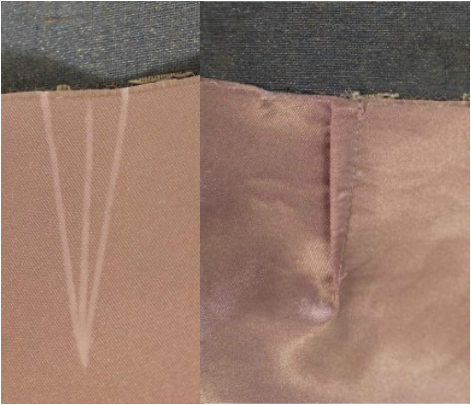
* Find the center of each back piece by folding the edge to the seam and mark, draw a line 2"-3" straight down from this mark (depending on how long you want your darts to be, you can reference the skirt you are mimicking for this), then make that the center of the measurement you found in the previous step and mark the sides of your dart, then draw a line from the marks just made to the bottom of the center line
* Sew your darts based on the angled line you just made making sure to catch the lace in the dart
Sewing the darts
Sewing the Waist:
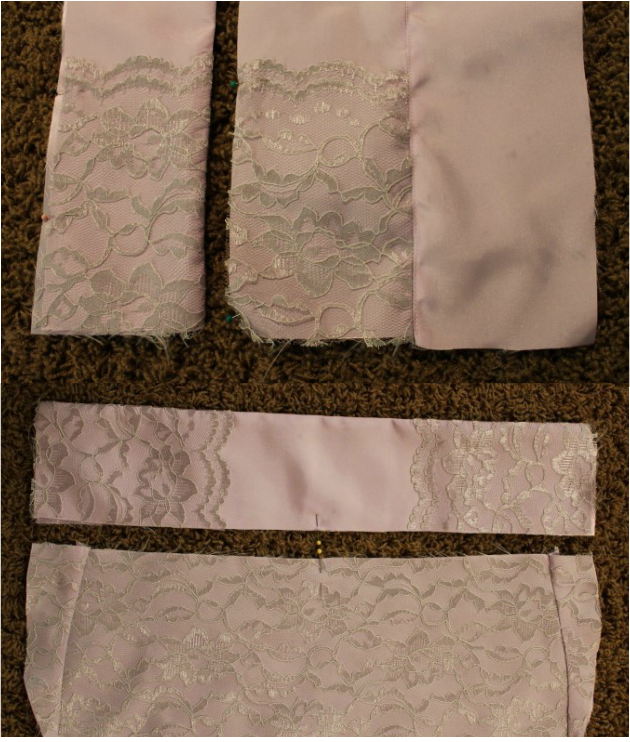
* Line up the edge of each lace piece with the edges of two of the waist piece rectangles and pin, then, with right sides together, pin each lace waist piece with one of the remaining fabric waist pieces and sew along the top
* Unfold and iron the seam open, then top stitch along the seam on the fabric side then fold again and iron
* Find the center of each waist piece and place a pin to mark it then line up one waist piece with the center of the front piece and then the remaining waist piece with the center of the back piece; pin with right sides together
* Sew with a 1/2" seam allowance, then zigzag stitch to prevent fraying

P.S. You may notice that I added some "wings" to the sides of my front piece, I was not generous when creating my pattern and had to add a bit to the hips to make it fit.
Adding the waistband
Finishing Up:
* Determine which side you want your zipper to be on then, with right sides together, sew along the opposite side
* Sew in your zipper following the directions on the package, if you need more instruction, there is a great tutorial by Clever Nesting
0 Comments

DIY Bath Crayons

4/2/2013

6 Comments

 
For some time now, I have been wanting to buy my daughter some bath crayons. Then, through Pinterest, I found a tutorial by SOS Mom that is super easy to follow. However, there are a few things I learned along the way.
DIY Bath Crayons
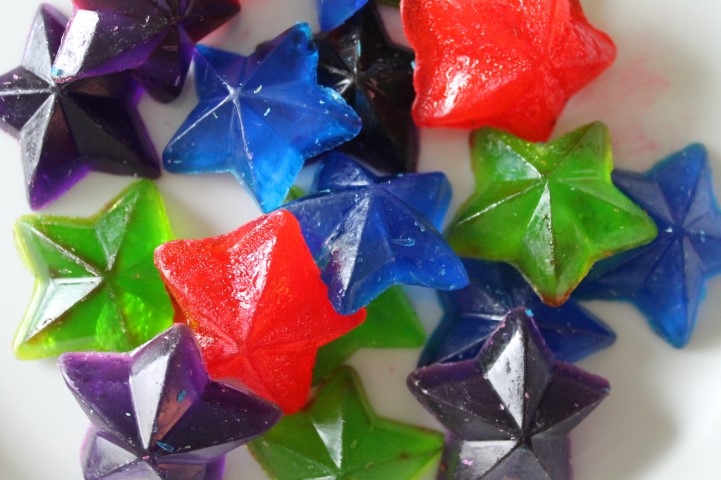
We used neon food coloring and star molds from Michael's and we did the glycerin soap method. Also, instead of melting the soap in the microwave, we melted it in a double boiler. In the end, we had 24 stars of each of the four colors, with the exception of the red stars, which came to only 21. I think the reason there were less red stars is because we let that batch stay on the stove longer. Consequently, the red shows up the best in the tub. I'm not sure if this is a direct correlation, or if we happened to put more food coloring in this batch (we didn't measure) either way, when I make these again I think I will be more generous with the food coloring and the amount of time I let the soap sit on the stove.
Bath Crayons Process Pictures
Picture
Picture

6 Comments
    Kit's Crafts
    Hey there! I'm Kristin, aka Kit. Here is just a peek into my crafting mind. I hope you find something to spur your creativity!
    Instagram

    Kit's Crafts Shop

    Popular Posts

    Picture
    Picture
    Picture
    Picture
    Picture
    Picture

    RSS Feed

    Picture
    Kit's Crafts
    Picture
    The Yarn Box

    Featured Here

    Picture
    Moogly
    Picture

    Categories

    All
    About
    Baby
    Baking
    Bio
    Caramel
    Child
    Chocolate
    Christmas
    Cooking
    Crochet
    Decor
    Dessert
    Dress
    Free Knit/crochet Pattern
    Free Sewing Pattern
    Interior Design
    Knitting
    Link Party
    Materials
    Pattern
    Quiet Book
    Quiet Book
    Recipe
    Selling Handmade Goods
    Sewing
    Spats
    T Shirt
    Tutorial

    Archives

    July 2020
    January 2020
    July 2019
    November 2018
    September 2018
    August 2018
    July 2018
    May 2018
    April 2018
    February 2018
    January 2018
    April 2016
    September 2015
    March 2015
    February 2015
    November 2014
    October 2014
    September 2014
    August 2014
    July 2014
    June 2014
    May 2014
    April 2014
    March 2014
    February 2014
    January 2014
    December 2013
    November 2013
    October 2013
    September 2013
    August 2013
    July 2013
    June 2013
    May 2013
    April 2013
    March 2013
    February 2013
    January 2013
    December 2012
    November 2012
    October 2012

Powered by Create your own unique website with customizable templates.