
I am loving the lace that I have been seeing pop up in the stores! I have been eyeing the darling lace skirts for quite some time and as luck would have it, I came across a yard of gray lace in the fabric remnants bin at Joanns. I was pretty excited also when I found a tutorial by Merricks Art for a Jersey Pencil Skirt. I knew I would need to modify the tutorial a bit to work the lace in and, since I was using a polyester satin (which I used the back side of so it wasn't quite so shiny) that doesn't stretch, but, no worries, I posted my adventure for you!
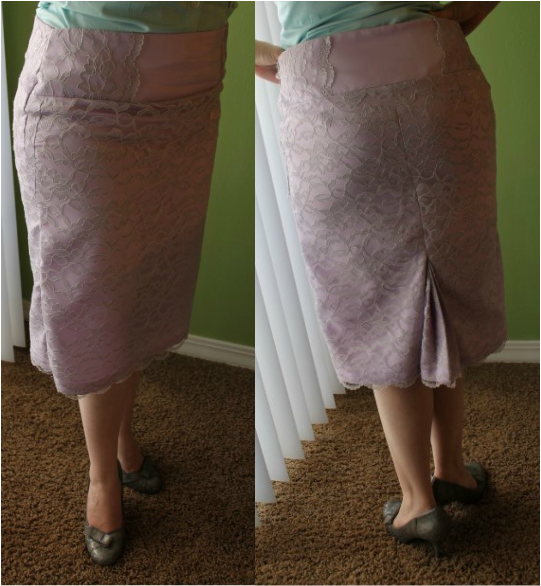
This skirt comes together pretty quick, I did add a little pleated detail in lue of a slit in the back, which takes some time. If my explanation is confusing, please email me with questions ([email protected]). Thanks!
Materials:
* 1 yard of lace (more for larger sizes)
* 1 yard of material, preferably something that is only as stretchy as the lace you buy (more for larger sizes)
* 1 matching 7" invisible zipper refer to Needlecrafts instructions to shorten it if necessary
* Sewing gauge or ruler
* Thread, pins, sewing machine
* Pencil skirt that fits nicely
* Iron and ironing board
If you are using a stretchy fabric, please refer to the tutorial for the Jersey Pencil Skirt, just add the extra step of cutting out the lace and layering it before sewing the skirt together.
Create a Pattern:
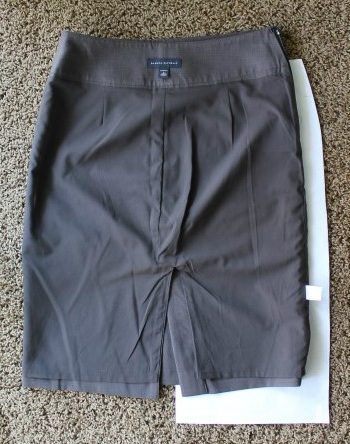
* Start by turning the skirt that you are mimicking inside out, then place it on a large sheet of paper (or several small pieces taped together) with the center of the skirt lined up with the edge of the paper
* You will create two pattern pieces, one for the front and one for the back
* For the front piece, draw a line around the outside of the skirt about 1"-2" away from the side of the skirt (be generous here, because you can always cut back, but it is harder to add on) and 2" from the bottom
* For the top of the pattern, stop at the seam that connects the skirt to the waist and add 1/2" for the seam allowance
* For the backside pattern piece follow the previous steps, but, place the middle of the skirt about 1/2" inside the edge of the paper and, at the hip of the skirt, where there is a curve in toward the waist, just go straight up
Materials:
* 1 yard of lace (more for larger sizes)
* 1 yard of material, preferably something that is only as stretchy as the lace you buy (more for larger sizes)
* 1 matching 7" invisible zipper refer to Needlecrafts instructions to shorten it if necessary
* Sewing gauge or ruler
* Thread, pins, sewing machine
* Pencil skirt that fits nicely
* Iron and ironing board
If you are using a stretchy fabric, please refer to the tutorial for the Jersey Pencil Skirt, just add the extra step of cutting out the lace and layering it before sewing the skirt together.
Create a Pattern:
* Start by turning the skirt that you are mimicking inside out, then place it on a large sheet of paper (or several small pieces taped together) with the center of the skirt lined up with the edge of the paper
* You will create two pattern pieces, one for the front and one for the back
* For the front piece, draw a line around the outside of the skirt about 1"-2" away from the side of the skirt (be generous here, because you can always cut back, but it is harder to add on) and 2" from the bottom
* For the top of the pattern, stop at the seam that connects the skirt to the waist and add 1/2" for the seam allowance
* For the backside pattern piece follow the previous steps, but, place the middle of the skirt about 1/2" inside the edge of the paper and, at the hip of the skirt, where there is a curve in toward the waist, just go straight up
Cutting the Pattern:
* Fold the fabric in half and line up the edge of the front piece with the fold and put the back piece
next to it so you end up with one front piece and two back pieces
* Cut a fabric rectangle that is 9" x 10"
* Measure the height of the waist band of the skirt you are mimicking and the width of the top of your front piece; add 1" to the height then cut 4 rectangles at those measurements, for example, my skirt waist height is 4" and the width of my front piece is 20", so I cut 4 rectangles at 5" x 20"
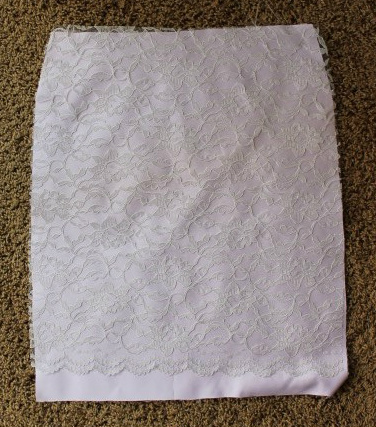
* For the lace, repeat the first step, but line the scalloped edge to about 1.5" above the bottom of your skirt pattern pieces
* Cut a rectangle of the lace at 9" x 8.5", with the scalloped edge on the 9" side
* For the waist cut 4 rectangles at the height of your waist plus 1" and 8" wide (wider if you want them to be closer together
* Fold the fabric in half and line up the edge of the front piece with the fold and put the back piece
next to it so you end up with one front piece and two back pieces
* Cut a fabric rectangle that is 9" x 10"
* Measure the height of the waist band of the skirt you are mimicking and the width of the top of your front piece; add 1" to the height then cut 4 rectangles at those measurements, for example, my skirt waist height is 4" and the width of my front piece is 20", so I cut 4 rectangles at 5" x 20"
* For the lace, repeat the first step, but line the scalloped edge to about 1.5" above the bottom of your skirt pattern pieces
* Cut a rectangle of the lace at 9" x 8.5", with the scalloped edge on the 9" side
* For the waist cut 4 rectangles at the height of your waist plus 1" and 8" wide (wider if you want them to be closer together
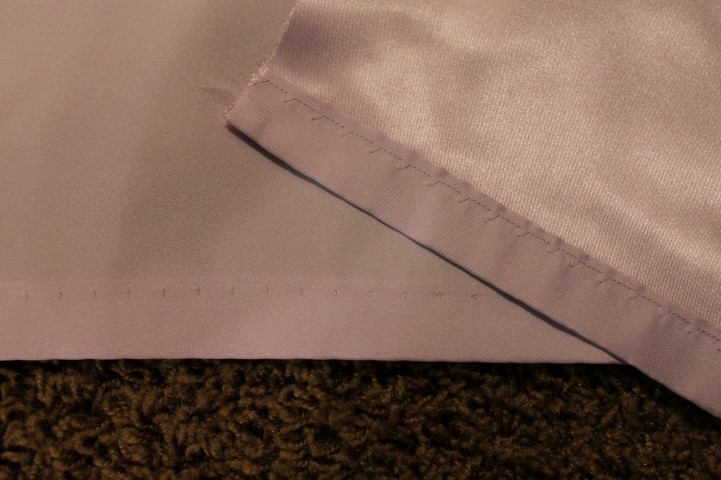
Blind Hem:
* Start by folding the bottom of each of your fabric skirt pieces and one of the 9" edges of the fabric 9" x 10" rectangle 1" to the back and iron, then fold again 1" and iron
* Sew a blind hem, if you don't know how to do this, refer to this tutorial by CraftStylish
* Start by folding the bottom of each of your fabric skirt pieces and one of the 9" edges of the fabric 9" x 10" rectangle 1" to the back and iron, then fold again 1" and iron
* Sew a blind hem, if you don't know how to do this, refer to this tutorial by CraftStylish
Ironing the Pleat Detail:
* Line up the lace 9" x 8.5" square with the fabric 9" x 10" square, the scallop edge should fall about
1/2" below the hem
* Fold over the sides 1/2" and iron, then pin (you may want to lightly spray with starch to solidify the pleats a little better)
* Fold the square in half lengthwise, wrong sides together and iron
* Unfold and place on the table with the wrong side facing you, fold each side into the center and iron
* For each side, match up the edge fold with the fold created in the previous step and iron
* Unfold, leaving the pins in the sides

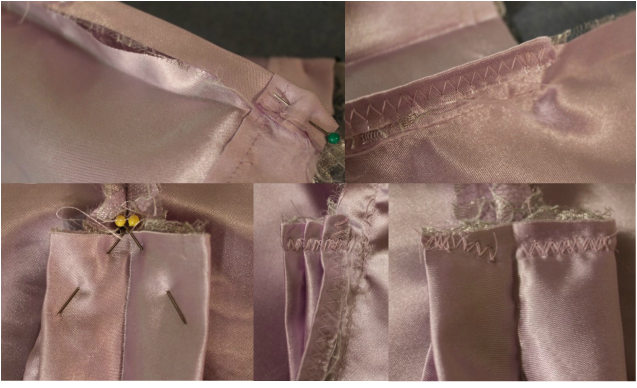
Sewing the Pleat Detail in Place:
* Line up each lace back piece with the coordinating fabric back piece and pin around the edges, the scallop of the lace should fall roughly 1/2" below the hem
* Fold and iron 1/2" of the center edges of the back pieces to the wrong side
* With the right sides facing down, fit the 1/2" fold made in the previous step into the 1/2" folded edge of the pleat detail sides and pin
* Zigzag stitch the 1/2" folds together
* Match up the center edges of the back pieces, right sides together and sew with a 1/2" seam allowance until you reach the pleat detail, back stitch and clip the thread
* Fold the pleats down and pin as shown in the picture, but do not go through the skirt pieces, this is a bit tricky and you may need to "fudge" it a bit, then zig zag stitch along the top of each side of the pleat detail
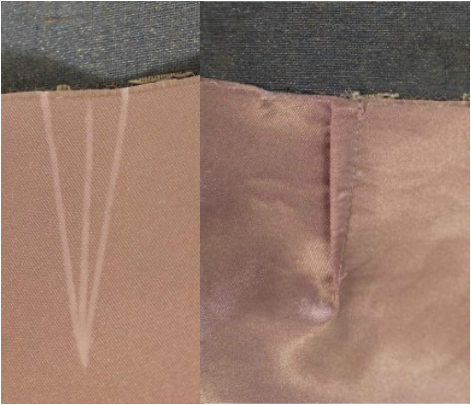
Darts:
A note about darts: Don't let them scare you. Yes, they can be tricky, but take your time and you will get it right. If you need a little extra help, here is a video from the Craft Channel that will walk you through how to sew a dart
* Measure the top of the front piece and the top of the back piece then divide the difference in half and this will be how wide your pleats will need to be on the back side, for example, the difference on my skirt was 2", so my darts were 1" wide
* Find the center of each back piece by folding the edge to the seam and mark, draw a line 2"-3" straight down from this mark (depending on how long you want your darts to be, you can reference the skirt you are mimicking for this), then make that the center of the measurement you found in the previous step and mark the sides of your dart, then draw a line from the marks just made to the bottom of the center line
* Sew your darts based on the angled line you just made making sure to catch the lace in the dart
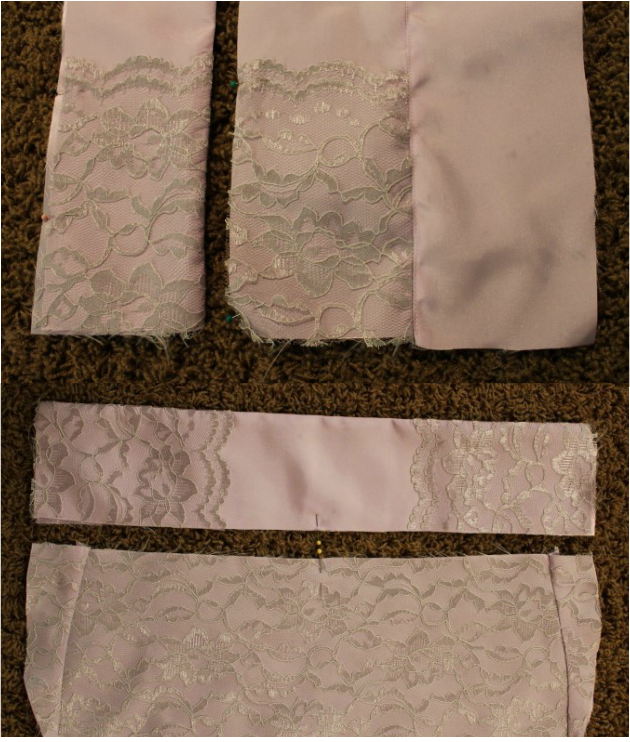
Sewing the Waist:
* Line up the edge of each lace piece with the edges of two of the waist piece rectangles and pin, then, with right sides together, pin each lace waist piece with one of the remaining fabric waist pieces and sew along the top
* Unfold and iron the seam open, then top stitch along the seam on the fabric side then fold again and iron
* Find the center of each waist piece and place a pin to mark it then line up one waist piece with the center of the front piece and then the remaining waist piece with the center of the back piece; pin with right sides together
* Sew with a 1/2" seam allowance, then zigzag stitch to prevent fraying
P.S. You may notice that I added some "wings" to the sides of my front piece, I was not generous when creating my pattern and had to add a bit to the hips to make it fit.
Finishing Up:
* Determine which side you want your zipper to be on then, with right sides together, sew along the opposite side
* Sew in your zipper following the directions on the package, if you need more instruction, there is a great tutorial by Clever Nesting
* Determine which side you want your zipper to be on then, with right sides together, sew along the opposite side
* Sew in your zipper following the directions on the package, if you need more instruction, there is a great tutorial by Clever Nesting


 RSS Feed


