Kit's Crafts
  • Home
  • About
    • Selling Handmade Goods
  • Knitting
  • Crochet
  • Sewing
  • Crafting
    • Just for Fun
    • Wall Decor
    • Christmas Fun
    • Party On
  • From the Kitchen
    • Chocolate
    • Sweet
    • Savory
  • Quiet Book
  • The Shop

Christmas Forest

11/30/2012

1 Comment

 
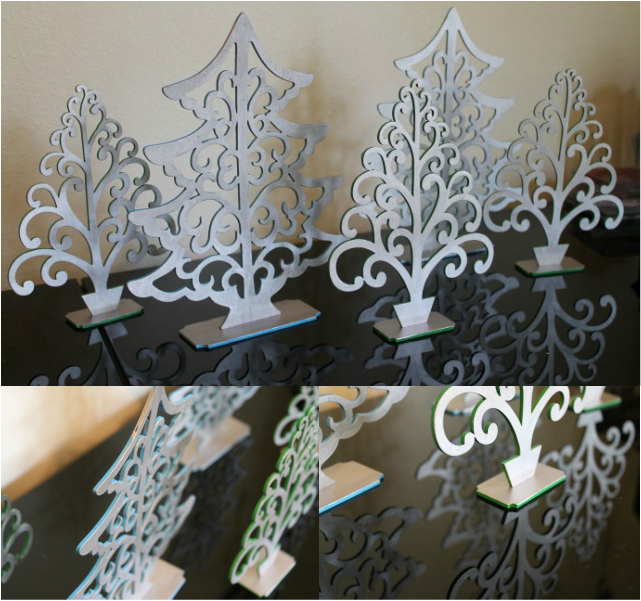
This year for Christmas, we decided not to get a tree. I am low on Christmas decorations, so I decided to head over to Michaels and see what I could find to fill the void. I came across these little wooden laser cut trees on sale and the Christmas forest was born.
Picture
Originally, I wanted to silver leaf these little guys, but the $9 price tag plus the cost of adhesive was a little much (I'm cheap). Then I came across silver leaf liquid and decided to give it a try. So, here is my process:
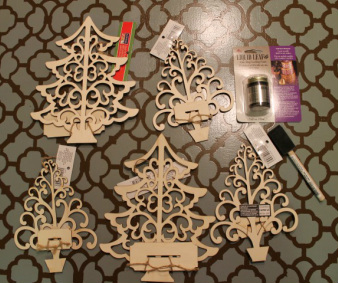
Picture
Materials:
* Wooden Trees
* Liquid Leaf
* Small Foam Brush
* Acrylic Paint
* 1/4" Paint Brush

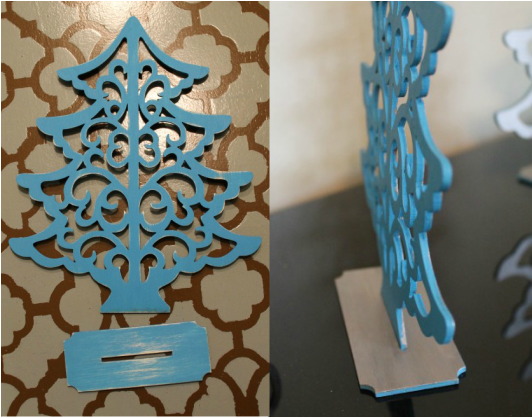
On the directions for the liquid leaf, it says you need to prime the object before liquid leafing it. So I busted out my acrylic paints and did two coats, but sanded the trees after the first coat because they were a little rough. Once the paint dried, I opened up the liquid leaf. It really stinks so you need to be in a well ventilated area. I got a bit of a head ache from it. Anyway, I used the 1/4" paint brush to paint the front of the trees. I let that dry overnight, which isn't necessary, but I did. Then I set them up on my TV stand. I'm thinking I will add something made from felt around the bases to help it stand out a bit.

Picture
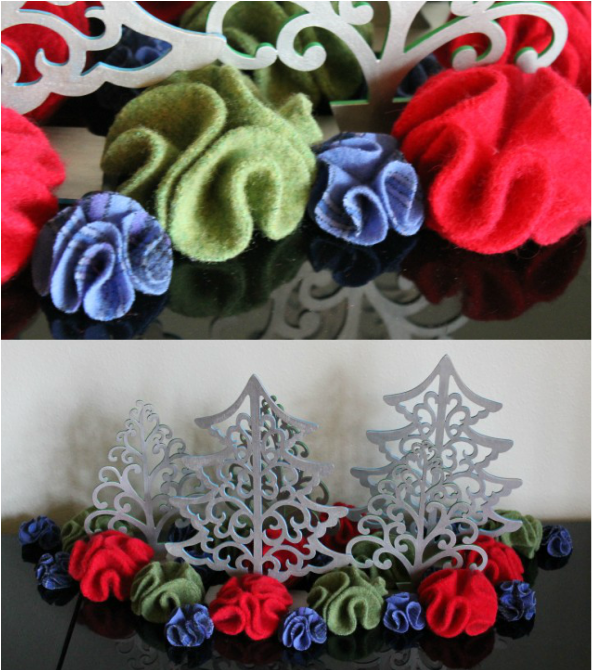
As an update, I later added felt flowers to little forest.
Kit's Crafts - Felt Flowers
1 Comment

 Tales of a Quiet Book, Button Flowers and Bugs

11/28/2012

0 Comments

 
I found this page on the blog Made by Molly and saw no reason to change it. I created a new pattern which is posted below, but it looks essentially the same. I did, however, create a bug page that works for boys. Stephanie, my neighbor, did the sewing on that and went with snaps as opposed to buttons. If you would rather do snaps, follow the method used on the cupcake page, posted a couple of weeks ago.
Picture
Materials Needed:
* Fabric (remember to prewash all fabrics)
* Fabric with flowers that have a diameter of at least 1.5", bigger is better
* Felt for the back of the pocket and the flowers
* 5 buttons with a 3/4" diameter
* Green 3/8" ribbon
* Steam a Seam
* 9"x9" square of reinforcement for the back of the page
* Pattern (I've included patterns for the bug page as well)

Stems:
* Cut 5 strips of the ribbon, each about 6"
* Using the template, arrange the ribbons and pin into place
* Sew ribbon to page using a zig-zag stitch (go through the reinforcement)
* Satin stitch the top of the ribbon to prevent fraying
* Sew buttons to the top of the ribbons
Picture
Pocket:
* Cut the pocket from fabric and felt
* With right sides together, sew the felt and pocket material along the top of the pocket
* Understitch the inside of the pocket
* Iron the pocket
* Baste the pocket to the page
Picture
Flowers:
* Cut flowers from fabric and steam a seam
* Iron flowers to felt
* Satin stitch around the edge of the flowers
* Make button hole in center of flower
* Cut flower from felt

Add 1 1/2" binding to side.
Picture
0 Comments

Caramel Apple Tartlets

11/26/2012

3 Comments

 
Last Saturday morning, I hosted a play group. I wanted to make something great, but semi easy. That is when I came up with these amazingly delicious, perfectly savory and sweet little pastries. The inspiration is really from a carmel apple my sister in law shared with us. Anyway, below is the recipe. You will want to make extras because it is IMPOSSIBLE to eat only one.
Picture
Picture
Ingredients:
Puff Pastry (thawed according to directions)
1/2 package of Caramels (unwrapped)
1/4 cup Heavy Whipping Cream
Corse Sea Salt
8 medium Golden Delicious Apples
Heavy Whipping Cream to brush onto pastries
1/4 cup Sugar
1 Tbspn Cinnamon
1/4 cup White Chocolate Chips
1/2 Tbspn Butter
1 Tbspn Heavy Whipping Cream

Center rack in oven. Preheat oven to 400 degrees.

Roll out one of the puff pastry sheets to a 16"x12" rectangle. Starting at the longer end, roll the dough. using dental floss or a sharp knife, cut the dough into 2" logs. Using your palm, push the dough into small discs. Roll the discs into 4"-5" diameter circles. If the dough is too springy, put in the fridge and let it rest for 5-10 minutes. Place the discs on a parchment paper lined cookie sheet 2" apart. Repeat with the second puff pastry sheet. Put pastries into fridge and let the dough rest while you make the carmel sauce and prepare the apples.

In a small sauce pan, combine the unwrapped caramels and the whipping cream. Stir occasionally until melted.

While the sauce is melting, peel each apple. Cut the apples in half perpendicular to the core. Use an apple slicer to core and slice the apples.

Remove dough from fridge. Place about a tablespoon of the caramel sauce in the center of each disc. Sprinkle a few pieces of the sea salt in the middle (Go easy, less is more). Pick up each half apple and place on the caramel, pushing it into the caramel. Brush rim of dough with cream. In a small bowl, mix together the cinnamon and sugar, then generously sprinkle over the pastries.

Bake for 20 minutes or until pastry is golden and apples are soft.

Place white chocolate and butter in a small bowl. Microwave for 30 seconds, stirring every 10 seconds. Repeat if needed until melted. Add remaining tablespoon of cream. Add more cream if needed to get a runny consistency. Drizzle over warm pastries.

 photo TGIF_zps40a588c0.png"/>"/>“ />
Foodies and Crafties Soiree

You might also like:

Picture
Picture
Picture
Picture
3 Comments

Christmas Ornaments

11/23/2012

0 Comments

 
6 years ago, Jeff and I were married 2 days before Christmas. Our colors were black, brown, green and cream. For the decorations on the tables, we used black and brown Christmas balls of various sizes. As a result, I have a ton of ornaments. Last year, we bought a real Christmas tree for the first time and I couldn't stomach putting these basic ornaments on, so I rummaged through my stash of fabric samples and busted out the glue gun and came up with the ornaments below.
Picture
I did a few different things with these. Once I got started my imagination ran wild. For one, I just wrapped strips of fabric virtically around the ball. For another one, I took small squares of fabric and just started gluing. With a fabric that I particularly liked, I just cut a large square and folded it up putting dots of glue to hold it in place. For the bottom left, I cut almond shaped pieces and glued them on. Below are picture instructions for the ruffley ones.
Picture
0 Comments

Tractor Hat

11/18/2012

3 Comments

 
This hat came about for the son of a friend who lives on a ranch. As usual, I began by looking online for inspiration and I found the most amazing knitted dress with a tractor motif from Moods of Norway that you must check out. I also found a pretty good tractor chart on Tricksy Knitter, that I ended up adapting into my design. 
Kit's Crafts - Tractor Hat #FreeKnitPattern
This hat is knitted from the bottom up, starting with the ear flaps. For the body of the hat, I start out knitting in the round then switch to the intarsia in the round method for the Tractor Chart (it could be stranded if the intarsia method is too confusing) and I finish off the hat by knitting in the round. Also, the braid attached to the ear flaps is an 8-stranded square braid.

This hat is for a child 3-10 years old (19"-20 1/2" circumference; 8.5"  high). If you would like a different size, change your needle size.

Print the pattern.

Gauge: 
7 rows is 1", 5.5 STS is 1"

Materials:
Size 4 Double Point Needles (DPNs) and Circular Needles
1 skein of Caron Simply Soft in Dark Sage and Sunshine
Size E Crochet Hook
Yarn Needle
Tractor Chart

Abbreviations:
MC = Main Color
CC = Contrast Color
CO = Cast On
K = Knit
M1A = Make 1 Away
STS = Stitches
PM = Place Marker
K2Tog = Knit 2 Together
SC = Single Crochet
SL = Slip Stitch

Ear Flaps:
Using the circular needles, with MC, CO 3 STS
Row 1: K1, P to 1 before end, K1
Row 2: K1, M1A, K to 1 before end, M1A, K1
Repeat Rows 1 and 2 until there are 33 STS (30 rows total). Repeat Row 1 once more. Cut yarn. Push the ear flap out of the way of the needles and hold on the circular part.
For the second ear flap, repeat the same process as for the first, but don't cut the yarn.

Hat Body:
Turn and K across the 2nd ear flap. Using a Cable CO, loosely CO 23 STS, K across the 1st ear flap. Again, using the Cable CO, loosely CO 7 STS, PM. (96 STS)
Being careful not to twist, connect for knitting in the round. Knit 2 rows in MC then start Tractor Chart.
Switch to DPNs in the last row of the Tractor Chart.
The rest of the hat will be knitted in the CC.

Decreases:
Round 1: *K10, K2Tog, repeat from * around (88 STS)
Round 2, 4, 6, 8, 10: K around
Round 3: *K9, K2Tog, repeat from * around (80 STS)
Round 5: *K8, K2Tog, repeat from * around (72 STS)
Round 7: *K7, K2Tog, repeat from * around (64 STS)
Round 9: *K6, K2Tog, repeat from * around (56 STS)
Round 11: *K5, K2Tog, repeat from * around (48 STS)
Round 12: *K2, K2Tog, K2 repeat from * around (40 STS)
Round 13: *K3, K2Tog, repeat from * around (32 STS)
Round 14: *K1, K2Tog, K1 repeat from * around (24 STS)
Round 15: *K1, K2Tog, repeat from * around (16 STS)
Round 16: K2Tog around (8 STS)
Cut a 6" tail and using the yarn needle, thread through the remaining STS and pull tight to close up the hole then go through the top of the hat and tie a knot inside of the hat. Weave in loose ends.

Finishing:
SC around the edge of the hat with MC. Weave in ends.
Using CC, loosely SL into the knit stitches around the base of the SCs just made. Weave in ends.
Using MC, make 4 long strands for the braids (I usually just do the length between my hands outstretched). Fold in half and using the crochet hook, pull about an inch of the middle of the strands through the middle of the ear flap, then pull the ends through the loop just made. Cut the ends to about 3" past how long you want the braid to go, then do the square braid and tie a knot at the end. Trim up the ends if necessary.

Below is a picture of the inside of the hat. You can see where I stranded and where I used bobbins for intarsia. There is also a picture of the seam; it is along the front of the tractor on the left.
Picture
3 Comments

Nativity Puppets

11/16/2012

6 Comments

 
Every year for our church Christmas party the children dress up and act out the nativity. To streamline the process, we decided to do a puppet show. Using some finger puppets as inspiration, I came up with patterns for hand puppets. I got together with the rest of the Primary Presidency and we spent the better half of the day creating these super cute little puppets. Below the pictures is a list of materials and a link for the patterns.
Picture
Materials:
* Patterns (the donkey's mane and the cow's spots are not included)
* Felt
* Googily Eyes
* Various Buttons and Ribbon
* Pink Ink Pad and Q-tip (for rosy cheeks)
* Markers
* Glue Gun
* Sewing Machine/Clear Thread (Optional)

We sewed the glove part of the puppets together because we figured that would be easier than gluing it, but you could glue it. Also, the pattern does not allow for a seam allowance for the glove part because we did not turn them inside out after sewing. Everything else is glued onto the glove. Oh, and we are starting our Nativity with Samuel the Lamanite prophesying of Christ's coming.
6 Comments

Tales of a Quiet Book, Cupcakes

11/14/2012

0 Comments

 
In looking for ideas to incorporate colors into the quiet book, I came across a little baking page by Imagine Our Life. The outcome of this inspiration is a little time consuming, but very cute.
Picture
For this page, you will need the usual suspects, felt, steam a seam, reinforcement material (for page stability and to reinforce snaps), various fabrics/ribbon for different items/embellishments, matching thread and the pattern. Make sure to UNCHECK THE FIT TO PAGE BOX when printing the pattern, also, pre-wash all fabrics before cutting. You will also need snaps

Here is the process:
* Cut a cupcake liner from each color of felt and steam a seam
* Layout on the page using the template, then iron onto page
* Place embellishments (I used ribbon for all of mine) and sew embellishments to page
* Using a satin stitch, attach the cups to the page
* Cut bowl and sew along the fold to secure it
* Attach bowl to page using satin stitch
Picture
Now its onto the cupcake tops. Here is where the time consuming part comes in.

* Cut each top/embellishment from their respective fabric as well as from steam a seam
* Attach each embellishment to each top and do any embroidery work
* Iron top to a strip of felt of the same color and attach to felt using a satin stitch
* Sew female side of each snap to the page above the cupcake liners (make sure to go through the reinforcement on the back of the page)
* Cut a piece of the reinforcement just bigger than the snap
* Sew male side of the snaps to felt going through the reinforcement, don't cut the thread
* Place the top where you would like it to be on the page
* Put your thumb over the top where the snaps would meet
* Position the male side of the snap beneath your thumb and sew the top to the snap
* Cut out the top leaving a tiny halo of felt around the top
* Continue in this manner for all of the cupcake tops
* Sew on a 1 1/2" binding and you are done!
Picture
0 Comments

Almond Chocolate Cream Tart

11/13/2012

5 Comments

 
This weekend, we attended a soup and pie night. I brought two pies, well a pie and a tart. Pretty much every time I bake I look first to Dorie Greenspan's From My Home to Yours, which is perhaps the BEST baking book known to man. This time around, I did just that for a Chocolate Cream Tart. I made two modifications, I added a teaspoon of almond extract after mixing in the butter to the chocolate (it was a little strong, you may want to use 1/2 a teaspoon) and I used the recipe below for the crust, which was adapted from Dorie's Sweet Tart Dough:

1 3/4 cups Nilla cookies crushed (about 50 cookies)
1 stick plus 2 tablespoons butter
3/4 cup crushed almond slices

Combine ingredients in a food processor and press into a buttered tart pan. Freeze for 30 minutes.

Center a rack in the oven and preheat the oven to 375 degrees. Butter the shiny side of a piece of aluminum foil and fit the foil tightly against the crust. Bake the crust 25 minutes, then carefully remove the foil.If the crust has puffed, press it down gently with the back of a spoon.  Bake for another 8 minutes, until it is golden and firm. Transfer the crust to a cooling rack, in its pan, and cool completely.
Picture
5 Comments

Trees!

11/9/2012

1 Comment

 
Picture
I came across this bookshelf by Shawn Soh a few weeks ago and fell in love! Then, I was in Anthropologie and saw these cute little trees:
Picture
On Studio 5 I saw a way to make trees festive for Halloween, but I think you could have a tree that you switch out ornaments for every holiday. Perhaps one day when I am in a house instead of a condo, I will do that....
1 Comment

Tales of a Quiet Book, Braid Page

11/7/2012

0 Comments

 
The inspiration for this page is a collaboration of two pages. The face and hair came from Craftalicious, but the waving hand came from a pirate page at Orange Crafts. I'm pretty pleased with the outcome.
Picture
For this page, beyond the basics, you will need:
* The template to lay out the page
* Pattern for this page (remember, when printing patterns UNCHECK THE FIT TO PAGE BOX)
* Ribbon for the shirt and for the hair
* Embroidery thread
* Two buttons, one matching the flesh colored felt and another to anchor it from behind
* Eyelet
* Yarn

So to start with, cut the head out of flesh colored felt. If it is see through, cut out a second one. Then embroider the face onto the felt. Here is a tutorial for how to embroider onto felt. I used a back stitch to create the face and filled the eyes with a chain stitch in a spiral.

The next thing is to decorate the shirt. If I had to do it over, I might have made a pocket on the shirt for hairties, but I'm not sure that is necessary. Anyway, I created the tuxedo shirt by first doing a basting stitch down the center of the ribbon, then pulling one of the strings to ruffle the ribbon. Then, I pinned and sewed each ribbon, one at a time.
Picture
The next step is to sew the face, shirt, and arm to the page. I added the binding strip (a 3"x9" piece of fabric ironed in half) at this time so I would remember which side it was on.
Next you will attach the hair.
* Measure how long you want the hair (over shoot it).
* Then just make it as thick as you like.
* To sew it on, I twisted it a couple times then placed it where I wanted the hair to lie, then sewed it on.
* Then give the girl a trim and add some barrettes (mine are just ribbons sewn on with a button)
Picture
Now to the hand.
* Cut one hand from felt and one from the reinforcement material
* Sew the cut hands to another piece of felt
* Install an eyelet in the lower middle of the palm
* Attach the hand to the page by sewing the two buttons together through the eyelet
Picture
0 Comments
<<Previous
    Kit's Crafts
    Hey there! I'm Kristin, aka Kit. Here is just a peek into my crafting mind. I hope you find something to spur your creativity!
    Instagram

    Kit's Crafts Shop

    Popular Posts

    Picture
    Picture
    Picture
    Picture
    Picture
    Picture

    RSS Feed

    Picture
    Kit's Crafts
    Picture
    The Yarn Box

    Featured Here

    Picture
    Moogly
    Picture

    Categories

    All
    About
    Baby
    Baking
    Bio
    Caramel
    Child
    Chocolate
    Christmas
    Cooking
    Crochet
    Decor
    Dessert
    Dress
    Free Knit/crochet Pattern
    Free Sewing Pattern
    Interior Design
    Knitting
    Link Party
    Materials
    Pattern
    Quiet Book
    Quiet Book
    Recipe
    Selling Handmade Goods
    Sewing
    Spats
    T Shirt
    Tutorial

    Archives

    July 2020
    January 2020
    July 2019
    November 2018
    September 2018
    August 2018
    July 2018
    May 2018
    April 2018
    February 2018
    January 2018
    April 2016
    September 2015
    March 2015
    February 2015
    November 2014
    October 2014
    September 2014
    August 2014
    July 2014
    June 2014
    May 2014
    April 2014
    March 2014
    February 2014
    January 2014
    December 2013
    November 2013
    October 2013
    September 2013
    August 2013
    July 2013
    June 2013
    May 2013
    April 2013
    March 2013
    February 2013
    January 2013
    December 2012
    November 2012
    October 2012

Powered by Create your own unique website with customizable templates.