
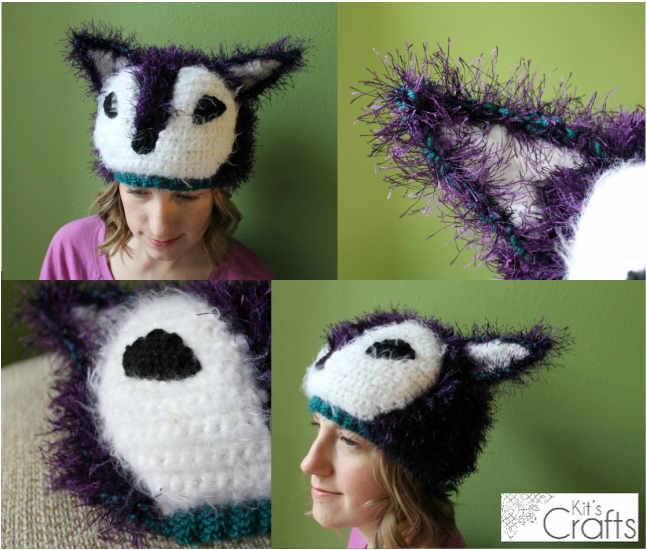
In general, I don't really like eyelash yarn, but I was perusing the yarn isle at Joanns and this purple stuff was on close out for only 97¢, which I couldn't pass up. I figured I could make a little bear or something from it. When I got home, I remembered that I was planning on making character hats for my daughter to play dress up with, so I thought I would make a purple fox. I went through my stash and I didn't have a purple yarn that would match to double up the eyelash, but I did have a full skein of Caron Simply Soft in a peacock blue color. I figured you wouldn't be able to really see the blue, so I got started. After creating the base hat, I thought, this really looks like it should be a peacock, so I looked to Facebook and Google+ for a weigh in. After a few days, it was close, but the fox won out by 2 votes. So, here is a fox hat. (I have enough yarn, I may go back and make a peacock too!)
The sizing is a bit big for a child. It fits my head and kind of drowns my toddler, but you can adjust the sizing by using a smaller hook, or take out a row of increases and one of the rows on the length. Or you could skip more stitches when you are adding the band at the bottom.
Gauge: 2 1/2 rows x 6 stitches = 2" in double crochet of A & B
Size: Small Adult or teen
Materials:
Sizes I and G Hook
(A) 1/2 Skein (or less) Caron Simply Soft in Ocean (I think... It was a peacock blue)
(B) 1 1/4 Skein Lion Brand Fun Fur in Dark Violet
Fuzzy white worsted weight yarn and basic black worsted weight black for the face and ears
Yarn Needle
Long Pins
Safety Pins
Abbreviations:
CH = Chain
SC = Single Crochet
DC = Double Crochet
ST = Stitch
SK = Skip Stitch
SL = Slip Stitch
DC2tog = Double Crochet 2 stitches together
SC2tog = Single Crochet 2 stitches together
Hat:
Using the I hook and a strand of A and B, create a magic loop using 2 fingers, CH 2, 11 DC in loop, close loop and place a marker
Row 1: 2 DC in second CH, 2DC around
Row 2: (2 DC next DC, DC in next DC) around (36 STS)
Row 3: (2 DC next DC, DC in next 2 DC) around (48 STS)
Row 4: DC around
Row 5: (2 DC next DC, DC in next 3 DC) around (60 STS)
Leave marker in the next row to make counting rows easier, DC around for 7 rows, then do one row of SC, SL, Bind off and remove marker.
Now for the band, like I said previously, if you want it to be a bigger size, then catch every SC on the hat, or you could make it smaller by skipping more SCs on the hat.
Using the G Hook and only yarn A, pick up a loop through one of the SC in the last row, CH 5, SC in second CH from the hook, SC 3x
Rows: *SK the next SC on the hat, SL in the next SC on the hat, turn with the yarn in back (DON'T CH 1), SC in back loops only, CH 1, SC in back loops only, repeat from * around the hat and bind off, leaving a long enough tail to whip stitch the two ends together.
Weave in loose ends.
Outer Ear:
Using the I hook and a strand of A and B, CH 16, DC in third CH from hook, DC across, CH 2, turn
Rows: *SK first ST, DC in next, DC to last two STS, DC2tog, CH2, turn, repeat from * until only three STS remain, SK first ST, DC2tog and bind off
Repeat for second ear.
Inner Ear:
Using the I hook and the fuzzy white yarn, CH 12, DC in third CH from hook, DC across, CH 2, turn
Rows: *SK first ST, DC in next, DC to last two STS, DC2tog, CH2, turn, repeat from * until only three STS remain, SK first ST, DC2tog and bind off
Repeat for second ear.
Face:
*As a side note, I tried to leave enough of a tail when I started and at each of the bind offs to sew the face to the hat
Using the I hook and the fuzzy white yarn, CH20, 2 SC in second CH from hook, SC to last CH, 2 SC, CH 1, turn
Rows 1 - 5: 2 Sc in first SC, SC to last ST, 2 SC in last ST, CH 1, turn (28STS)
Row 6: 2 SC in first ST, SC in next 12 STS, CH 1, turn
Row 7: SC across, CH 1, turn
Rows 8, 10, & 12: 2 SC in first ST, SC in next 13 STS, CH 1, turn
Rows 9, 11, & 13: SK first ST, SC across, CH 1, turn
Rows 14 - 16: SC in next 14 STS, CH 1, turn
Rows 17, 19, 21, 23, & 25: SK first ST, SC to last 2 STS, SC2tog, CH 1, turn
Row 18: SC in next 12 STS, CH 1, turn
Row 20: SC in next 10 STS, CH 1, turn
Row 22: SC in next 8 STS, CH 1, turn
Row 24: SC in next 6 STS, CH 1, turn
Row 26: SC in next 4 STS, Bind off
Pull a loop one SC from the peak just made, SC to last ST, 2SC in last ST, CH 1, turn
Row 7: SC across, CH 1, turn
Rows 8, 10, & 12: SC in next 13 STS, 2 SC in last ST, CH 1, turn
Rows 9, 11, & 13: SC in next 11 STS, SC2tog, CH 1, turn
Rows 14 - 16: SC in next 14 STS, CH 1, turn
Rows 17, 19, 21, 23, & 25: SK first ST, SC to last 2 STS, SC2tog, CH 1, turn
Row 18, 20, 22, 24: SC across, CH 1, turn
Row 26: SC across, Bind off
Eyes:
Using the G hook and the black yarn, CH 10, SC in second CH from the hook, SC across, CH 1, turn
Rows 1 - 3: SK first ST, SC to last 2 STS, SC2tog, CH 1, turn
Rows 4: SK first ST, SC2tog, bind off, leaving a tail long enough to sew eyes to face
Repeat for the second eye
Nose:
Using the G hook and the black yarn, create a magic loop, 8 SC in the loop, close loop, SL to join
Row 1: CH 1, 2 SC around, SL into CH to join, bind off leaving a long enough tail to sew to hat
Assemble:
Start by placing the face on the hat where you would like it, then pin it to the hat using long pins. Begin at the bottom of the face with the tail from your original chains and begin to whip stitch around the hat. I tied my yarn when I reach a bind off or cast on, then continued with that tail.
Place and pin the eyes and nose to the face, then whip stitch in place.
Line up the bottom of each inner ear with each outer ear and use the tail of the inner ear to attach, taking care not to go completely through the outer ear.
Place the ears about 1" from the side of the face, with one corner following the angle of the eyes and the other corner lined up with the corner of each peak of the face. You will need to curve the ear a bit, which gives it more of a natural look, then safety pins to attach each ear to the hat and use the tail to whip stitch the ears on, making long stitches to prevent the ears from flopping around.
Weave in any loose ends.


 RSS Feed


