
I came up with a basic version of this hat a few years ago and wrote down most of the pattern. Recently, I had a friend contact me about making some hats for her kids for Christmas and resurrected this pattern for her daughter. I think it is a better version then the original.

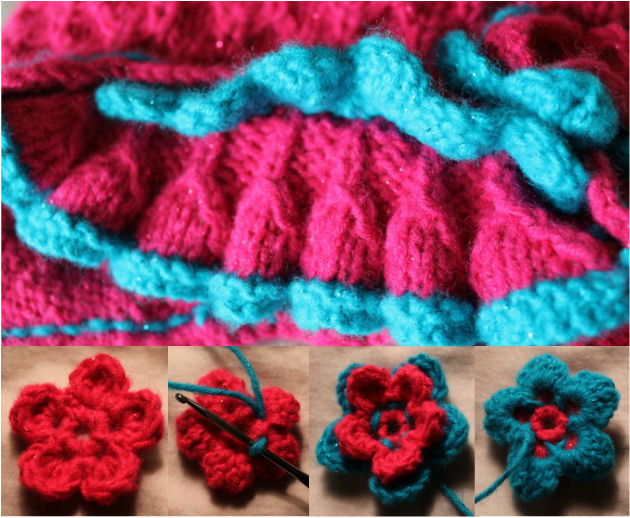
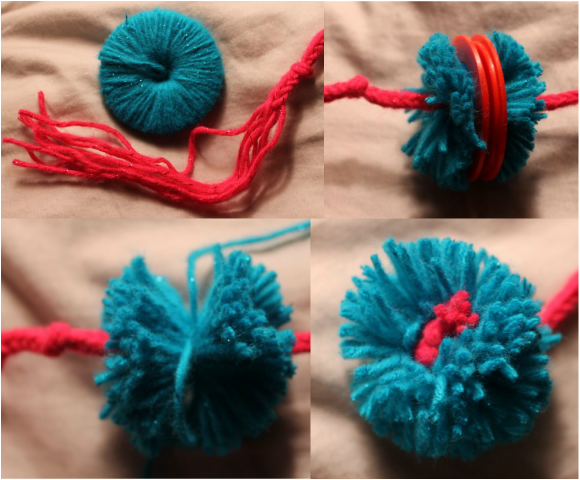
This hat is knit from the bottom up and makes use of the mock honeycomb stitch. The earflaps are knit back and forth then the hat is knit in the round. For the crown, decreases are made with cables. A ruffle is added to form a "brim" and adorned with a crocheted scalloped edge. To add charm, pom poms are attached to an 8-stranded square braid. To complete the girliness of this lovely little hat, a flower with a button center is added to the corner.
Gauge:
14 rows = 2"
10.5 STS = 2"
Materials:
* Size 4 Double Point Needles and Circular Needle
* Red Heart Shimmer in Hot Pink and Turquoise
* E Crochet Hook
* Yarn Needle
* Plastic Pom Pom Maker (or one from cardboard)
* 3/4" Button for flower
Gauge:
In Stockinette Stitch
Sizing:
* Child ages 3-10 yrs, (Teen and Adult)
Abbreviations:
MC = Main Color (Hot Pink)
CC = Contrast Color (Turquoise)
CO = Cast On
K = Knit
P = Purl
M1A = Make 1 Away
WYIF = With Yarn In Front
PS = Pick up 2 strands below and knit with the next stitch (Image below)
STS = Stitches
X = Times
PM = Place Marker
K2Tog = Knit 2 Together
SC = Single Crochet
SL = Slip Stitch
SLM = Slip Marker
K2TOG = Knit 2 together
CB8 = SL 4 STS to cable needle, hold in back and K4, [K2TOG, K2] from the cable needle
CB7 = SL 4 STS to cable needle, hold in back and K3, [K2TOG, K2] from the cable needle
CB6 = SL 3 STS to cable needle, hold in back and K2TOG, K1, [K2TOG, K1] from the cable needle
CB4 = SL 2 STS to cable needle, hold in back and K2TOG, K2TOG from the cable needle
PSSO = Pass Slipped Stitch Over
SC = Single Crochet
DC = Double Crochet
TR = Triple Crochet
Gauge:
14 rows = 2"
10.5 STS = 2"
Materials:
* Size 4 Double Point Needles and Circular Needle
* Red Heart Shimmer in Hot Pink and Turquoise
* E Crochet Hook
* Yarn Needle
* Plastic Pom Pom Maker (or one from cardboard)
* 3/4" Button for flower
Gauge:
In Stockinette Stitch
Sizing:
* Child ages 3-10 yrs, (Teen and Adult)
Abbreviations:
MC = Main Color (Hot Pink)
CC = Contrast Color (Turquoise)
CO = Cast On
K = Knit
P = Purl
M1A = Make 1 Away
WYIF = With Yarn In Front
PS = Pick up 2 strands below and knit with the next stitch (Image below)
STS = Stitches
X = Times
PM = Place Marker
K2Tog = Knit 2 Together
SC = Single Crochet
SL = Slip Stitch
SLM = Slip Marker
K2TOG = Knit 2 together
CB8 = SL 4 STS to cable needle, hold in back and K4, [K2TOG, K2] from the cable needle
CB7 = SL 4 STS to cable needle, hold in back and K3, [K2TOG, K2] from the cable needle
CB6 = SL 3 STS to cable needle, hold in back and K2TOG, K1, [K2TOG, K1] from the cable needle
CB4 = SL 2 STS to cable needle, hold in back and K2TOG, K2TOG from the cable needle
PSSO = Pass Slipped Stitch Over
SC = Single Crochet
DC = Double Crochet
TR = Triple Crochet
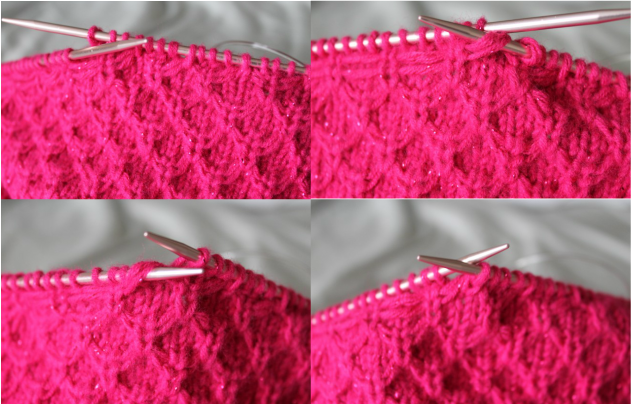
PS = Pick up 2 strands below and knit with next stitch
Ear Flaps:
For all sizes
Using the circular needles, with MC, CO 3 STS
All Odd Rows: K1, P to 1 before end, K1Row 2: K1, M1A, K1, M1A, K1 (5 STS)
Row 4: K1, M1A, SL3 WYIF, M1A, K1 (7 STS)
Row 6: K1, M1A, K1, SL3 WYIF, K1, M1A, K1 (9 STS)
Row 8 K1, M1A, K3, PS, K3, M1A, K1 (11 STS)
Row 10: K1, M1A, [K1, SL3 WYIF] twice, K1, M1A, K1 (13 STS)
Row 12: K1, M1A, K1, [K1, SL3 WYIF] twice, K2, M1A, K1 (15 STS)
Row 14: K1, M1A, K4, [PS, K3] twice, K1 M1A, K1 (17 STS)
Row 16: K1, M1A, K1, [K1, SL3 WYIF] 3X, K2, M1A, K1 (19 STS)
Row 18: K1, M1A, K2, [K1, SL3 WYIF] 3X, K3, M1A, K1 (21 STS)
Row 20: K1, M1A, K5, [PS, K3] 3X, K2 M1A, K1 (23 STS)
Row 22: K1, M1A, K2, [K1, SL3 WYIF] 4X, K3, M1A, K1 (25 STS)
Row 24: K1, M1A, K3, [K1, SL3 WYIF] 4X, K4, M1A, K1 (27 STS)
Row 26: K1, M1A, K6, [PS, K3] 4X, K3 M1A, K1 (29 STS)
Row 28: K1, M1A, [SL3 WYIF, K1] 6X, SL3 WYIF, M1A, K1 (31 STS)
Row 30: K1, M1A, K1, [SL3 WYIF, K1] 7X, M1A, K1 (33 STS)
Child:
(You will no longer make increases)
Row 32: K4, [PS, K3] 7X, K1 (33 STS)
Row 34 and 36: [K1, SL3 WYIF] 8X, K1
Row 38: K2, [PS, K3] 7X, PS, K2
Teen and Adult:
Row 32: K1, M1A, K3, [PS, K3] 7X, M1A, K1 (35 STS)
Row 34: K1, M1A, K1, [SL3 WYIF, K1] 8X, M1A, K1 (37 STS)
Row 36: K1, M1A, K2, [SL3 WYIF, K1] 8X, K1, M1A, K1 (39 STS)
(You will no longer make increases)
Row 38: K5, [PS, K3] 8X, K2 (39 STS)
Row 40 and 42: K2, [SL3 WYIF, K1], K1 9X, K1
Row 44: K3, [PS, K3] 9X
Cut yarn. Push the ear flap out of the way of the needles and hold on the circular part.
For the second ear flap, repeat the same process as for the first, but don't cut the yarn.
Hat Body:
Child:
Using a cable cast on, CO 3 STS, knit across 1st ear flap, again using the cable cast on, CO 27 STS, knit across 2nd ear flap, PM. Being careful not to twist, connect for knitting in the round for the rest of the hat. (96 STS)
Teen and Adult:
Using a cable cast on, CO 5 STS, knit across 1st ear flap, again using the cable cast on, CO 29 STS, knit across 2nd ear flap, PM. Being careful not to twist, connect for knitting in the round for the rest of the hat. (112 STS)
All Sizes:
Rounds 1 and 3: K2, *SL3 WYIF, K1, repeat from * until the last 2 STS, SL2 WYIF
Rounds 2 and 4: SLM WYIF, SL1 WYIF, K around
Round 5: *K3, PS, repeat from * around
Rounds 6, 8, 10, 12: K around
Rounds 7 and 9: *SL3 WYIF, K1, repeat from * around
Round 11: K1, *PS, K3 repeat from * to last 3 STS, PS, K2
Child:
Complete these 12 rows 4 times, then rows 1-6 once more, knit one more round and switch to double point needles.
Teen and Adult:
Complete these 12 rows 5 times, then rows 1-6 once more, knit one more round and switch to double point needles.
Decreases:
Round 1: CB8 around (84 STS, 98 STS)
Rounds 2 & 3: K around
Round 4: CB7 around (72 STS, 84 STS)
Rounds 5 & 6: K around
Round 7: CB6 around (48 STS, 56 STS)
Round 8: K around
Round 9: CB4 around (24 STS, 28 STS)
Round 10: K2TOG around (12 STS, 14 STS)
Cut yarn leaving a 6" tail, thread tail through STS and pull tight to close hole. Weave in ends.
Using an E crochet hook, with MC, SC around the edge. Using the same hook, with CC, loosely SL into the knit stitches at the base of the SC's just made.
Ruffle:
With CC, CO 87 STS using a long tail cast on.
Row 1: K12, *P3, K9, repeat from * until last 3 STS, K3
Row 2: K3, *K9, P3, repeat from * until last 12 STS, K12
Row 3: Switch to MC, K3, *SSK, K5, K2TOG, P3, repeat from * until last 3 STS, K3 (73 STS)
Row 4: K3, *P7, K3, repeat from * until last 3 STS, K3
Row 5: K3, *SSK, K3, K2TOG, P3, repeat from * until last 3 STS, K3 (59 STS)
Row 6: K3, *P5, K3, repeat from * until last 3 STS, K3
Row 7: K3, *SSK, K1, K2TOG, P3, repeat from * until last 3 STS, K3 (45 STS)
Row 8: K3, *P3, K3, repeat from * until last 3 STS, K3
Row 9: K3, *SL 1, K2TOG, PSSO, P3, repeat from * until last 3 STS, K3 (31 STS)
Row 10: K3, *P1, K3, repeat from * until last 3 STS, K3
Row 11: K3, *P3, K1, repeat from * until last 3 STS, K3
Row 12: K6, *P1, K3, repeat from * until last 3 STS, K3
Row 13: K3, *P3, K1, repeat from * until last 3 STS, K3
Bind off, cut a long tail and, using the tail, sew ruffle to hat just above the SC's
Scalloped Edge:
Using E hook with CC, CH 25, turn, SC in 2nd CH from the hook, SC across
Turn, *Skip SC, 5DC in next SC, skip SC, SL in next SC, repeat from * across
Cut yarn, leaving a long tail, sew to hat with tail
Flower:
Using E hook, with MC, CH 5, SL in 1st CH to join in circle, CH4, SC in circle, [CH3, SC in circle] 4X, SL in CH4, CH1, (DC, TR, CH1, TR, DC, SL) in CH4 space, then in each CH3 space, SL into 1st SLCut YarnFrom the back side, w/CC, pull up loop around one of the SC posts, CH1, [CH4, SC] around remaining posts, SL in 1st CH
CH1, turn, [SC, 2DC, TR, CH1, TR, 2DC, SC] in each CH4 space (5X), SL in 1st SC
Cut long enough tail to sew flower to hat
Finishing:
Cut 4 long strands of MC, fold in half and slip knot through middle of one earflap
Make 8-stranded square braid and tie off at desired length
Repeat for second earflap
Make pom pom using either a plastic pom pom maker or two cardboard rings
After cutting the wrapped strands, but before tying off the pom pom, put braid through center of rings
then tie a tight knot, pull the rings from pom pom and position pom pom at bottom of braid
Cut any long ends


 RSS Feed


