
Alright, so I know I have been a little heavy on the sewing projects lately, but I promise in the next few weeks to have at least 1 knitting project and 1 crochet project. As for now, I am posting a beach bag I made last week. We started swim lessons and I realized the day before that we did not have a proper bag to take to the pool, so I rummaged through my fabric remnants bin then looked to the internet for inspiration. I basically followed the directions provided by Say Yes To Hoboken for the Purple Striped Market Tote, of course with a few select changes to make it mine.
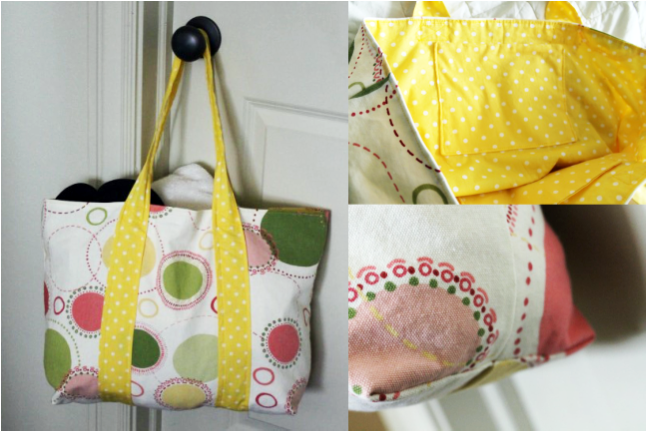
Materials:
* At least half a yard of fabric for the outside, preferably a canvas or other durable material
* 3/4 to 1 yard of fabric for the lining and the straps, I just used a basic cotton, you may want to buy straps by the yard, in which case you will need 3 1/2 yards and only 3/4 yard for the lining and pockets
* Sewing machine, thread and pins
* Fabric tape measure
Instructions:
* Prewash and iron all fabrics
* Start by folding your fabric (for both the lining and the bag) in half and cut along fold, then cut the sides to straighten them out
* Use your tape measure to determine the length of your straps (mine were 60" each), then cut strips this length and 4" wide (you may need to piece together a few strips to get the right length)
* Fold each strip, right sides together and pin, then sew shut with a 1/4" seam allowance
* Turn straps right side out and iron flat
* Place each strap on the appropriate bag piece where you want it to determine where the top of the bag meets the strap and mark with a pin, then using the width of the strip, pin that distance above the pin you just placed, repeat for the other side of the strap
* Fold each strap in half width-wise starting at the most recent pin and going around to the other side, pinning as you go, then sew the strap sides together
* Do a zigzag stitch where you started the straight stitch to secure it
* I did a decorative stitch along this new fold to give my straps more structure because I used such flimsy fabric, if you use a heavy weight fabric or get straps by the yard, that would be unnecessary.
* Measuring from the bottom center of your bag, place and pin your straps to the bag (my straps are 2.5" from center to edge of strap)
* Measure down from the top of the bag about 2" and mark with a pin
* Starting at the bottom of the bag, sew the straps on, but only go to the pin placed in the previous step
* Match up the sides of the bag along the bottom so the straps meet, then pin with right sides together
* Sew along sides and bottom of bag with a 1/4" seam allowance

Lining:
* Cut four rectangles for the pockets, the size doesn't really matter just that the edges are straight, I think mine were about 5" x 6", but I didn't measure
* Pin two of the rectangles with right sides together, then sew along sides and top with 1/4" seam allowance, repeat for remaining two rectangles
* Iron each pocket flat, then fold up the unsewn side 1/4" and iron
* Match the center of one lining piece with the center of one pocket and place the pocket about 1 1/2" from the top of the lining piece, then pin the pocket in place with the ironed up side facing in
* Sew around the sides and bottom of the pocket to attach
* Repeat previous two steps for remaining pocket and lining piece
* With right sides together, pin the lining pieces, marking off a 4"-6" section in the middle of one of the sides
* Sew along the sides and bottom with a 1/4" seam allowance, but when you come to the marked off section, back stitch, then baste through that section and back stitch again when reach the end of the section, then continue sewing
* Iron the basted seam, then unpick it
* At the bottom corners, match up the side seam and the bottom seam to create a triangle (with right sides together), then mark 3" from the peak of the triangle and draw a line (refer to picture), pin and sew along the line, then cut the excess fabric about 1/4" from the seam just made
* Repeat the previous step for the outside of the bag
* With right sides together, place the lining inside the bag and pin along the top, matching up the seams
* Sew along the top with a 1/4" seam allowance being careful not to catch the straps in the seam
* Pull the bag through the hole left in the side of the lining to turn them both right side out
* Sew the opening shut along the iron marks you made before unpicking the basting stitches (if you were to properly do this you would hand sew, but as it is a beach bag and I didn't really care, I took it to the machine)
* Iron the top to flatten out the seam, then top stitch along the top to secure placement
* Reinforce the straps by sewing a box and X in the unsewn space left near the top
* Head to the pool/beach to show off your new bag!
PS. The best part is that you can just throw it in the wash with like colors!

You might also like:
 |  |  |  |
Where I partied:
  |   |


 RSS Feed


