Kit's Crafts
  • Home
  • About
    • Selling Handmade Goods
  • Knitting
  • Crochet
  • Sewing
  • Crafting
    • Just for Fun
    • Wall Decor
    • Christmas Fun
    • Party On
  • From the Kitchen
    • Chocolate
    • Sweet
    • Savory
  • Quiet Book
  • The Shop

Ricky's Blanket

1/24/2013

0 Comments

 
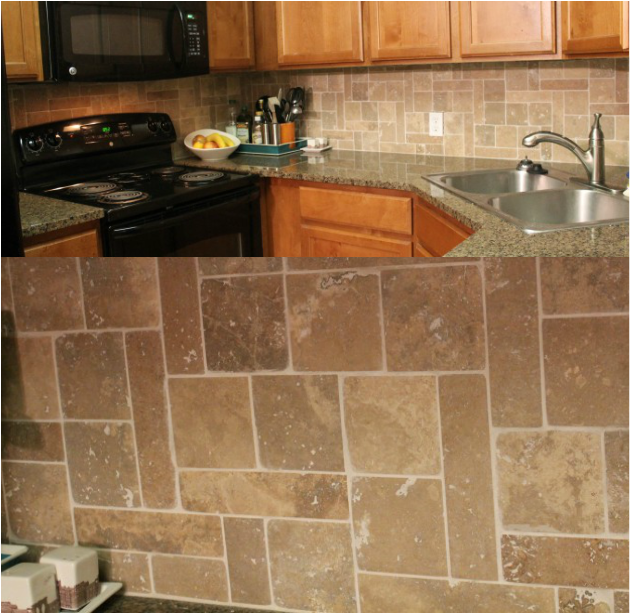
When my husband and I bought our condo I told him that I really wanted to tile the backsplash in our kitchen. I found out that every May, Contempo Tile has a psycho sale to get rid of discontinued tile and tile from deals that went south. We went last May and found the most beautiful travertine tiles. We walked away with 50 square feet and supplies for installation spending only $80. The only problem is that we do not own a tile saw. So, we contacted a guy my husband works with, Ricky and not only did he let my husband borrow it, but he showed up to help. Below is a picture of the end product, which I must say turned out even better than I had hoped!
Picture
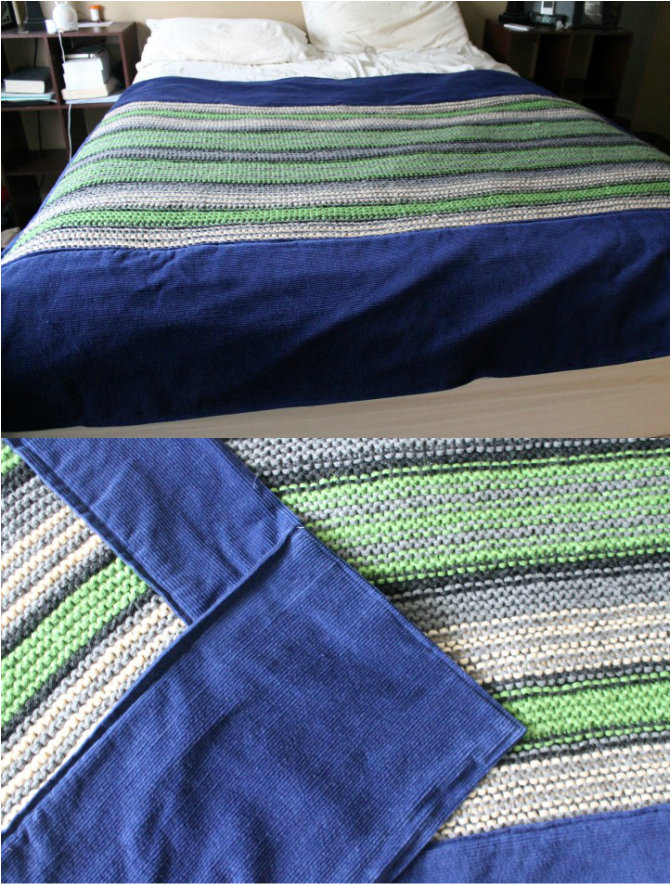
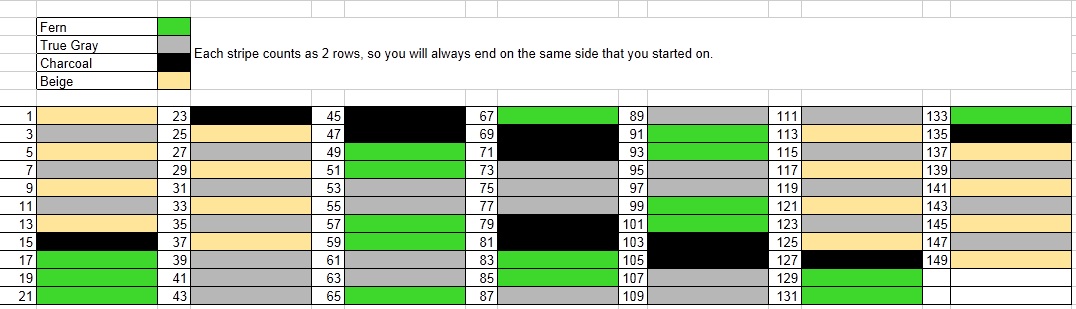
Anyway, as a thank you to Ricky, I made him an afghan. I really don't like to make blankets because it seems to take forever, but Ricky had mentioned he was looking to get one (his house is REALLY cold). My inspiration for the general design of the blanket came from a bathroom mat by Thomas O'brien. I kept the stripe pattern, but changed the colors to go with Ricky's house, then added a wide binding. The final measurements are 72" x 64", so really I guess it is more of a blanket than an afghan. Originally, I had planned on just knitting the blanket, but it was taking forever, so I ended the madness and attached a fabric binding to get the final size.
Kit's Crafts - Ricky's Blanket #FreeKnitPattern
Materials:
* 2-3 Skeins Lion Brand Vanna's Choice in Charcoal Gray
* 2-3 Skeins Lion Brand Vanna's Choice in Fern
* 2-3 Skeins Lion Brand Vanna's Choice in Beige
* 2-3 Skeins Loops and Threads, Impeccable in True Gray
* Size 13 Needles
* Blue Courderoy, two strips measuring 76" x 30" each and two strips measuring 44" x 18" each (Prewash before using)
* Sewing machine and thread

Abbreviations:
CG = Charcoal Grey
CO = Cast On
K = Knit
STS = Stitches

Gauge:
8 Rows and 5.5 Stitches = 2" in Stockinette Stitch

Instructions:
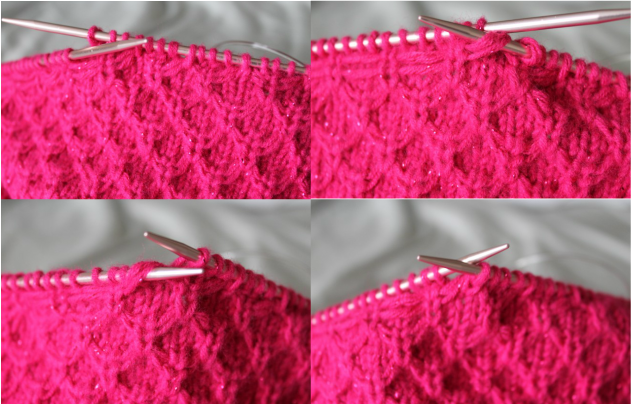
* With a double strand of CH and using a long tail cast on, CO 180 STS. Follow stripe pattern knitting every row with a double strand. Bind off and weave in ends.
* Fold each fabric strip in half lengthwise and iron (two 15" x 76" strips and two 9" x 44" strips)
* Open the fold, then fold up each long side 3" and iron (two 12" x 76" strips and two 6" x 44" strips)
Picture
Complete the following steps fully with each strip one at a time, it will be MUCH easier.
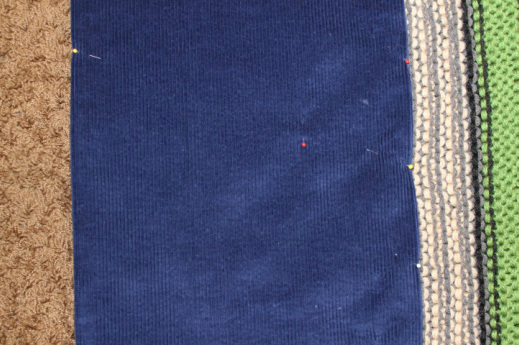
* Pin along the fold  and every so often in the middle to secure the binding folds while you attach the bindings to the blanket
* Lay the blanket out on the floor, it will have some stretch, start with the short sides and adjust the blanket to match 2" shy of the 6" x 44" strip on each side, then pin with long pins being careful to get
through all layers
* Take it to the sewing maching and do a straight stitch with a 3/8" seam allowance

For the long strips:
* Fold over and iron 2" on each of the short sides of the long strips
* Roughly, line up the centers of the stip and the blanket and pin from the center to the ends, adjusting the blanket as you go, matching up the edge of the blanket to the fold just made
* Tuck the short strips into the 2" fold of the long strip ends
* Sew the strip to the blanket
* Repeat with remaining strip

Finishing:
* Sew along the folds/edges of the strips
0 Comments

Bucking Bronco Hat

1/3/2013

4 Comments

 
Some of you may remember the tractor hat I posted not too long ago. This is essentially the same hat, with the exception of the color work pattern.
Kit's Crafts - Bucking Bronco Hat #FreeKnitPattern
This hat is knitted from the bottom up, starting with the ear flaps. For the body of the hat, I start out knitting in the round then switch to the intarsia in the round method for the Tractor Chart (it could be stranded if the intarsia method is too confusing, but make sure to keep the strands loose as the hat WILL NOT be stretchy) and I finish off the hat by knitting in the round. Also, the braid attached to the ear flaps is an 8-stranded square braid.

This hat is for a child, 4-12 years old. If you would like a different size, adjust your needles and/or your yard.

Print the pattern.

Gauge: 
7 rows is 1", 5.5 STS is 1"

Materials:
Size 4 Double
Point Needles (DPNs) and Circular Needles
1 skein of Caron Simply Soft in Bone and Chocolate
Size E Crochet Hook
Yarn Needle
Bronco Chart

Abbreviations:
MC = Main Color (Chocolate)
CC = Contrast Color (Bone)
CO = Cast On
K = Knit
M1A = Make 1 Away
STS = Stitches
PM = Place Marker
K2Tog = Knit 2 Together
SC = Single Crochet
SL = Slip Stitch

Ear Flaps:
Using the circular needles, with MC, CO 3 STS
Row 1: K1, P to 1 before end, K1
Row 2: K1, M1A, K to 1 before end, M1A, K1
Repeat Rows 1 and 2 until there are 33 STS (30 rows total). Repeat Row 1 once more. Cut yarn. Push the ear flap out of the way of the needles and hold on the circular part.
For the second ear flap, repeat the same process as for the first, but don't cut the yarn.

Hat Body:
Turn and K across the 2nd ear flap. Using a Cable CO, loosely CO 27 STS, K across the 1st ear flap. Again, using the Cable CO, loosely CO 3 STS, PM. (96 STS)
Being careful not to twist, connect for knitting in the round. Knit 2 rows in MC then start Bronco Chart.
Switch to DPNs in the last row of the Bronco Chart.
The rest of the hat will be knitted in the CC.

Decreases:
Round 1: *K10, K2Tog, repeat from * around (88 STS)
Round 2, 4, 6, 8, 10: K around
Round 3: *K9, K2Tog, repeat from * around (80 STS)
Round 5: *K8, K2Tog, repeat from * around (72 STS)
Round 7: *K7, K2Tog, repeat from * around (64 STS)
Round 9: *K6, K2Tog, repeat from * around (56 STS)
Round 11: *K5, K2Tog, repeat from * around (48 STS)
Round 12: *K2, K2Tog, K2 repeat from * around (40 STS)
Round 13: *K3, K2Tog, repeat from * around (32 STS)
Round 14: *K1, K2Tog, K1 repeat from * around (24 STS)
Round 15: *K1, K2Tog, repeat from * around (16 STS)
Round 16: K2Tog around (8 STS)
Cut a 6" tail and using the yarn needle, thread through the remaining STS and pull tight to close up the hole then go through the top of the hat and tie a knot inside of the hat. Weave in loose ends.

Finishing:
SC around the edge of the hat with MC. Weave in ends.
Using CC, loosely SL into the knit stitches around the base of the SCs just made. Weave in ends.
Using MC, make 4 long strands for the braids (I usually just do the length between my hands outstretched). Fold in half and using the crochet hook, pull about an inch of the middle of the strands through the middle of the ear flap, then pull the ends through the loop just made. Cut the ends to about 3" past how long you want the braid to go, then do the square braid and tie a knot at the end. Trim up
the ends if necessary.
4 Comments

Girly Girl Hat

12/14/2012

3 Comments

 
I came up with a basic version of this hat a few years ago and wrote down most of the pattern. Recently, I had a friend contact me about making some hats for her kids for Christmas and resurrected this pattern for her daughter. I think it is a better version then the original.
Kit's Crafts - Girly Girl Hat #FreeKnitPattern
This hat is knit from the bottom up and makes use of the mock honeycomb stitch. The earflaps are knit back and forth then the hat is knit in the round. For the crown, decreases are made with cables. A ruffle is added to form a "brim" and adorned with a crocheted scalloped edge. To add charm, pom poms are attached to an 8-stranded square braid. To complete the girliness of this lovely little hat, a flower with a button center is added to the corner.

Gauge:
14 rows = 2"
10.5 STS = 2"

Materials:
* Size 4 Double Point Needles and Circular Needle
* Red Heart Shimmer in Hot Pink and Turquoise
* E Crochet Hook
* Yarn Needle
* Plastic Pom Pom Maker (or one from cardboard)
* 3/4" Button for flower

Gauge:
In Stockinette Stitch

Sizing:
* Child ages 3-10 yrs, (Teen and Adult)

Abbreviations:
MC = Main Color (Hot Pink)
CC = Contrast Color (Turquoise)
CO = Cast On
K = Knit
P = Purl
M1A = Make 1 Away
WYIF = With Yarn In Front
PS = Pick up 2 strands below and knit with the next stitch (Image below)
STS = Stitches
X = Times
PM = Place Marker
K2Tog = Knit 2 Together
SC = Single Crochet
SL = Slip Stitch
SLM = Slip Marker
K2TOG = Knit 2 together
CB8 = SL 4 STS to cable needle, hold in back and K4, [K2TOG, K2] from the cable needle
CB7 = SL 4 STS to cable needle, hold in back and K3, [K2TOG, K2] from the cable needle
CB6 = SL 3 STS to cable needle, hold in back and K2TOG, K1, [K2TOG, K1] from the cable needle
CB4 = SL 2 STS to cable needle, hold in back and K2TOG, K2TOG from the cable needle
PSSO = Pass Slipped Stitch Over
SC = Single Crochet
DC = Double Crochet
TR = Triple Crochet
Picture
PS = Pick up 2 strands below and knit with next stitch
Ear Flaps:
For all sizes

Using the circular needles, with MC, CO 3  STS
All Odd Rows: K1, P to 1 before end, K1Row 2: K1, M1A, K1, M1A, K1 (5 STS)
Row 4: K1, M1A, SL3 WYIF, M1A, K1 (7 STS)
Row 6: K1, M1A, K1, SL3 WYIF, K1, M1A, K1 (9 STS)
Row 8  K1, M1A, K3, PS, K3, M1A, K1 (11 STS)
Row 10: K1, M1A, [K1, SL3 WYIF] twice, K1, M1A, K1 (13 STS)
Row 12: K1, M1A, K1, [K1, SL3 WYIF] twice, K2, M1A, K1 (15 STS)
Row 14: K1, M1A, K4, [PS, K3] twice, K1 M1A, K1 (17 STS)
Row 16: K1, M1A, K1, [K1, SL3 WYIF] 3X, K2, M1A, K1 (19 STS)
Row 18: K1, M1A, K2, [K1, SL3 WYIF] 3X, K3, M1A, K1 (21 STS)
Row 20: K1, M1A, K5, [PS, K3] 3X, K2 M1A, K1 (23 STS)
Row 22: K1, M1A, K2, [K1, SL3 WYIF] 4X, K3, M1A, K1 (25 STS)
Row 24: K1, M1A, K3, [K1, SL3 WYIF] 4X, K4, M1A, K1 (27 STS)
Row 26: K1, M1A, K6, [PS, K3] 4X, K3 M1A, K1 (29 STS)
Row 28: K1, M1A, [SL3 WYIF, K1] 6X, SL3 WYIF, M1A, K1 (31 STS)
Row 30: K1, M1A, K1, [SL3 WYIF, K1] 7X, M1A, K1 (33 STS)

Child:
(You will no longer make increases)
Row 32: K4, [PS, K3] 7X, K1 (33 STS)
Row 34 and 36: [K1, SL3 WYIF] 8X, K1
Row 38: K2, [PS, K3] 7X, PS, K2 

Teen and Adult:
Row 32: K1, M1A, K3, [PS, K3] 7X, M1A, K1 (35 STS)
Row 34: K1, M1A, K1, [SL3 WYIF, K1] 8X, M1A, K1 (37 STS)
Row 36: K1, M1A, K2, [SL3 WYIF, K1] 8X, K1, M1A, K1 (39 STS)
(You will no longer make increases)
Row 38: K5, [PS, K3] 8X, K2 (39 STS)
Row 40 and 42: K2, [SL3 WYIF, K1], K1 9X, K1
Row 44: K3, [PS, K3] 9X

Cut yarn. Push the ear flap out of the way of the needles and hold on the circular part.
For the second ear flap, repeat the same process as for the first, but don't cut the yarn.

Hat Body:
Child:
Using a cable cast on, CO 3 STS, knit across 1st ear flap, again using the cable cast on, CO 27 STS, knit across 2nd ear flap, PM. Being careful not to twist, connect for knitting in the round for the rest of the hat. (96 STS)

Teen and Adult:
Using a cable cast on, CO 5 STS, knit across 1st ear flap, again using the cable cast on, CO 29 STS, knit across 2nd ear flap, PM. Being careful not to twist, connect for knitting in the round for the rest of the hat. (112 STS)

All Sizes:
Rounds 1 and 3: K2, *SL3 WYIF, K1, repeat from * until the last 2 STS, SL2 WYIF
Rounds 2 and 4: SLM WYIF, SL1 WYIF, K around
Round 5: *K3, PS, repeat from * around
Rounds 6, 8, 10, 12: K around
Rounds 7 and 9: *SL3 WYIF, K1, repeat from * around
Round 11: K1, *PS, K3 repeat from * to last 3 STS, PS, K2

Child:
Complete these 12 rows 4 times, then rows 1-6 once more, knit one more round and switch to double point needles.

Teen and Adult:
Complete these 12 rows 5 times, then rows 1-6 once more, knit one more round and switch to double point needles.

Decreases:
Round 1:
CB8 around (84 STS, 98 STS)
Rounds 2 & 3: K around
Round 4: CB7 around (72 STS, 84 STS)
Rounds 5 & 6: K around
Round 7: CB6 around (48 STS, 56 STS)
Round 8: K around
Round 9: CB4 around (24 STS, 28 STS)
Round 10: K2TOG around (12 STS, 14 STS)

Cut yarn leaving a 6" tail, thread tail through STS and pull tight to close hole. Weave in ends.
Using an E crochet hook, with MC, SC around the edge. Using the same hook, with CC, loosely SL into the knit stitches at the base of the SC's just made.

Ruffle:
With CC, CO 87 STS using a long tail cast on.
Row 1: K12, *P3, K9, repeat from * until last 3 STS, K3
Row 2: K3, *K9, P3, repeat from * until last 12 STS, K12
Row 3: Switch to MC, K3, *SSK, K5, K2TOG, P3, repeat from * until last 3 STS, K3 (73 STS)
Row 4: K3, *P7, K3, repeat from * until last 3 STS, K3
Row 5: K3, *SSK, K3, K2TOG, P3, repeat from * until last 3 STS, K3 (59 STS)
Row 6: K3, *P5, K3, repeat from * until last 3 STS, K3
Row 7: K3, *SSK, K1, K2TOG, P3, repeat from * until last 3 STS, K3 (45 STS)
Row 8: K3, *P3, K3, repeat from * until last 3 STS, K3
Row 9: K3, *SL 1, K2TOG, PSSO, P3, repeat from * until last 3 STS, K3 (31 STS)
Row 10: K3, *P1, K3, repeat from * until last 3 STS, K3
Row 11: K3, *P3, K1, repeat from * until last 3 STS, K3
Row 12: K6, *P1, K3, repeat from * until last 3 STS, K3
Row 13: K3, *P3, K1, repeat from * until last 3 STS, K3

Bind off, cut a long tail and, using the tail, sew ruffle to hat just above the SC's

Scalloped Edge:
Using E hook with CC, CH 25, turn, SC in 2nd CH from the hook, SC across
Turn, *Skip SC, 5DC in next SC, skip SC, SL in next SC, repeat from * across
Cut yarn, leaving a long tail, sew to hat with tail

Flower:
Using E hook, with MC, CH 5, SL in 1st CH to join in circle, 
CH4, SC in circle, [CH3, SC in circle] 4X, SL in CH4, CH1, (DC, TR, CH1, TR, DC, SL) in CH4 space, then in each CH3 space, SL into 1st SLCut YarnFrom the back side, w/CC, pull up loop around one of the SC posts, CH1, [CH4, SC] around remaining posts, SL in 1st CH
CH1, turn, [SC, 2DC, TR, CH1, TR, 2DC, SC] in each CH4 space (5X), SL in 1st SC
Cut long enough tail to sew flower to hat
Picture
Finishing:
Cut 4 long strands of MC, fold in half and slip knot through middle of one earflap
Make 8-stranded square braid and tie off at desired length
Repeat for second earflap

Make pom pom using either a plastic pom pom maker or two cardboard rings
After cutting the wrapped strands, but before tying off the pom pom, put braid through center of rings
then tie a tight knot, pull the rings from pom pom and position pom pom at bottom of braid

Cut any long ends
Picture
3 Comments

Baby Bear Hat

12/7/2012

4 Comments

 
I finished this hat a couple days ago for a friend and it was too cute not to post. The inspiration came from this darling hat on etsy.
Kit's Crafts - Baby Bear hat #FreeKnitPattern
This hat is knitted from the bottom up, starting with the ear flaps. The braid attached to the ear flaps is an 8-stranded square braid. The ears and bow are knitted separately and sewn in place. This hat is for a newborn (3-6 months) (6-12 months). If you would like a different size, adjust your needles and/or your yard.

Print the pattern.

Gauge: 
10 rows is 2", 6.5 STS is 2"

Materials:
Size 10 Double Point Needles (DPNs) and Circular Needles
1 skein of Bernat Softee Chunky in Dark Taupe
1 skein of Lion Brand Baby's First in Fairy Tale
Size J Crochet Hook
Yarn Needle

Abbreviations:
MC  = Main Color
CC = Contrast Color
CO = Cast On
K = Knit
M1A = Make 1 Away
STS = Stitches
PM = Place Marker
K2Tog = Knit 2 Together
SC = Single Crochet
SL = Slip Stitch

Ear Flaps:
Using the circular needles, with MC, CO 3 STS
Row 1: K1, P to 1 before end, K1
Row 2: K1, M1A, K to 1 before end, M1A, K1
Repeat Rows 1 and 2 until there are 15 STS (17 STS) (19 STS).
Repeat Row 1 once more. Cut yarn. Push the ear flap out of the way of the needles and hold on the circular part.
For the second ear flap, repeat the same process as for the first, but don't cut the yarn.

Hat Body:
Turn and K across the 2nd ear flap. Using a Cable CO, loosely CO 13 STS (13 STS) (15 STS), K across the 1st ear flap. Again, using the Cable CO, loosely CO 3 STS (3 STS) (3 STS), PM. Total: 44 STS (52 STS) (56 STS)
Being careful not to twist, connect for knitting in the round. Knit all rounds until the hat reaches 5" (5.5") (6") and switch to double point needles for the decreases.

Decreases for all sizes:
Round 1: *K2, K2Tog, K2 repeat from * around (40 STS)
Round 2 and 4: K around
Round 3: *K1, K2Tog, repeat from * around
Round 5: K2Tog around

Cut a 6" tail and using the yarn needle, thread through the remaining STS and pull tight to close up the hole then go through the top of the hat and tie a knot inside of the hat. Weave in loose ends.

Finishing:
SC around the edge of the hat with MC. Weave in ends. Using CC, loosely SL into the knit stitches around the base of the SCs just made. Weave in ends. Using MC, make 4 long strands for the braids (I usually just do the length between my hands outstretched). Fold in half and using the crochet hook, pull about an inch of the middle of the strands through the middle of the ear flap, then pull the ends through the loop just made. Cut the ends to about 3" past how long you want the braid to go, then do the square braid and tie a knot at the end. Trim up the ends if necessary.

Ears:
Using MC with an invisible cast on, CO 12 STS while leaving an 8" tail
Row 1, 3, 5, 7, 9, 11: K across
Row 2, 4, 6, 8, 10, 12: Purl across
DO NOT BIND OFF

Cut an 8" tail and using the yarn needle, thread tail through stitches, sinch together and tie to secure. Use the yarn needle to thread original tail through cast on stitches (removing scrap thread as you go), sinch and tie to secure and cut working yarn.

Repeat the same process for the second ear. Use the tails to secure the ears to the hat.

Bow:
I got the pattern for the bow from Cornflower Blue. I did number 2, but I only cast on 11.

***UPDATE***
So, the blog I refer to for bow pattern that I used originally has been privatized or something, so here is a link to a similar bow, the Not-So-Itty-Bitty Bow by Untangling Knots.
Picture
Oombawka Design
Foodies and Crafties Soiree
4 Comments

Tractor Hat

11/18/2012

3 Comments

 
This hat came about for the son of a friend who lives on a ranch. As usual, I began by looking online for inspiration and I found the most amazing knitted dress with a tractor motif from Moods of Norway that you must check out. I also found a pretty good tractor chart on Tricksy Knitter, that I ended up adapting into my design. 
Kit's Crafts - Tractor Hat #FreeKnitPattern
This hat is knitted from the bottom up, starting with the ear flaps. For the body of the hat, I start out knitting in the round then switch to the intarsia in the round method for the Tractor Chart (it could be stranded if the intarsia method is too confusing) and I finish off the hat by knitting in the round. Also, the braid attached to the ear flaps is an 8-stranded square braid.

This hat is for a child 3-10 years old (19"-20 1/2" circumference; 8.5"  high). If you would like a different size, change your needle size.

Print the pattern.

Gauge: 
7 rows is 1", 5.5 STS is 1"

Materials:
Size 4 Double Point Needles (DPNs) and Circular Needles
1 skein of Caron Simply Soft in Dark Sage and Sunshine
Size E Crochet Hook
Yarn Needle
Tractor Chart

Abbreviations:
MC = Main Color
CC = Contrast Color
CO = Cast On
K = Knit
M1A = Make 1 Away
STS = Stitches
PM = Place Marker
K2Tog = Knit 2 Together
SC = Single Crochet
SL = Slip Stitch

Ear Flaps:
Using the circular needles, with MC, CO 3 STS
Row 1: K1, P to 1 before end, K1
Row 2: K1, M1A, K to 1 before end, M1A, K1
Repeat Rows 1 and 2 until there are 33 STS (30 rows total). Repeat Row 1 once more. Cut yarn. Push the ear flap out of the way of the needles and hold on the circular part.
For the second ear flap, repeat the same process as for the first, but don't cut the yarn.

Hat Body:
Turn and K across the 2nd ear flap. Using a Cable CO, loosely CO 23 STS, K across the 1st ear flap. Again, using the Cable CO, loosely CO 7 STS, PM. (96 STS)
Being careful not to twist, connect for knitting in the round. Knit 2 rows in MC then start Tractor Chart.
Switch to DPNs in the last row of the Tractor Chart.
The rest of the hat will be knitted in the CC.

Decreases:
Round 1: *K10, K2Tog, repeat from * around (88 STS)
Round 2, 4, 6, 8, 10: K around
Round 3: *K9, K2Tog, repeat from * around (80 STS)
Round 5: *K8, K2Tog, repeat from * around (72 STS)
Round 7: *K7, K2Tog, repeat from * around (64 STS)
Round 9: *K6, K2Tog, repeat from * around (56 STS)
Round 11: *K5, K2Tog, repeat from * around (48 STS)
Round 12: *K2, K2Tog, K2 repeat from * around (40 STS)
Round 13: *K3, K2Tog, repeat from * around (32 STS)
Round 14: *K1, K2Tog, K1 repeat from * around (24 STS)
Round 15: *K1, K2Tog, repeat from * around (16 STS)
Round 16: K2Tog around (8 STS)
Cut a 6" tail and using the yarn needle, thread through the remaining STS and pull tight to close up the hole then go through the top of the hat and tie a knot inside of the hat. Weave in loose ends.

Finishing:
SC around the edge of the hat with MC. Weave in ends.
Using CC, loosely SL into the knit stitches around the base of the SCs just made. Weave in ends.
Using MC, make 4 long strands for the braids (I usually just do the length between my hands outstretched). Fold in half and using the crochet hook, pull about an inch of the middle of the strands through the middle of the ear flap, then pull the ends through the loop just made. Cut the ends to about 3" past how long you want the braid to go, then do the square braid and tie a knot at the end. Trim up the ends if necessary.

Below is a picture of the inside of the hat. You can see where I stranded and where I used bobbins for intarsia. There is also a picture of the seam; it is along the front of the tractor on the left.
Picture
3 Comments

Strawberry Hat

10/23/2012

2 Comments

 
A few years back, I made hats for all of the nieces and nephews on my husband's side of the family. I will eventually post all of them with directions/links on how I did them and what yarn I used. To start off with, I made this little strawberry hat. When doing the research for strawberry hats, I found a lot of very basic patterns that were straight stockinette stitch or single crochets. Being the person that I am, I had to complicate it a bit and add texture. I found the star stitch and then I found a pattern for a hat using the star stitch. The only changes I made here was I used a G hook and I used Caron Simply Soft yarn in red. Below is the pattern for the brim:

Double Cluster Stitch:
Yo and insert hook from front to back around the post below the last dc, pull up a loop, *yo and pull through 2 loops on hook, repeat from*, skip next dc, insert hook from font to back on the next post, *yo and pull through 2 loops on hook, repeat from*, yo and draw through the 5 loops on hook

After joining the last row, ch2 (counts as first st), dc around, join with sl st

Ch 5, dc in next 2 dc, work Double Cluster Stitch, *dc in same dc and in next 2 dc, work Double Cluster Stitch, repeat from* around, join with sl st

Ch1, sc around, join with sl st

Switch to green, ch1, sc in same st, skip next st, *5 dc in next sc, skip next st, sc in next st, repeat from* around, join with sl st
Kit's Crafts - Strawberry Hat #FreeCrochetPattern
Now for embellishments!

For the stem, knit a 5 st I-cord of whatever length you like. I just kept going until I could tie a knot. Then sew it to the top

For the leaves, go here and do the basic leaf pattern. I made 5 then sewed them to the hat, overlapping a bit so the red wouldn't show through at the base of the stem.

For the flower, I crocheted a simple one you can find here. The instructions are toward the bottom and it is the purple flower. Add a cute little button when you sew the flower to the hat.

For the curly cue, crochet a chain to the desired length, then do 2sc in the second ch from the hook and do 2sc in every ch to the end. Sew it on next to the flower.

For the seeds, make little V stitches with a yarn needle every 2nd or 3rd stitch along each row.

Sew in the ends and tah dah, you are done!
2 Comments

Little Diamond Dress

10/17/2012

3 Comments

 
In an effort to use up some soft pink bamboo yarn and make a cute little outfit for my daughter, I searched Ravelry for baby dresses and came across the Glockenblume. I basically followed the pattern, but since my daughter is on the small side, I eliminated a "blossom" from the front and the back. The other modifcation I made was to the top. Instead of doing a reverse stockinette stitch on the straps and then joining with a kitchener stitch, I knitted every row and then started to decrease every other row on the inside after 12 rows. Then I overlapped the straps and sewed on the frill. I also added some cute eyelet trim I found at Joanns, which makes the bottom flare out a bit.
Kit's Crafts - Little Diamond Dress #FreeKnitPattern
3 Comments
Forward>>
    Kit's Crafts
    Hey there! I'm Kristin, aka Kit. Here is just a peek into my crafting mind. I hope you find something to spur your creativity!
    Instagram

    Kit's Crafts Shop

    Popular Posts

    Picture
    Picture
    Picture
    Picture
    Picture
    Picture

    RSS Feed

    Picture
    Kit's Crafts
    Picture
    The Yarn Box

    Featured Here

    Picture
    Moogly
    Picture

    Categories

    All
    About
    Baby
    Baking
    Bio
    Caramel
    Child
    Chocolate
    Christmas
    Cooking
    Crochet
    Decor
    Dessert
    Dress
    Free Knit/crochet Pattern
    Free Sewing Pattern
    Interior Design
    Knitting
    Link Party
    Materials
    Pattern
    Quiet Book
    Quiet Book
    Recipe
    Selling Handmade Goods
    Sewing
    Spats
    T Shirt
    Tutorial

    Archives

    July 2020
    January 2020
    July 2019
    November 2018
    September 2018
    August 2018
    July 2018
    May 2018
    April 2018
    February 2018
    January 2018
    April 2016
    September 2015
    March 2015
    February 2015
    November 2014
    October 2014
    September 2014
    August 2014
    July 2014
    June 2014
    May 2014
    April 2014
    March 2014
    February 2014
    January 2014
    December 2013
    November 2013
    October 2013
    September 2013
    August 2013
    July 2013
    June 2013
    May 2013
    April 2013
    March 2013
    February 2013
    January 2013
    December 2012
    November 2012
    October 2012

Powered by Create your own unique website with customizable templates.