Kit's Crafts
  • Home
  • About
    • Selling Handmade Goods
  • Knitting
  • Crochet
  • Sewing
  • Crafting
    • Just for Fun
    • Wall Decor
    • Christmas Fun
    • Party On
  • From the Kitchen
    • Chocolate
    • Sweet
    • Savory
  • Quiet Book
  • The Shop

Fancy Pants Cupcakes

8/27/2013

3 Comments

 
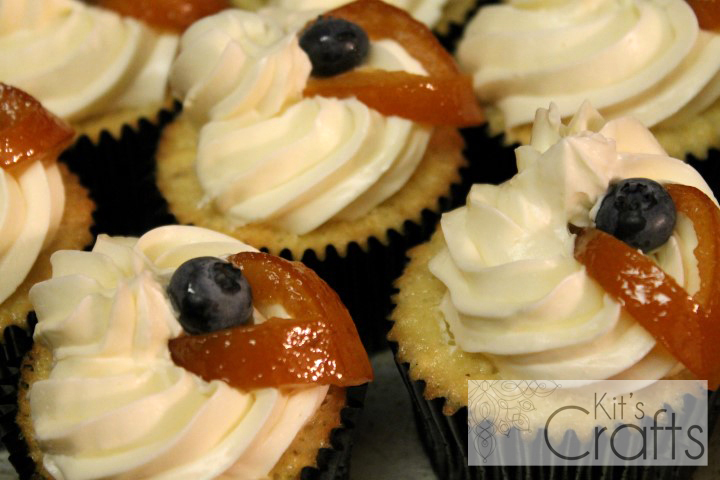
These cupcakes have been quite the labor of love. The inspiration came from Dorie Greenspan's White Chocolate Brownies, which is perhaps my favorite recipe of all time. They are comprised of subtle flavors that compliment each other so perfectly and the texture is fabulous! Anyway, so I set out to create a cupcake with these fabulous brownies in mind. I owe many thanks to my good friends Devin and Stephanie Davis who continually offered suggestions and "suffered" through taste tests. Anyway, the picture below features the cupcake, of course, which Devin frosted, and I added the candied orange peel (that Devin made, which takes a month!) and blueberry.
Kit's Crafts - Fancy Pants Cupcakes
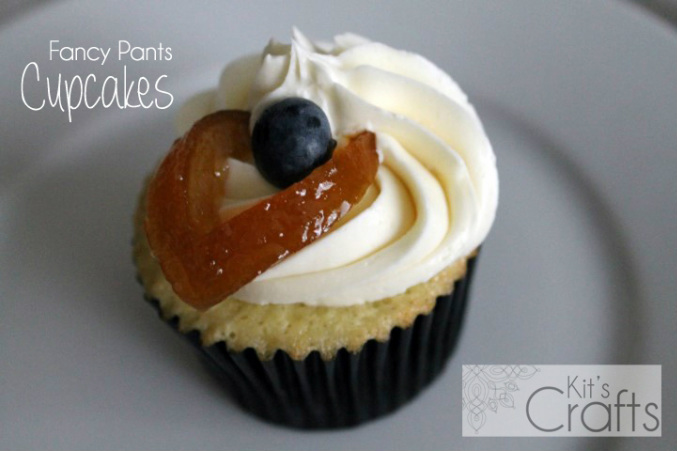
To give you a sum up of this delightful cupcake, it contains almonds, orange zest and blueberries and then is covered with a decadent white chocolate butter frosting. Make them tonight, you will NOT regret it!

Makes 30 cupcakes

Cupcake Ingredients:
2 1/2 cups All Purpose Flour
1/2 teaspoon Baking Powder
1/2 teaspoon Salt
1/3 cup Toasted Sliced Almonds (or toasted almond flour)
1 cup butter at room temperature
1 cup Sugar
zest from 1 Orange
4 Egg Yolks at room temperature
1 tablespoon Vanilla
1 cup buttermilk at room temperature
4 Egg Whites at room temperature
1 cup Sugar
1 cup Blueberries or Raspberries (it may be tempting to put more in, but refrain, it will overpower the other flavors)

White Chocolate Frosting Ingredients:
2 cups White Chocolate Chips
2 cups Unsalted Butter slightly softened

Directions:
Center rack in oven. Preheat oven to 350F. Line two 12 cup muffin tins with cupcake liners. (Although you will probably need three) 

Sift together flour, baking powder and salt. Reserve about 1 tablespoon of the dry mixture and place in a small bowl. Set both dry mixtures aside.

Pour almonds into a Ziplock bag and zip shut, squeezing the air out as you go. Pound the almonds with a mallet or a rolling pin to crush them. You want tiny bits, nothing to really chew. Add almonds to a large bowl or the bowl of a stand mixer, along with the butter. Cream together for about 3 minutes on medium. Zest the orange over the first cup of sugar, then remove the zest and set aside to add later. Add the sugar to the butter mixture, blending until light and fluffy. Mix in the egg yolks one at a time, blending after each addition. Turn the mixer to low and add about 1/3 of the dry ingredients and mix until there are just streaks, then add about 1/3 of the buttermilk and mix until just blended. Continue alternating the dry ingredients and the buttermilk in this fashion, only mixing until streaks remain, being careful not to over blend. With the last addition of the buttermilk, also add the vanilla and zest still only mixing until streaks are left.

In a separate bowl, with clean a mixer, whip the egg whites with the remaining cup of sugar until they reach a medium stiff peak. Gently fold the whipped whites into the rest of the batter until just a few white streaks remain.

Rinse the berries and coat with the reserved dry mixture. Fold berries into batter.

Ladle batter into muffin cups, filling each cup 2/3 full. Bake for 18 - 20 minutes or until the edges are golden and a toothpick entered into the center comes out clean. Let cupcakes cool to room temperature.

For frosting, melt chocolate in a double boiler with 1/4 cup of the butter until smooth, stirring occasionally. Set aside and Let cool a bit while you whip the butter.

Place the remaining 1 3/4 cups butter in the bowl of a stand mixer or in a large mixing bowl. Whip the butter on medium high for about 1-2 minutes or until light and fluffy. In a slow stream, blend in the melted white chocolate. Keep mixing until well blended. Once the cupcakes are room temperature, either pipe or spatula frosting on top.

You can make the cupcakes at least 2-3 days ahead of time; keep at room temperature in an airtight container. The frosting should only be made the night before and kept in the fridge in an airtight container. Wait to frost cupcakes until, at most, an hour ahead of serving.

Okay people, now it's your turn. Do share, what is your most favorite recipe of all time?
Kit's Crafts - Fancy Pants Cupcakes

Picture
3 Comments

Semi-Healthy Chocolate Cake

8/22/2013

11 Comments

 
I LOVE the harvest season! I don't have a garden, but my in-laws always grow way more veggies then they need, so I lovingly reap the rewards. Last week, I got a few zucchinis, so of course I had to make zucchini brownies. However, I thought I would try something new and replace the sugar with honey and the oil with yogurt. The yogurt makes the brownies more cakey and the honey makes them more moist, hence why this is a recipe for a cake. This recipe is loaded with chocolate (which makes it not so healthy) but I figured the zucchini, honey and yogurt make it somewhat healthy, hence the name. Anyway, share links to recipes you make every year during the harvest season in the comments!
Kit's Crafts - Semi-Healthy Chocolate Cake
Cake Ingredients:
2 cups All-Purpose Flour
1/2 cup Unsweetened Cocoa Powder
1 1/2 teaspoons Baking Soda
1 teaspoon Salt
1/3 cup Plain Yogurt or Greek Yogurt
1 1/3 cups Honey (preferably local)
2 teaspoons Vanilla Extract
2 cups Shredded Zucchini
2 cups Milk Chocolate Chips

Icing Ingredients:
1/4 cup Butter
6 tablespoons Unsweetened Cocoa Powder
2 cups Confectioners' Sugar
1/4 cup Milk
1/2 teaspoon Vanilla Extract

Directions:
Preheat oven to 325 F. Grease and flour a 9" x 13" baking pan.

In a medium bowl, combine flour, 1/2 cup cocoa powder, baking soda and salt. Set aside.

In a large bowl, mix together yogurt, honey and vanilla until well blended. Stir in the flour mixture. Fold in the zucchini and chocolate chips, then spread evenly into prepared pan.

Bake for 30 to 35 minutes or until the cake springs back when gently touched. Place on a cooling rake until room temperature.

While the cake is cooling, prepare the icing by first melting the butter in a small saucepan. Whisk in the remaining cocoa powder, then set aside. In a medium bowl, combine the confectioners' sugar, milk and vanilla until well blended. Stir in the butter mixture then spread over the cooled cake.

P.S. as a little tip, I usually get WAY more zucchini then our little family needs, so I send it through the grater on my food processor then freeze it in 2 cup increments so I can make stuff throughout the year!
Content in the Meantime
Picture
11 Comments

Caramel Puffed Wheat Squares

8/16/2013

0 Comments

 
In an effort to cut back on costs, I tried making my own granola bars, but they really weren't that great. For the recipe, I bought a bag of puffed wheat. Unfortunately, the puffed wheat sat in my cupboard for at least a month without being eaten. A couple Sundays ago I decided it was time to do something with this neglected cereal. Here is the recipe I made, which was adapted from a recipe I found at The Mother Huddle.
Kit's Crafts - Caramel Puffed Wheat Squares
Ingredients:
8 oz bag Puffed wheat
1/2 cup Butter
1 cup Brown Sugar
1/2 cup Light Corn Syrup
1 cup Sweetened Condensed Milk
12 oz bag Milk Chocolate Chips

Directions:
Grease a 9" x 13" pan. Pour puffed wheat into a large bowl and set aside.

In a medium saucepan, melt butter over medium low heat, but do not let boil. Add sugar and corn syrup, then turn up the heat and bring to a boil. Add sweetened condensed milk and return to a boil. Then, reduce heat to medium and, stirring constantly, cook to 240⁰ (soft ball stage), which takes about 10-15 minutes.

Pour caramel mixture over puffed wheat and mix thoroughly. Gently press into greased pan with the back of a wooden spoon.

In a small saucepan, melt the chocolate chips. Sporadically drop dollops of the melted chocolate on top of the caramel puffs, then spread into a semi even layer and let cool.

Once both layers are room temperature, cut into 16 rectangles. Store in an air tight container for up to a week.
Picture
0 Comments

Garlic Spirals

7/30/2013

0 Comments

 
Lately, on Pinterest, I have seen a lot of different ways to make monkey bread that depart from the typical gooey sugar and cinnamon syrup. One such recipe was Mini Garlic Monkey Bread over at Crumbs and Chaos. This recipe is simple enough and tastes pretty good, but, as usual, I took it up a notch and made spirals so that the flavoring spreads more evenly.
Kit's Crafts - Garlic Spirals
Ingredients:
2 cans (8 oz) Pillsbury® refrigerated crescent dinner roll (or you could just make your favorite baking powder biscuit dough from scratch)
6 Tablespoons Butter
4 Cloves Garlic (pressed, finely chopped, or grated)
1 Tablespoon Dried Parsley, Basil, Oregano, OR Italian Seasoning
1/4 cup Parmesan cheese


Preheat oven to 400F. Grease a 12 cup muffin tin.

In a small saucepan, melt the butter. Add the garlic and cook for 30 - 60 seconds. Remove from heat and stir in the parsley and Parmesan cheese. Set aside.

Open the cans of crescent rolls and unroll the dough into a flat rectangle (or roll dough from scratch into a rectangle). Brush the dough with the butter mixture. Starting on one of the long sides, begin tightly rolling the dough. When you reach the end, pinch the seam shut. Using dental floss, cut slices about 1/2" to 1" thick. Place up to 3 slices in each of the muffin cups. If needed, brush the tops with more of the butter mixture.

Bake for 12 - 14 minutes or until the edges are browned.

Another great twist on this classic is Maple Bacon Monkey Bread. Just switch out the butter mixture here and replace it with the maple bacon mixture. Oh, and add about a 1/2 cup diced apples to the mix. SO GOOD!

You might also like:

Picture
Picture
Picture
Picture
0 Comments

Jacob's Pizza

7/25/2013

4 Comments

 
About a year ago, at a family get together, my nephew introduced me to the delightful taste of combining apple slices with cheese and crackers. It was so good, I have done it several times since. More recently, while enjoying a lovely cheese plate his mother put together, Jacob added pepperoni to the mix. I must say I don't really care for pepperoni, but in this combination I loved it! About a week later, when I was planning out my meals, I was inspired by that little combo to create this pizza. The dough is a cross between a baking powder biscuit and focaccia bread. The sweetness of the apples really calms the spicy of the pepperoni creating a wonderfully balanced mix of flavor. Try it out and tell me what you think!
Kit's Crafts - Jacob's Pizza (Apple Pepperoni) #pizza
Pizza Dough Ingredients:
2 1/2 cups Flour
2 3/4 teaspoons baking powder
1/2 teaspoon sugar
1/4 teaspoon chili powder
1 teaspoon each salt, rosemary, basil, garlic powder, ground pepper
1 Tablespoon oil
3/4 to 1 cup water

Pizza Toppings:
olive oil brushed on top
1/4 cup shredded Parmesan Cheese
1 cup thinly sliced Sweet Apples (fuji, golden delicious, gala, etc.)
1 (8 ounce) package sliced Pepperoni Sausage
1/2 cup Cheddar Cheese

Directions:
Preheat oven to 400F. Line a cookie sheet with parchment paper.
Mix together the dry ingredients for the pizza dough. Make a well in the center and fill it with the oil and the water, then begin stirring with a wooden spoon until a ball forms. Add more water if the dough is dry or stiff. You should have a soft, not sticky dough. Place the dough on a floured surface and roll to about 1/2" thick. Place dough on cookie sheet.
Brush dough with oil, then sprinkle with the parmesan cheese. Place the apples on the dough then layer them with the pepperoni. Sprinkle the pepperoni with the cheddar cheese.
Bake for 15 - 25 minutes or until cheese is bubbling and the crust is browned.

If you want to take your pizza to a new level, check out the Stuffed Pizza over at I Want Crazy.

You might also like:

Picture
Picture
Picture
Picture

Where I partied:

Foodies and Crafties Soiree
4 Comments

Shrimp Pasta

3/28/2013

0 Comments

 
This is a dish I started making years ago. It is best on the grill in a tin foil pouch, but you can fry or broil it and it will still be good.
Kit's Crafts - Shrimp Pasta
Serves 8

Ingredients:

1 14.5oz box spaghetti
1 pound frozen 41/50 shrimp, cleaned and peeled
1/2 cup olive oil (it seems like a lot, but this is your sauce)
4 tablespoons butter
2 tablespoons dried dill
1 tablespoon dried rosemary
2 large cloves garlic, minced
4 tablespoons lemon juice
Salt and Pepper to taste
Parmesan cheese for topping

Prepare spaghetti according to package directions.

To Fry:
While water is coming to a boil, but before you add the dry pasta, thaw the shrimp according to package directions. Once you have added the pasta, heat olive oil and butter in a frying pan over medium heat. Add dill, rosemary, garlic, salt and pepper. Fry until fragrant, only a minute or two, DONOT over cook. Add shrimp. Cook until shrimp is opaque. Remove from heat, add lemon juice and pasta. Sprinkle with parmesan before serving.

To Grill:
While water is coming to a boil, but before you add the dry pasta, thaw the shrimp according to package directions. Stir together the olive oil, dill, rosemary, garlic, lemon juice salt and pepper. In a large bowl, stir in the thawed shrimp. Make a bowl out of tinfoil and add the oil mixture. Once you have added the pasta to the boiling water, put the tin foil pouch on the grill and cook for about 5-10 minutes or until the shrimp is opaque. Combine the shrimp and pasta then sprinkle with parmesan before serving.

To Broil:
Preheat oven to broil with a rack in the top third of the oven. While the water for the pasta is coming to a boil and before you add the dry pasta, thaw the shrimp according to package directions. In a large bowl, stir together the olive oil, dill, rosemary, garlic, lemon juice salt and pepper. Stir in the thawed shrimp. Make a bowl out of tinfoil and add the oil mixture. Once you have added the pasta to the boiling water, put the tin foil pouch in the oven on a cookie sheet and cook for about 5-10 minutes or until the shrimp is opaque. Combine the shrimp and pasta then sprinkle with Parmesan before serving.

You might also like:

Picture
Picture
Picture
Picture
0 Comments

Couscous Chicken

3/14/2013

2 Comments

 
About a year ago, I was looking for quick easy recipes that were actually good. I stumbled upon this one on the Food Network website  and now I make it at lease once a month, if not twice. It is one of those "quiet meals" as in it is so good you are too busy eating to bother conversing. The best part is that it is pretty healthy, granted there is butter involved, but I feel like that negative is cancelled out by the other good-for-you ingredients. Plus, it has pleased a couple of very picky little eaters who even asked for seconds. I made a few alterations, mostly to go with what I usually keep on hand.
Kit's Crafts - Couscous Chicken
Chicken and Couscous
4 servings

Ingredients:
1/2 teaspoon ground cinnamon
1 teaspoon ground ginger
Salt and pepper
15-20 petite carrots or 4 medium carrots, thinly sliced
1 cup couscous
2 cups coarsely shredded rotisserie chicken (I find it easier to at least pull the chicken from the bones
whiled it is still warm so that the fat doesn't get all gelatanous and gross)
3 tablespoons unsalted butter
1/2 cup sliced or slivered almonds
1/2 cup Craisens
4 scallions, roughly chopped
1/4 teaspoon ground cinnamon
1/2 cup roughly chopped fresh cilantro
Greek yogurt for topping

Directions:
Bring 2 1/2 cups water to boil (do NOT substitute this with broth) and add 1/2 teaspoon cinnamon and the ginger, then season to taste with salt and pepper. Add the carrots and cook until tender. Drain, reserving the liquid.

Combine couscous and chicken in a bowl with a lid or have plastic wrap handy. Stir in 1 cup of the reserved liquid then cover and let sit while you finish the recipe.

Melt butter over medium-high heat. Add almonds, Craisens, scallions, and the 1/4 teaspoon cinnamon. Fry stirring until the almonds are browned. Removed from heat and stir in cilantro.

Divide chicken and couscous into bowls top with carrots and some of the reserved liquid. Sprinkle almond mixture over top. Add a dollup or two of yogurt and serve.
Picture

You might also like:

Picture
Picture
Picture
Picture
2 Comments

Potato Balls

2/21/2013

1 Comment

 
Sometime the week before the Super Bowl, I made Bobby Dean's Simply Smashed Potato Cakes. They were really good, but needed a few tweeks. I began to think about what to bring to the Super Bowl party I would be attending that Sunday and my mind went back to these cakes, but turning them into more of an appetizer by rolling little balls and adding a ranch dip. The result was a success! I'm pretty sure that I will now make mashed potatoes this way, with the exception of the breadcrumbs.
Kit's Crafts - Potato Balls
Potato Balls Ingredients:
Nonstick cooking spray
4-5 red potatoes
4 cloves garlic, peeled and cut lengthwise in half
3 slices of thick cut bacon
1/4 cup chicken broth
1/4 cup plain Greek-style yogurt
Salt and pepper
1 1/2 cups plain breadcrumbs (preferably panko)
1/2 cup shredded cheddar cheese
1 finely chopped scallion

Ranch Dip Ingredients:
1 1/4 cup plain Greek-style yogurt
1/2 cup skim milk
1 packet Ranch dressing mix

Directions:
Put the potatoes and garlic in a pot and cover with enough water to go 2 inches past the potatoes. Bring to a boil, then reduce heat and let simmer until the potatoes are tender, about 20 minutes. Drain then return to pot.

While the potatoes are cooking, spray a large non stick skillet with nonstick cooking spray, add bacon and fry at medium heat until crispy. Remove bacon and chop into small bits. Reserve bacon fat in
the skillet.

While potatoes and bacon are cooking, mix the ingredients for the Ranch Dip and refrigerate until balls are ready.

Once the potatoes and garlic are returned to the pot, season with salt and pepper, then mash with yogurt and broth, once incorporated, add 1/2 cup of the breadcrumbs, cheese, scallions and bacon bits, then continue to mash until fully incorporated.

Put the remaining cup of breadcrumbs in a shallow dish. With a melon baller, scoop about a walnut sized amount of the potatoes and put in the breadcrumbs. Roll around until fully coated with breadcrumbs then set aside while you make the rest.

Reheat the bacon fat, if cooled, to medium-high heat. Drop the balls into the skillet, placing them about an inch apart. Rotate every couple of minutes to fry evenly.

Serve hot with Ranch Dip.
Kit's Crafts - Potato Balls

You might also like:

Picture
Picture
Picture
Picture
1 Comment
Forward>>
    Kit's Crafts
    Hey there! I'm Kristin, aka Kit. Here is just a peek into my crafting mind. I hope you find something to spur your creativity!
    Instagram

    Kit's Crafts Shop

    Popular Posts

    Picture
    Picture
    Picture
    Picture
    Picture
    Picture

    RSS Feed

    Picture
    Kit's Crafts
    Picture
    The Yarn Box

    Featured Here

    Picture
    Moogly
    Picture

    Categories

    All
    About
    Baby
    Baking
    Bio
    Caramel
    Child
    Chocolate
    Christmas
    Cooking
    Crochet
    Decor
    Dessert
    Dress
    Free Knit/crochet Pattern
    Free Sewing Pattern
    Interior Design
    Knitting
    Link Party
    Materials
    Pattern
    Quiet Book
    Quiet Book
    Recipe
    Selling Handmade Goods
    Sewing
    Spats
    T Shirt
    Tutorial

    Archives

    July 2020
    January 2020
    July 2019
    November 2018
    September 2018
    August 2018
    July 2018
    May 2018
    April 2018
    February 2018
    January 2018
    April 2016
    September 2015
    March 2015
    February 2015
    November 2014
    October 2014
    September 2014
    August 2014
    July 2014
    June 2014
    May 2014
    April 2014
    March 2014
    February 2014
    January 2014
    December 2013
    November 2013
    October 2013
    September 2013
    August 2013
    July 2013
    June 2013
    May 2013
    April 2013
    March 2013
    February 2013
    January 2013
    December 2012
    November 2012
    October 2012

Powered by Create your own unique website with customizable templates.