
A couple weeks ago, I posted a Lacy Halloween Wreath tutorial in an effort to class up Halloween. Here is another little decor item that I came up with. Granted, it could really be more of a fall item then specifically Halloween, but if you were to use orange yarn and black filling or vice versa, then it would be more Halloween. Especially if you added some great spider webs or some creepy crawlies.
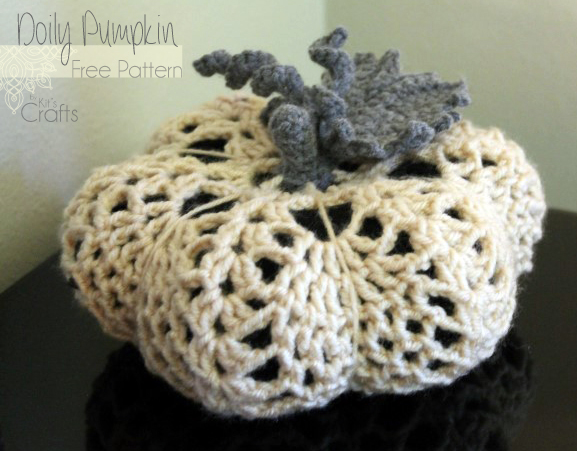
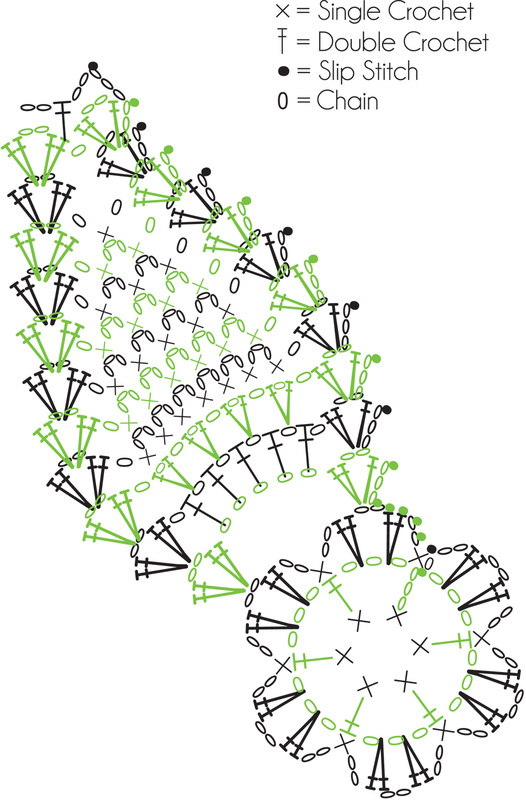
So, the inspiration for this little ditty, came from a doily pattern I found using the pineapple stitch. I had to modify the pattern quite a bit to make the shape I was looking for, but it was totally worth it. This pumpkin is crocheted in the round, starting with the stem. I haven't had a chance to test the pattern, so if you find mistakes, please let me know via email at [email protected]. Also, I would love to show off your finished product as well as provide links to your website/blog. Email me with your photos/info and I will gladly post them!
Print Pattern
Materials:
80-90 yards Worsted Weight Yarn (pumpkin)
2-3 yards Worsted Weight Yarn (stem, leaf, curly cues)
Yarn needle
Crochet Hook of your choice (I used a G)
Your choice of filling, I used tulle, but fabric would work or colorful hay or basic fiber fill
Abbreviations:
CH = Chain
SL = Slip Stitch
ST = Stitch
SC = Single Crochet
DC = Double Crochet
MC = Main Color (pumpkin)
CC = Contrasting Color (stem, leaf, curly cues)
Pattern:
Using CC, create a magic loop, CH1, SC6 in loop, SC around until stem measures about 1.5", SC2 in each st, switch to MC (12 STS)
Round 1: CH6, (SK 1st, DC in next st, CH3) 5X, SL in the 3rd ch of the original ch6
Round 2: CH1, SC in same st as sl of previous round, ch2, (DC2 in ch3 sp, CH2, DC2 in the same ch3 sp, CH2, SC in next dc, CH2) 6X, SL in original sc of round, ch2, dc2, and ch2 sp)
*At this point, tie your loose ends together, trim them a bit, then stuff them into the stem
Round 3: SL in ch2, SL in dc2 and SL into ch2sp, CH3, DC in ch2 sp, CH2, DC2 in same ch2 sp, CH5, (DC2 in ch2 sp, CH2, DC2 in same ch2 sp, CH5) 5X, SL in 3rd ch of original ch3
Round 4: SL into ch2 sp, CH3, DC in ch2 sp, CH2, DC2 in same ch2 sp, *CH1, (DC, CH1)5X in ch5 sp, Ch1, DC2 in ch2 sp, CH2, DC2 in ch2 sp, repeat from * 5X, (DC, CH1)5X in ch5 sp, SL in 3rd ch of original ch3
Round 5: SL into ch2 sp, CH3, DC in ch2 sp, CH2, DC2 in same ch2 sp, *CH1, SK Ch1, (DC1 in next ch1 sp, CH1, DC1 in same ch1 sp, CH1) 4X, CH1, DC2 in ch2 sp, CH2, DC2 in same ch2 sp, repeat from * 5X, CH1, SK ch1, (DC1, in ch1 sp, CH1, DC1, in same ch1 sp, CH1) 4X, SL in 3rd ch of original ch3
Round 6: SL into ch2 sp, CH3, DC in ch2 sp, CH2, DC2 in same ch2 sp, *CH1, SK ch1, (SC1 in next ch1 sp, CH3) 6X, SC1 in next ch1 sp, CH1, DC2 in ch2 sp, CH2, DC2 in same ch2 sp, repeat from * 5X, CH1, SK ch1, (SC1 in next ch1 sp, CH3) 6X, SC1 in next ch1 sp, CH1, SL in 3rd ch of original ch3
Round 7: SL into ch2 sp, CH3, DC in ch2 sp, CH2, DC2 in same ch2 sp, *CH1, (SC1 in next ch3 sp, CH3) 5X, SC1 in next ch3 sp, CH1, DC2 in ch2 sp, CH2, DC2 in same ch2 sp, repeat from * 5X, CH1, (SC1 in next ch3 sp, CH3) 5X, SC1 in next ch3 sp, CH1, SL in 3rd ch of original ch3
Round 8: SL into ch2 sp, CH3, DC in ch2 sp, CH2, DC2 in same ch2 sp, *CH1, (SC1 in next ch3 sp, CH3) 4X, SC1 in next ch3 sp, CH1, DC2 in ch2 sp, CH2, DC2 in same ch2 sp, repeat from * 5X, CH1, (SC1 in next ch3 sp, CH3) 4X, SC1 in next ch3 sp, CH1, SL in 3rd ch of original ch3
Round 9: SL into ch2 sp, CH3, DC in ch2 sp, CH2, DC2 in same ch2 sp, *CH1, (SC1 in next ch3 sp, CH3) 3X, SC1 in next ch3 sp, CH1, DC2 in ch2 sp, CH2, DC2 in same ch2 sp, repeat from * 5X, CH1, (SC1 in next ch3 sp, CH3) 3X, SC1 in next ch3 sp, CH1, SL in 3rd ch of original ch3
Round 10: SL into ch2 sp, CH3, DC in ch2 sp, CH2, DC2 in same ch2 sp, *CH1, (SC1 in next ch3 sp, CH3) 2X, SC1 in next ch3 sp, CH1, DC2 in ch2 sp, CH2, DC2 in same ch2 sp, repeat from * 5X, CH1, (SC1 in next ch3 sp, CH3) 2X, SC1 in next ch3 sp, CH1, SL in 3rd ch of original ch3
Round 11: SL into ch2 sp, CH3, DC in ch2 sp, CH2, DC2 in same ch2 sp, *CH1, SC1 in next ch3 sp, CH3, SC1 in next ch3 sp, CH1, DC2 in ch2 sp, CH2, DC2 in same ch2 sp, repeat from * 5X, CH1, SC1 in next ch3 sp, CH3, SC1 in next ch1 sp, CH1, SL in 3rd ch of original ch3
Round 12: SL into ch2 sp, CH3, DC in ch2 sp, CH2, DC2 in same ch2 sp, *CH1, SC1 in next ch3 sp, CH1, DC2 in ch2 sp, CH2, DC2 in same ch2 sp, repeat from * 5X, CH1, SC1 in next ch3 sp, CH3, SC1 in next ch3 sp, CH1, SL in 3rd ch of original ch3
Round 13: SL into ch2 sp, CH3, DC in ch2 sp, CH2, DC2 in same ch2 sp, *CH1, DC2 in next ch2 sp, CH2 DC2 in same ch2 sp, repeat from * 5X, SL in 3rd ch of original ch3
*Stuff your pumpkin at this point. I used some black tulle, but you could use basic fiber fil or fabric scraps or whatever, just keep in mind that you will be able to see the filling.
Round 14: CH5, *SK(dc, ch2, dc2) DC in next dc, CH2, repeat from * 4X, SL in 3rd ch of original ch5, fasten off leaving about a 3 foot tail.
Thread the yarn needle with the 3' tail, then push the needle up through the middle of the pumpkin and then around one of the sides and back into the pumpkin. This exaggerates the pumpkin shape. Continue doing this until all of the indents are created, there should be 6.
Curly Cues (make 2):
CH to desired length, SC2 in the 2nd ch from the hook, *SC3 in the next ch, SC2 in the next ch, repeat from * until you reach the end of the ch, fasten off, leaving a tail long enough to sew to pumpkin.
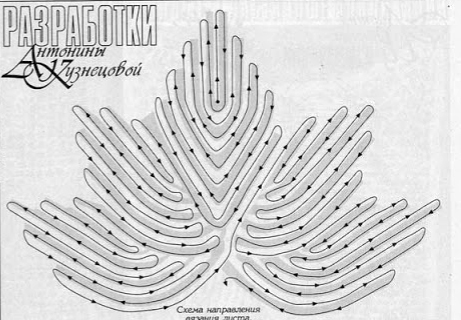
Leaf:
For the leaf, I modified a pattern I found on Pinterest. The original seemed a little large and was in another language, but the method is good. The picture below is from that same source and, although it is of the bigger leaf, the picture illustrates how you will crochet the leaf.
Row 1: CH7, SC in the 2nd ch from the hook, SC in remaining 5 chs, CH3, SC5 along the back of the original ch7, CH2, turn
Row 2: SC in the next 5 scs, SC5 in ch3 sp, SC in the next 3scs, CH2, turn
Row 3: SC in next 5 scs, SC3 in next sc, SC in next 6 scs, CH4, turn
Row 4: SC in third and fourth ch from hook, SC in the next 3 scs, CH1, turn
Row 5: SK the first sc, SC in the next 4 scs, CH2, turn
Row 6: SC in the next 4 scs, SC3 in the ch1 sp, SC in the next sc, CH1, turn
Row 7: SK the first sc, SC in the next 6 scs, CH2, turn
Row 8: SC in the next 6 scs, SC2 in the ch1 sp, SC in the next sc, SK1 sc, SC in the next 6 scs, CH4, turn
Row 9: SC in third and fourth ch from hook, SC in the next 3 scs, CH1, turn
Row 10: SK the first sc, SC in the next 4 scs, CH2, turn
Row 11: SC in the next 4 scs, SC3 in the ch1 sp, SC in the next sc, CH1, turn
Row 12: SK the first sc, SC in the next 6 scs, CH2, turn
Row 13: SC in the next 6 scs, SC2 in the ch1 sp, SC in the next sc, SK1 sc, SC in the next 6 scs, CH4, turn
Row 14: SC in third and fourth ch from hook, SC in the next 3 scs, CH1, turn
Row 15: SK the first sc, SC in the next 4 scs, CH2, turn
Row 16: SC in the next 4 scs, SC2 in the ch1 sp, SC in the next sc, SK1 sc, SC in the next 6 scs, CH4, turn
Row 17: SC in third and fourth ch from hook, SC in the next 3 scs, CH1, turn
Row 8: SK the first sc, SC in the next 4 scs, CH2, turn
Row 19: SC in the next 4 scs, SC2 in the ch1 sp, SC in the next sc, SL in the next sc and fasten off leaving a long enough tail to sew the leaf to the pumpkin.
****I wrote the leaf pattern after I had made it, instead of while I was making it and haven't had a chance to really test the leaf, so if you see issues PLEASE email me at [email protected]. THANK YOU!!!
CH to desired length, SC2 in the 2nd ch from the hook, *SC3 in the next ch, SC2 in the next ch, repeat from * until you reach the end of the ch, fasten off, leaving a tail long enough to sew to pumpkin.
Leaf:
For the leaf, I modified a pattern I found on Pinterest. The original seemed a little large and was in another language, but the method is good. The picture below is from that same source and, although it is of the bigger leaf, the picture illustrates how you will crochet the leaf.
Row 1: CH7, SC in the 2nd ch from the hook, SC in remaining 5 chs, CH3, SC5 along the back of the original ch7, CH2, turn
Row 2: SC in the next 5 scs, SC5 in ch3 sp, SC in the next 3scs, CH2, turn
Row 3: SC in next 5 scs, SC3 in next sc, SC in next 6 scs, CH4, turn
Row 4: SC in third and fourth ch from hook, SC in the next 3 scs, CH1, turn
Row 5: SK the first sc, SC in the next 4 scs, CH2, turn
Row 6: SC in the next 4 scs, SC3 in the ch1 sp, SC in the next sc, CH1, turn
Row 7: SK the first sc, SC in the next 6 scs, CH2, turn
Row 8: SC in the next 6 scs, SC2 in the ch1 sp, SC in the next sc, SK1 sc, SC in the next 6 scs, CH4, turn
Row 9: SC in third and fourth ch from hook, SC in the next 3 scs, CH1, turn
Row 10: SK the first sc, SC in the next 4 scs, CH2, turn
Row 11: SC in the next 4 scs, SC3 in the ch1 sp, SC in the next sc, CH1, turn
Row 12: SK the first sc, SC in the next 6 scs, CH2, turn
Row 13: SC in the next 6 scs, SC2 in the ch1 sp, SC in the next sc, SK1 sc, SC in the next 6 scs, CH4, turn
Row 14: SC in third and fourth ch from hook, SC in the next 3 scs, CH1, turn
Row 15: SK the first sc, SC in the next 4 scs, CH2, turn
Row 16: SC in the next 4 scs, SC2 in the ch1 sp, SC in the next sc, SK1 sc, SC in the next 6 scs, CH4, turn
Row 17: SC in third and fourth ch from hook, SC in the next 3 scs, CH1, turn
Row 8: SK the first sc, SC in the next 4 scs, CH2, turn
Row 19: SC in the next 4 scs, SC2 in the ch1 sp, SC in the next sc, SL in the next sc and fasten off leaving a long enough tail to sew the leaf to the pumpkin.
****I wrote the leaf pattern after I had made it, instead of while I was making it and haven't had a chance to really test the leaf, so if you see issues PLEASE email me at [email protected]. THANK YOU!!!
You might also like:
 |  |  |  |
Where I partied:
 |  |


 RSS Feed


