
Truth be told, with the exception of Christmas, I am not the best at decorating for the different holidays. I would like to get better about it and start a collection of things I can put up to celebrate. So, in an effort to do so, I am starting with Halloween. I love the effort that some have made to class up the holiday with lace and things, so I thought it would be fun to add to that effort. Of course, this wreath could just be the base for a ghoulish item for your wall or can even be used for a different holiday entirely.

My inspiration for this wreath came from the stiff lace crowns I keep seeing all over Pinterest. I am actually surprised that I didn't find a tutorial for a wreath using the same method. Anyway, just a note about fabric stiffener. I tried using mod podge for this, but it was too flimsy. I know I could have used more coats to stiffen it up, but I was worried about the sheen the glue would leave. I also tried sugar syrup as is used for doilies. Not only was this method ridiculously messy to apply, but it shed like crazy after it dried. It also left a flaky white residue on the lace. So, save yourself some trouble, buck up and buy some fabric stiffener. I promise, you will get MUCH better results.
Materials:
Foam Wreath Form
Tape Measure
Lace by the yard*
Saran Wrap
Fabric Stiffener
Glue Gun/Sticks
Decorations of your choice
Directions:
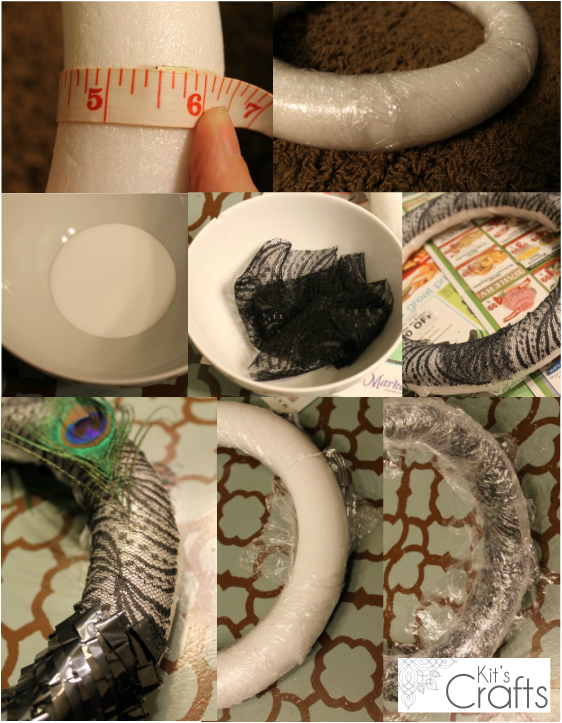
Measure the circumference of your wreath as shown in the picture. Cut a strip of lace at half of this measurement. For example, mine was about 5.5", so I cut a strip at 2.25" wide. *You can use ribbon and not bother with this step, just make sure that the width of your ribbon does not exceed half of this measurement.
Next, wrap your wreath form in saran wrap. Dip the lace in stiffener to completely soak. Pull up an end of the lace with one hand and, using the pointer and thumb on your other hand, wring out the excess stiffener. Place the lace on the top half of the wreath, stretching it over the wreath to completely conform to the shape and creating folds where needed so that the strip becomes a circle. Let the wreath dry over night.
Before removing your wreath from the form, attach any decorations using a glue gun. When you are ready, turn the wreath over and cut along the back of the saran wrap, then peel the lace from the form. Carefully, peel the saran wrap from the lace and discard. Add a ribbon to your wreath you are good to go!
So, do share, what decor items are you going to make for Halloween? The wreath is lonely! :)
P.S. The shiny black ribbon is actually a VHS tape I pleated on my sewing machine, the beaded leaf came from a headband from the Family Dollar, the peacock feathers are from Michaels and the purple ribbon is from Walmart
Materials:
Foam Wreath Form
Tape Measure
Lace by the yard*
Saran Wrap
Fabric Stiffener
Glue Gun/Sticks
Decorations of your choice
Directions:
Measure the circumference of your wreath as shown in the picture. Cut a strip of lace at half of this measurement. For example, mine was about 5.5", so I cut a strip at 2.25" wide. *You can use ribbon and not bother with this step, just make sure that the width of your ribbon does not exceed half of this measurement.
Next, wrap your wreath form in saran wrap. Dip the lace in stiffener to completely soak. Pull up an end of the lace with one hand and, using the pointer and thumb on your other hand, wring out the excess stiffener. Place the lace on the top half of the wreath, stretching it over the wreath to completely conform to the shape and creating folds where needed so that the strip becomes a circle. Let the wreath dry over night.
Before removing your wreath from the form, attach any decorations using a glue gun. When you are ready, turn the wreath over and cut along the back of the saran wrap, then peel the lace from the form. Carefully, peel the saran wrap from the lace and discard. Add a ribbon to your wreath you are good to go!
So, do share, what decor items are you going to make for Halloween? The wreath is lonely! :)
P.S. The shiny black ribbon is actually a VHS tape I pleated on my sewing machine, the beaded leaf came from a headband from the Family Dollar, the peacock feathers are from Michaels and the purple ribbon is from Walmart
  |   |


 RSS Feed


