
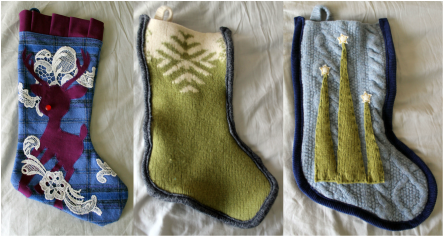
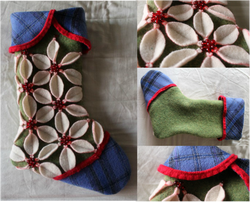
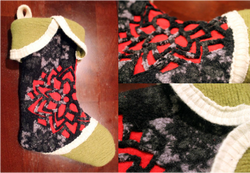
Last week, I posted about Blazing Needles and the incredible donation they made to fill stockings that I had created. These stockings are being donated to Helping Kids With Cancer in an effort to bring some Christmas cheer to children fighting cancer and their families. I also made and filled another stocking to be donated (I just can't help myself!). Best part is that I am providing you with quick tutorial of how I made this lovely item. There are two parts to it, the stocking itself, which I will show today, and a mini quiet book closet with Velcro dress up clothes, which I will show on Thursday.

Stocking Materials:
12" of a sturdy fabric or 24" of a lighter fabric (44"wide)
9" of fabric (for the flap and the loop to hang it) (44" wide)
5 rectangles of fabric measuring 14" x 6" (for the ruffles)
Sewing Machine/Pins/Thread/Scissors
Iron/Ironing Board
Stocking Pattern
Directions:
1. Pre-wash all fabric. Print the pattern, making sure that the box labeled "fit to page" is NOT checked. Piece together and tape the main stocking before cutting out.
2. Fold your main fabric in half and cut 2 stocking patterns, repeat if you are using a lighter weight fabric. Fold your flap fabric in half and cut 4 flaps (the last page of the pattern).
3. Pin 2 of your flaps right sides together. Sew along the rounded edge using a 1/2" seam allowance. Unfold and iron the seam to one side. Sew along the seam, attaching it to the side you just ironed it to. (This causes the fabric to fold to one side making a cleaner finish). Repeat this step, but iron the seam to the other side and sew it to the other side. Make a few clips along the seam so that it lays flat when you fold it right side out. (You should have a visible seam on only one side of each flap which will be the wrong side).
4. Lay down one of your stockings with the wrong side up. Place one of the flaps with the right side down on top. Line up the top edges and pin. Sew together using a straight stitch, then zig zag along the edge. Repeat the same process with the remaining stocking and flap.
5. Open up the flap and iron the seam toward the stocking. Top stitch along the top of the stocking, being careful to catch the seam as you sew.
6. Cut a 2 1/2" x 4" rectangle of fabric for your loop. Fold the rectangle so that the 4" sides meet and sew along this same edge using a 1/4" seam allowance. Turn the loop right side out and iron. Fold in the loop in half so the short ends meet. with the flap unfolded, place and pin the loop on the wrong side of the back stocking about 1 1/2" from the top and 1" from the side. Sew with a straight stitch and a zig zag stitch. (Please refer to the Origami Stocking for further pictorial representation)
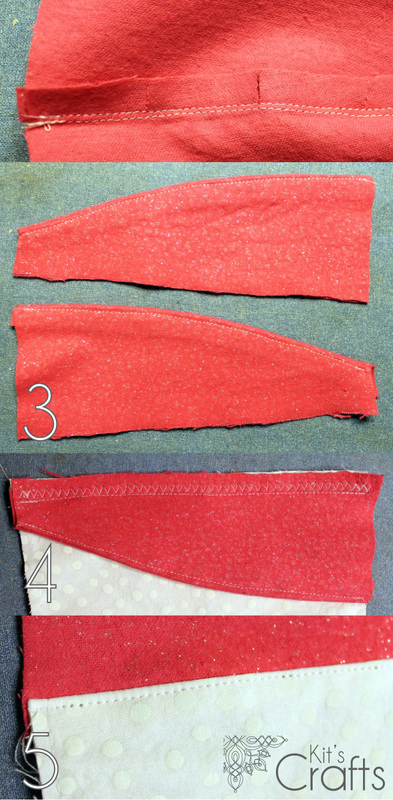
1. To do the ruffles, fold each of your 5 rectangles in half, wrong sides together, and iron. Next, do a "dry fitting" as in place the rectangles about where you would like them to go on the stocking. This is especially necessary if you are using directional fabric or putting tulle on one side. Mark the side of the ruffle that will be angling up toward the flap with a pin.
2. Using a basting stitch, sew about 1/4" from the top of each rectangle, rounding off the corner that will be angling up toward the flap at about 1" - 2" from the end. The rounding off doesn't have to be exact as you will be bunching it anyway, but if you are really nervous about it, use a cup or a bowl to draw a round line on the ruffle before you begin sewing.
3. Pull one of the strings on each ruffle to bunch it and tie off the ends when it is bunched enough, then cut off the excess fabric from the rounded corner.
4. Do another "dry fitting" by placing all of your ruffles on the front stocking, then pin the bottom most ruffle in place and sew using a zig zag stitch to prevent unraveling. Repeat until all of the ruffles are attached; placing the topmost ruffle right under the flap.
5. If you are planning on adding the mini quiet book, then place the hook end of a large eye and hook under the bottom most ruffle and mark with a fabric pen, then hand sew to the front.
6. Pin the front and back stockings right sides together, tucking the ruffles a bit as you go. Starting about 1/2" from the top of the stocking and with the flap unfolded, sew the stocking together using a 1/2" seam allowance. End about 1/2" from the top on the opposite side. Cut off any excess fabric from the ruffles and make small clips about 1/2" apart in the seam allowance at the rounded portions of the stocking, taking care not to cut through the seam.
7. Turn the stocking right side out and sew along the flap sides with a 1/2" seam allowance. Fold the flap down and you have a lovely ruffled stocking!

You might also like:
 |  |  |


 RSS Feed


