
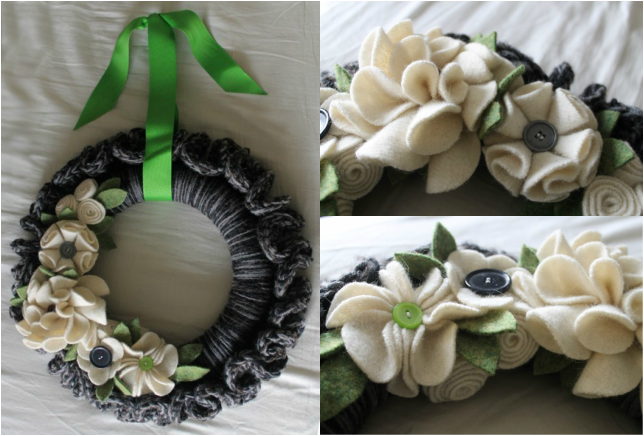
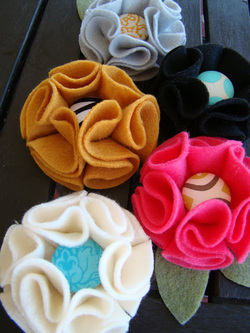
Over the holidays I started looking for wreaths I could make for my door. I came across a lovely plum colored wreath, which linked me to the Simple Statement Wreath and my search ended. At first I was planning on it being a holiday staple, but I soon changed my mind and felt it needed a permanent place in my home. The major change I made was the edging. I did a ruffle instead of the eyelet surround that the original suggests. I also added some felt flowers and leaves and I used 5 strands of worsted weight yarn in lieu of chuncky.
Materials:
* 2 Skeins Lion Brand Vanna's Choice in Charcoal Grey
* 2 Skeins Loops and Threads, Impeccable in True Gray
* 1/2 Skein Lion Brand Fisherman's Wool in Dark Chocolate Brown
* Size N Crochet Hook
* Styrofoam wreath form
* White and Green Felt (I felted old sweaters)
* Various Buttons (for flower centers)
* Glue and Glue Gun
* 2" Ribbon (for hanging)
Abbreviations:
* SL = Slip Stitch
* SC = Single Crochet
* CH = Chain
* DC = Double Crochet
Instructions:
Pull from each skein of yarn so you will be working with 5 strands.
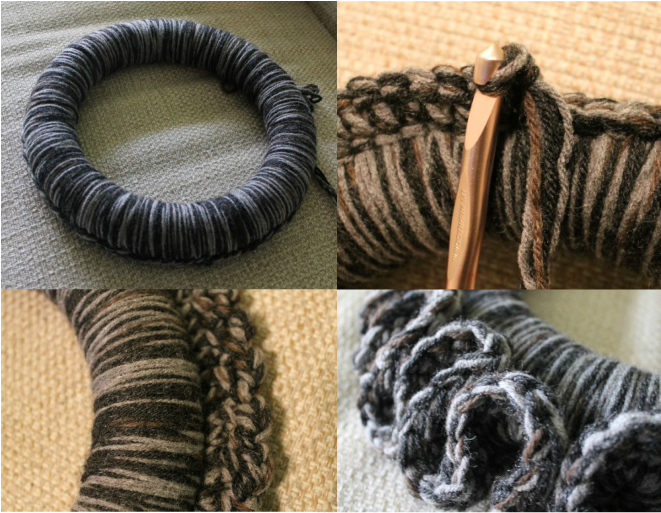
Start by using the method outlined on the tutorial for the Simple Statement Wreath up until the wreath form is covered, then SL in the first stitch. The number of stitches you have needs to be divisible by 3. Push the single crochets toward the back of the wreath as shown in the photo below
Ruffle:
Round 1: CH1, SC in first stitch, SC around, Sl into 1st CH
Round 2: CH1, SC in first stitch,CH3, *skip 2 stitches, SC in next stitch, CH3, repeat from * around, SL in the first CH
Round 3: SL into CH3 space, CH2, 7DC in CH3 space, 8DC in all remaining CH3 spaces, SL in CH2, Bind off and weave in ends
* 2 Skeins Lion Brand Vanna's Choice in Charcoal Grey
* 2 Skeins Loops and Threads, Impeccable in True Gray
* 1/2 Skein Lion Brand Fisherman's Wool in Dark Chocolate Brown
* Size N Crochet Hook
* Styrofoam wreath form
* White and Green Felt (I felted old sweaters)
* Various Buttons (for flower centers)
* Glue and Glue Gun
* 2" Ribbon (for hanging)
Abbreviations:
* SL = Slip Stitch
* SC = Single Crochet
* CH = Chain
* DC = Double Crochet
Instructions:
Pull from each skein of yarn so you will be working with 5 strands.
Start by using the method outlined on the tutorial for the Simple Statement Wreath up until the wreath form is covered, then SL in the first stitch. The number of stitches you have needs to be divisible by 3. Push the single crochets toward the back of the wreath as shown in the photo below
Ruffle:
Round 1: CH1, SC in first stitch, SC around, Sl into 1st CH
Round 2: CH1, SC in first stitch,CH3, *skip 2 stitches, SC in next stitch, CH3, repeat from * around, SL in the first CH
Round 3: SL into CH3 space, CH2, 7DC in CH3 space, 8DC in all remaining CH3 spaces, SL in CH2, Bind off and weave in ends
For the flowers, I found tutorials for all but two of them so below are tutorials for the two I did and a list of the tutorials I found.
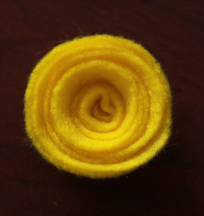
Poppy from Positively Splendid, I just did the inner most layer.
"S" Flower from the Fickle Pickle
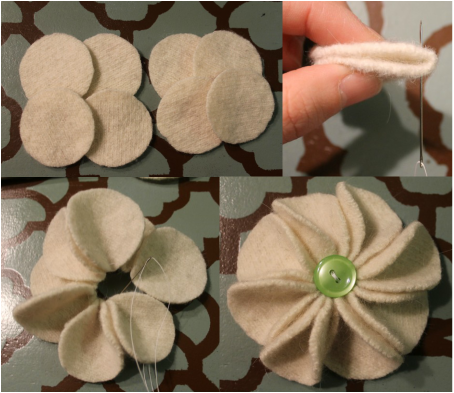
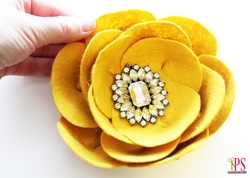
8 Petal Flower:
Cut 8 circles with a 2" diameter
Fold one circle in half and, with the fold facing down, pull a needle and knotted thread through one of the corners
Repeat previous step with remaining circles
Pull thread once more thorugh all petals, then pull the thread tight to draw the petals close together and tie off
Add a button to the center
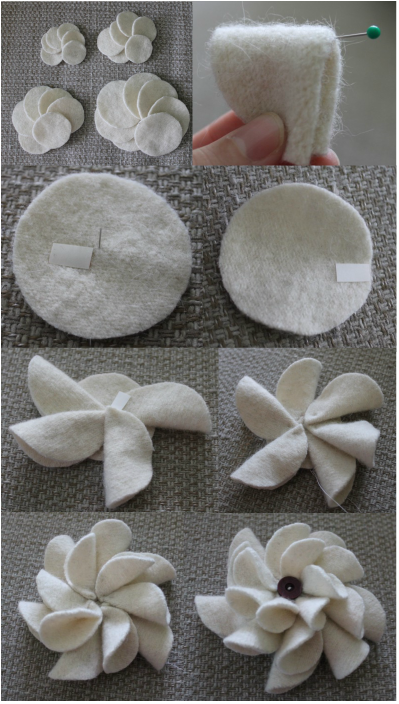
3 Layer Flower:
Cut 6 circles with diameters of 2" and 2.5" (disregard the smaller circles, I was going to do 4 layers and decided not to)
Cut 7 circle at 3"
Fold one of the 3" circle in half twice and put a pin in the corner of the folds for the center
Open up the circle and place a piece of double sided fabric tape to one side
Fold another 3" circle in half once and place a piece of double sided fabric tape to one side of the fold and next to the edge then remove the backing of the tape and secure the fold in that spot and attach to the first 3" circle
Repeat the previous step with the remaining 3" circles pinwheel-ing them around the original 3" circle
Pin the petals in place with a needle and knotted thread
Repeat the the previous three steps to create the remaining 2 layers
Add a button to the center
 |  |


 RSS Feed


