
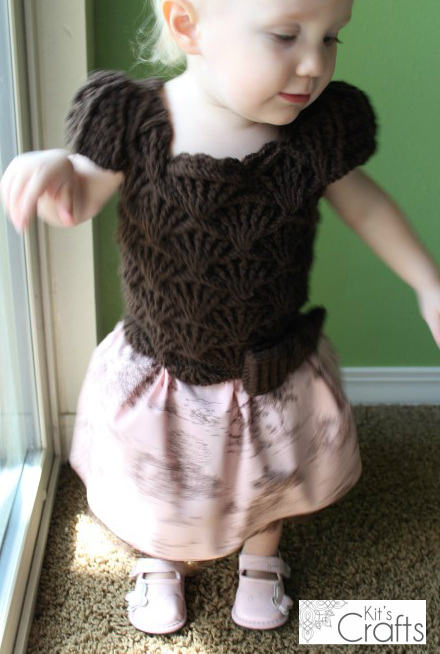
A couple months ago I was at Hancock Fabrics and came across the cutest toile fabric in the remnant bin. I couldn't resist despite there only being 1/4 of a yard, but that lovely fabric sat for at least a month before I was able to designate a cute enough project for it. So, here you go. It is a crochet dress with a fabric skirt. Essentially, I treated this pattern like I would treat a fabric dress, so I don't have an exact pattern, but rather a method. I'm not going to lie, there is a lot of measuring and math involved, but nothing too complicated.

Materials:
1 Skein Loops & Threads Impeccable yarn in Chocolate
G Hook
1/4 Yard desired fabric (pre wash and iron)
3/8 Yard matching lace (pre wash and iron)
Fray Check
Sewing machine, thread, pins
Needle for hand sewing
Method:
To start with, I found a crochet chart for the pretty shell stitch at My Picot and I crocheted up the whole chart to determine how wide a repeat would be. Then I measured my daughter at her waist, chest and hips and used the largest measurement as a gauge for the circumference of the bodice. Ok, at this point I have the measurement/gauge of the chart (6.5") and I have the circumference/length that I need to make the bodice so it fits (19.5"). So, to determine how many repeats to make, I divided the bodice by the stitch (19.5"/6.5"=3). I was lucky that it came out to a whole number. If yours doesn't, round up. So, the chart requires 25 chains per repeat of the whole chart and I need 3 repeats of that chart to get my desired width, which means I need 25x3=75. And there you go, that is the base, 75 chains. I know this sounds like a lot of work, but it really is easy, just take your time. (P.S. this is crocheted from the bottom up)
Now it is time to consider armholes. I went back to my daughter and measured from where I wanted the bodice to end to where I wanted the armhole to start (7") and just continued in the chart pattern until I reached that point. Then, I put the two sides together to form a circle and centered them and marked where I wanted the arm holes to start and end based on the chart repeats. I continued the chart until I reached a marker and turned back. After a full vertical repeat, I continued only half of the width to create the neck hole. Then, I picked up at the next marker and continued in this fashion to create the shape in the picture.
To connect the shoulders, overlap the front and back shoulder of each side then slip stitch with your hook through both layers. Weave in all loose ends.
I did go back and exaggerate the shells along the bottom by basically doing the shell pattern in the chart along the bottom.
To make the sleeves, I kind of winged it, but here is what I wrote down, let me know if you need clarification:
SC = Single Crochet
DC = Double Crochet
SK = Skip
STS = Stitches
FPDC = Front Post Double Crochet
Starting with the left sleeve, pull up a loop 4 stitches to the right of the seam, SC, 5 DC around 2 stitches to the left of the seam, SK 2 stitches to the left of the seam, SC in next 2 STS, CH 1 turn
Row 1: (FPDC, DC in the same DC)4X, FPDC, SK SC, SC in next 2 on the bodice, CH1, turn
Row 2: (FPDC, DC in the same DC, DC in next ST) 4X, FPDC, SK 2 SC, SC in next 2 on the bodice, CH1, turn
Row 3: (FPDC, DC in next 2 STS) 4X, FPDC, SK 2 SC, SC in next 2 on the bodice, CH1, turn
Row 4: (FPDC, DC in the same DC, DC in next 2 ST) 4X, FPDC, SK 2 SC, SC in next 2 on the bodice, CH1, turn
Row 5 &6: (FPDC, DC in next 3 STS) 4X, FPDC, SK 2 SC, SC in next 2 on the bodice, CH1, turn
Row 7: (FPDC, DC in the same DC, DC in next 3 ST) 4X, FPDC, SK 2 SC, SC in next 2 on the bodice, CH1, turn
Row 8: (FPDC, DC in next 4 STS) 4X, FPDC, SK 2 SC, SC in next 2 on the bodice, CH1, turn
Row 9: SC, (SK 2 STS, 5 DC in next STS, SK 2 STS, SC in next ST) across
Bind Off. Repeat for the right sleeve switching the right and left directions. Weave in ends
For the buttons, SC along the side you would like to overlap. Then, determine how many you would like (I did 5) then divide the length of the side by that number. Place markers on the overlapping side at the length you just got. SC until 1 ST before each marker, CH 3, SK 3 STS, then SC until 1 before the next marker and repeat. When you reach the end, CH 1 and turn. (SC, SK 2 STS, 5 DC in the next ST, SK 2 STS) across, you may need to fudge the last shell. Bind off and weave in ends.
Sew buttons to the appropriate side, matching them up with the button holes.

Now for the skirt. Start by hemming both top and bottom of your fabric. Then, measure the width of your bodice (mine is 19.5") and minus this number from the width of your fabric (45" - 19.5" = 25.5") then minus 1" for the seam allowance. This is the amount of fabric that needs to be gathered. Now, divide the number you just got (24.5) by the number of places you want to gather your fabric or each of the valleys in between the shells (24.5/7 = 3.5). With right sides together, sew the two sides of your fabric together using a 1/2" seam allowance. Measure and mark, along the top of the skirt, the width of a shell (2.5")then the last number you calculated (3.5"). Baste the gathering widths about 1/4" from the edge, leaving long tails. Gather each of the basted areas.
For the lace, cut 2 strips, perpendicular to the salvage edge, 8" wide and one that is 9". Go along one long edge with your fray check and let dry. Sew the 2 8" strips together along one of the short ends. baste along the side that is not fray checked and gather it until it is the same width as the 9" strip. Pin the gathered strip to the 9" strip, 1/2" down from the side that is not fray checked and sew. With right sides together, pin the side short sides of the 9" strip and the 8" strip together and sew with a 1/2" seam allowance. Find the middle of the 9" strip and mark with a pin. Baste along the top of the 9" strip from the seam to the pin, then cut the thread leaving a long tail then baste from the pin back to the seam. With the 8" lace layer facing the inside of the fabric skirt, gather the lace and fit it into the fabric skirt, matching up the pin with the center of the fabric skirt, and pin in place. Sew the lace to the skirt about 1/4" from the top.
Button up the bodice, then fit the skirt into the bodice. You may need to adjust your gathers so they match up with the valleys in between the shells. Pin in place, then hand sew the skirt to the bodice being careful not to go all the way through the bodice.

I entered this project in the All Free Crochet Stitch and Share.


 RSS Feed


