
This is a Sponsored post written by me on behalf of Walmart for SocialSpark. All opinions are 100% mine.
I'm sure you have all seen the incredible things you can create with Duck Tape® and right now, with back-to-school in full swing there are TONS of things that Duck Tape® can add to the experience! So when you are perusing the aisles at Walmart getting great deals, don't forget to check out the fabulous assortment of patterns and colors of Duck Tape® to add to your cart. Better yet, just go online to buy Duck Tape at Walmart. Just to show you an awesome project, I bring you a sweet pencil case created using Duck Tape® and a recycled soda bottle.

So the first step in this masterpiece definitely requires adult supervision, but most of the rest can be done by your child, especially the best part, decorating with Duck Tape®.
Materials:
Empty, Cleaned and Dried Soda Bottle (preferably a tall skinny one)
Candle
Craft Knife
Self Healing Mat
Permanent Marker
Cardboard
Push Pin
7" Zipper
Needle and Thread
Glue Gun/Sticks
Tissue or Scrap Paper
Directions (refer to pictures):
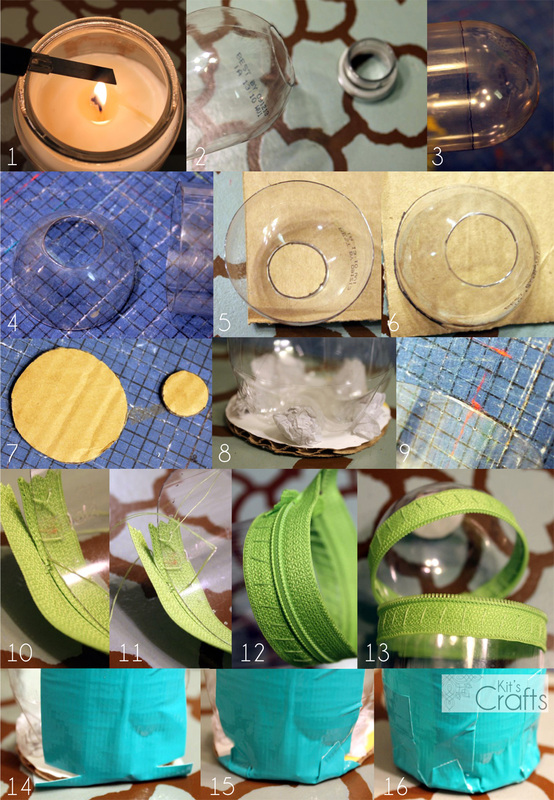
(1 & 2) Heat up your craft knife over the candle for a few seconds, then, holding the bottle over a self healing mat, carefully cut along the base of the mouth opening on the bottle. This will take a few swipes per cut to penetrate the plastic, but it is worth it because the hot knife will melt the plastic as you cut, making the cut more straight and the edges of the bottle not as sharp.
(3 & 4) Draw a line with your permanent marker around the top of where the label is and remove the label. Again, heating up the craft knife and holding the bottle over the self healing mat, carefully cut along this line.
(5, 6 & 7) Turn your top over onto the cardboard and trace the hole in the top to create a plug. Then, flip the lid over and trace around the base, which will create a base for the pencil case that will help it look less like a bottle. Then cut these circles out.
(8) Using the glue gun, plue the smaller circle into the hole in top of the lid. Glue the larger cardboard circle to the bottom of the bottle. Squirt some glue into each of the gaps between the bottle and the cardboard and stuff the tissue or scrap paper inside.
(9) Hold the top of the long portion of your bottle lined up against one of the lines on your self healing mat. Take your push pin an poke holes at each of the 1/4" marks, 1/4" from the edge. Do the same along the the bottom of your lid. This is so you can sew your zipper to the bottle.
(10, 11, 12 &13) Using your needle and thread, sew the zipper to the outside of the bottle. Start with your needle on the inside of the bottle and go through one of holes you just created, then come back through over the top of the bottle and continue in this method until you make it around the bottle and tie off. Unzip the zipper and follow the same method to attach the other side of the zipper to the lid.
(14, 15 &16) To cover up the bottom, cut a piece of Duck Tape® long enough to cover the bottom and go up at least 1" on both sides. Press the bottom onto the middle of the tape, then press the middle of each side onto the bottle. Make a cut close to the bottom on each side and fold up the flaps. Continue doing this until you have wrapped the whole bottom.
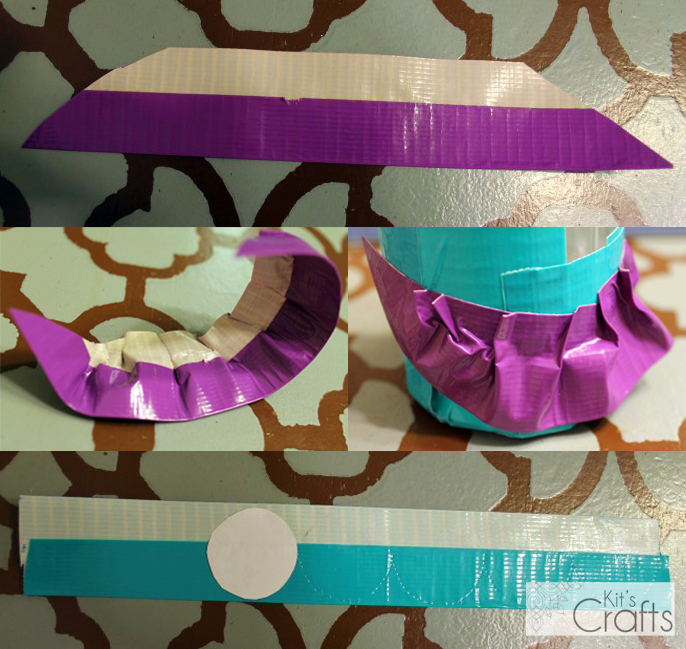
Now to the decorating!
Of course you can do whatever you like as the options with Duck Tape® are only limited by your imagination, but I have pictures to show how I did my ruffles and the scallops.
So this is just one option amongst the wide range of possibilities Duck Tape® offers. For more projects and inspiration follow @TheDuckBrand on Twitter for tons of tutorials and projects!


 RSS Feed


