Kit's Crafts
  • Home
  • About
    • Selling Handmade Goods
  • Knitting
  • Crochet
  • Sewing
  • Crafting
    • Just for Fun
    • Wall Decor
    • Christmas Fun
    • Party On
  • From the Kitchen
    • Chocolate
    • Sweet
    • Savory
  • Quiet Book
  • The Shop

Peanut Butter Cookie Balls

11/21/2013

0 Comments

 
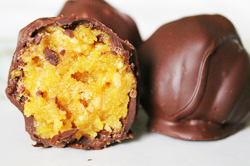
Move over cake balls/pops and make room for the cookie ball! That's right people, the cookie ball. Funny thing, this recipe came about as a result of not having to gone shopping, but needing to make a dessert. I knew I had vanilla pudding in my cupboard and peanut butter cookies in my freezer. At first I was thinking of making some kind of cookie custard, but then I discovered a round up of cookie ball recipes over at Snack Works and my decision was made!
Kit's Crafts - Peanut Butter #CookieBalls
Ingredients:
1 package Instant Vanilla Pudding
Pinch of Chili Powder
3/4 cup Milk
12 - 14 Crushed Peanut Butter Cookies (Nutter Butters would be awesome!)
1 package Semi Sweet Chocolate Chips
Plastic fork with two middle tines removed

Directions:
Combine milk, pudding and chili powder. Stir in crushed cookies. You should have a very sticky dough. Roll dough into about 20 balls. Place balls on a cookie sheet lined with wax paper. Place balls in the freezer for 1 hour.

Melt chocolate in the microwave or over a double boiler. Place 6 - 8 balls in the chocolate and carefully stir until balls are covered. Use the 2-tined fork to remove each ball and place back on the wax paper. Continue the last step until all balls are covered. Let chocolate set. You can put the balls in the fridge to speed up the process.

You might also like

Picture
Picture
Picture
Picture
Foodies and Crafties Soiree
0 Comments

Pear Surprise Mini Pies

11/12/2013

2 Comments

 
Last week, I made some really yummy veggie potstickers I found over at the Food Network, which used wonton wrappers (as most pot sticker recipes do). The problem with any recipe that involves wonton wrappers is that you rarely use all of the wrappers that come in the package. I hate to waste anything, so I went in search for a recipe to use up these little squares of dough. There are TONS of ideas out there; everything from lasagna cupcakes (very good) to deep fried pillows (sounds amazing!) to just simply buttering and sprinkling with cinnamon and sugar then baking. While many of the ideas sounded enticing, I kept thinking about a pear I didn't want to go bad as well as some leftover white chocolate (from the cake pops a few weeks ago) and some crushed pecans (also a left over). This brought to mind my Caramel Apple Tartlets from a year ago and with all of that in mind, I came up with the following recipe. Let me just tell you, I ate about 3/4 of them without even thinking they are so good!
Kit's Crafts - Pear Surprise #MiniPies
Ingredients:
24 Wonton Wrappers
1 Pear, diced (I didn't peel it, but you can)
1/2 cup White Chocolate Chips
3 tablespoons sugar
1 teaspoon Cinnamon
dash of Ginger
1/4 cup crushed Pecans
12 Caramels, unwrapped and cut into 4 pieces each (48 pieces)
Spray Oil
Coarse Sea Salt

Directions:
Preheat oven to 350 degrees. Grease a 12 cup muffin tin with spray oil.
Press 1 wrapper into each cup. Divide pear and white chocolate chips into each cup evenly. Combine sugar, cinnamon and ginger in a small bowl. Sprinkle half of the sugar mixture over the pears and chocolate. Press another wrapper into each cup. Put 4 pieces of caramel in each cup. Sprinkle with the pecans and remaining sugar mixture. Spray with oil. Sprinkle VERY LIGHTLY with salt (between 3-5 crystals per cup)
Bake for 10 minutes or until edges are browned and crispy. 

The only change I might make the next time I make these is to leave the caramel out and melt it instead, then, once baked, top each cup with a scoop of ice cream and drizzle with the caramel. Mmmmmmmm.....

So, do share, what have you made with wonton wrappers?

You might also like

Picture
Picture
Picture
Picture

Where I partied:

Picture
2 Comments

Cake Pop Save

10/28/2013

0 Comments

 
Do you ever go to make something that seems really straightforward and everyone you know who has tried it talks up the simplicity of the project? So you go at it with a head full of confidence thinking, "I'm crafty, I make stuff, I got this" only to find that what you are trying to do is much more difficult then you thought. Enter the cake pop.

Pretty much everyone I know has made cake pops and I have seen them all over the web. So, when my husband's family decided to do a Halloween Party, I thought, "Perfect, I will make cute little ghosts!" I gathered my supplies, baked up a box cake, watched a tutorial online and went fearlessly to work. 

Apparently, I overestimated my abilities. When it came to dunking, my ghosts kept falling off into the chocolate. I ended up drizzling them instead (what a mess!), which "saved" them, however, I made the little guys too big and they kept falling off the sticks throughout the little soiree.

Here is the lesson: Cake pops are tricky! You need to have the perfect ratio of frosting to cake, DO NOT over heat your chocolate, and (perhaps the biggest failure) DO NOT make them too big. I am sure there are other things I did horribly wrong, and, since my husband lovingly told me to try them different the next time (as if there would be one) I would love to hear your suggestions!
Kit's Crafts - Cake Pop Save

You might also like

Picture
Picture
Picture
Picture
0 Comments

Stenciled Sprinkles Cake

10/15/2013

2 Comments

 
Here is a sweet cake I made for my daughter. I have seen stenciling all over Pinterest and thought I would give it a try. Turns out, it is immensely easy. So, here are the few steps.
Kit's Crafts - Stenciled Sprinkles
Materials:
Wax Paper
Paper/Printer
Craft Knife/Self Healing Mat (preferable) or Scissors
Frosted Cake
Sprinkles of your choice
Kitchen Brush
Tooth Pick

Ok, to start out with, determine what you want to stencil and print it out at the size you want it to be. I did a 2 in Poor Richard font, which came with my computer. 

You have two options for the next step:

For scissors, trace the picture onto the wax paper and cut it out.

For a craft knife, tape the image to the mat, then tape the wax paper on top. Carefully cut the image out.

Now, gently place the wax paper onto the frosted cake and carefully push down and corners that roll up.

Cover the cut out in sprinkles, brush away the excess sprinkles and carefully lift off the wax paper.

Use a tooth pick to remove any stray sprinkles and smooth out areas of the cake that were tampered by the wax paper.

Too easy, right?
Kit's Crafts - Stenciled Sprinkles

You might also like:

Picture
Picture
Picture
Picture

Where I partied:

Photobucket
Picture
KitchenFun
2 Comments

No-Bake Peaches and Cream Pie

9/19/2013

0 Comments

 
This is one of those desserts that will never win a beauty award, but it sure tastes great. The best part is how easy it is to make. Aside from slicing up some peaches, it is basically a dump and refrigerate recipe. 
No Bake Peaches & Cream Pie - Kit's Crafts, It isn't pretty but it sure is good!
Ingredients:
2 cups sliced and peeled Fresh Peaches (about 4 medium)
1 can Sweetened Condensed Milk
1/4 cup Lemon Juice
Dash of Nutmeg
1 baked 9" Pie Crust or Graham Cracker Crust

Directions:
In a medium bowl, combine milk, juice and nutmeg. Add peaches, stirring until combined. Pour mixture into pie crust. Let chill in refrigerator for at least 1 hour. Does it get any easier?!

You might also like:

Picture
Picture
Picture
Picture
0 Comments

Cake Mix Cookies with Bananas

9/5/2013

0 Comments

 
I don't know about you, but it seems like every time I buy bananas, the majority of them go bad before my family gets a chance to eat them. All growing up, when our bananas went bad, the go to recipe was banana bread. I like banana bread as much as the next kid, but a few weeks ago, I had some aging bananas and was looking for something a little more sweet. That is when I came across marvelous blog Inside BrewCrew Life where a recipe for Banana Caramel Cookies was featured. I made them that night and was completely delighted! It occurred to me that this could be the base for any type of cookie. So, I modified the recipe slightly and now I am sharing it with you.
Kit's Crafts - Cake Mix Cookies with Bananas
The great thing about this recipe is that it is very adaptable for whatever you flavor tickles your fancy and the banana flavor isn't overpowering, which also makes it a delightful recipe!

Ingredients:
1/2 cup Butter, softened
2 Bananas, smashed
1 teaspoon Vanilla
1/4 cup Flour
1 Cake Mix, flavor of your choice
Any add-ins of your choice (chocolate chips, nuts, craisens, toffee bits etc.)

Directions:
Preheat oven to 350F and line a baking sheet with parchment paper.

Combine the butter and bananas with a hand mixer or in the bowl of a stand mixer until well blended. Stir in the vanilla. Add in the flour and cake mix, until just combined. Then add any extras you would like. Drop dough onto prepared baking sheet from a spoon to form 1" to 1.5" dollops with about 2" in between. Bake for 10-12 minutes or until the edges of the cookies look slightly browned. Let cool for a few minutes on the baking sheet before transferring to a cooling rack to reach room temperature.

Makes about 25-30 cookies.

You might also like:

Picture
Picture
Picture
Picture

Where I partied:

Foodies and Crafties Soiree
0 Comments

Fancy Pants Cupcakes

8/27/2013

3 Comments

 
These cupcakes have been quite the labor of love. The inspiration came from Dorie Greenspan's White Chocolate Brownies, which is perhaps my favorite recipe of all time. They are comprised of subtle flavors that compliment each other so perfectly and the texture is fabulous! Anyway, so I set out to create a cupcake with these fabulous brownies in mind. I owe many thanks to my good friends Devin and Stephanie Davis who continually offered suggestions and "suffered" through taste tests. Anyway, the picture below features the cupcake, of course, which Devin frosted, and I added the candied orange peel (that Devin made, which takes a month!) and blueberry.
Kit's Crafts - Fancy Pants Cupcakes
To give you a sum up of this delightful cupcake, it contains almonds, orange zest and blueberries and then is covered with a decadent white chocolate butter frosting. Make them tonight, you will NOT regret it!

Makes 30 cupcakes

Cupcake Ingredients:
2 1/2 cups All Purpose Flour
1/2 teaspoon Baking Powder
1/2 teaspoon Salt
1/3 cup Toasted Sliced Almonds (or toasted almond flour)
1 cup butter at room temperature
1 cup Sugar
zest from 1 Orange
4 Egg Yolks at room temperature
1 tablespoon Vanilla
1 cup buttermilk at room temperature
4 Egg Whites at room temperature
1 cup Sugar
1 cup Blueberries or Raspberries (it may be tempting to put more in, but refrain, it will overpower the other flavors)

White Chocolate Frosting Ingredients:
2 cups White Chocolate Chips
2 cups Unsalted Butter slightly softened

Directions:
Center rack in oven. Preheat oven to 350F. Line two 12 cup muffin tins with cupcake liners. (Although you will probably need three) 

Sift together flour, baking powder and salt. Reserve about 1 tablespoon of the dry mixture and place in a small bowl. Set both dry mixtures aside.

Pour almonds into a Ziplock bag and zip shut, squeezing the air out as you go. Pound the almonds with a mallet or a rolling pin to crush them. You want tiny bits, nothing to really chew. Add almonds to a large bowl or the bowl of a stand mixer, along with the butter. Cream together for about 3 minutes on medium. Zest the orange over the first cup of sugar, then remove the zest and set aside to add later. Add the sugar to the butter mixture, blending until light and fluffy. Mix in the egg yolks one at a time, blending after each addition. Turn the mixer to low and add about 1/3 of the dry ingredients and mix until there are just streaks, then add about 1/3 of the buttermilk and mix until just blended. Continue alternating the dry ingredients and the buttermilk in this fashion, only mixing until streaks remain, being careful not to over blend. With the last addition of the buttermilk, also add the vanilla and zest still only mixing until streaks are left.

In a separate bowl, with clean a mixer, whip the egg whites with the remaining cup of sugar until they reach a medium stiff peak. Gently fold the whipped whites into the rest of the batter until just a few white streaks remain.

Rinse the berries and coat with the reserved dry mixture. Fold berries into batter.

Ladle batter into muffin cups, filling each cup 2/3 full. Bake for 18 - 20 minutes or until the edges are golden and a toothpick entered into the center comes out clean. Let cupcakes cool to room temperature.

For frosting, melt chocolate in a double boiler with 1/4 cup of the butter until smooth, stirring occasionally. Set aside and Let cool a bit while you whip the butter.

Place the remaining 1 3/4 cups butter in the bowl of a stand mixer or in a large mixing bowl. Whip the butter on medium high for about 1-2 minutes or until light and fluffy. In a slow stream, blend in the melted white chocolate. Keep mixing until well blended. Once the cupcakes are room temperature, either pipe or spatula frosting on top.

You can make the cupcakes at least 2-3 days ahead of time; keep at room temperature in an airtight container. The frosting should only be made the night before and kept in the fridge in an airtight container. Wait to frost cupcakes until, at most, an hour ahead of serving.

Okay people, now it's your turn. Do share, what is your most favorite recipe of all time?
Kit's Crafts - Fancy Pants Cupcakes

Picture
3 Comments

Semi-Healthy Chocolate Cake

8/22/2013

11 Comments

 
I LOVE the harvest season! I don't have a garden, but my in-laws always grow way more veggies then they need, so I lovingly reap the rewards. Last week, I got a few zucchinis, so of course I had to make zucchini brownies. However, I thought I would try something new and replace the sugar with honey and the oil with yogurt. The yogurt makes the brownies more cakey and the honey makes them more moist, hence why this is a recipe for a cake. This recipe is loaded with chocolate (which makes it not so healthy) but I figured the zucchini, honey and yogurt make it somewhat healthy, hence the name. Anyway, share links to recipes you make every year during the harvest season in the comments!
Kit's Crafts - Semi-Healthy Chocolate Cake
Cake Ingredients:
2 cups All-Purpose Flour
1/2 cup Unsweetened Cocoa Powder
1 1/2 teaspoons Baking Soda
1 teaspoon Salt
1/3 cup Plain Yogurt or Greek Yogurt
1 1/3 cups Honey (preferably local)
2 teaspoons Vanilla Extract
2 cups Shredded Zucchini
2 cups Milk Chocolate Chips

Icing Ingredients:
1/4 cup Butter
6 tablespoons Unsweetened Cocoa Powder
2 cups Confectioners' Sugar
1/4 cup Milk
1/2 teaspoon Vanilla Extract

Directions:
Preheat oven to 325 F. Grease and flour a 9" x 13" baking pan.

In a medium bowl, combine flour, 1/2 cup cocoa powder, baking soda and salt. Set aside.

In a large bowl, mix together yogurt, honey and vanilla until well blended. Stir in the flour mixture. Fold in the zucchini and chocolate chips, then spread evenly into prepared pan.

Bake for 30 to 35 minutes or until the cake springs back when gently touched. Place on a cooling rake until room temperature.

While the cake is cooling, prepare the icing by first melting the butter in a small saucepan. Whisk in the remaining cocoa powder, then set aside. In a medium bowl, combine the confectioners' sugar, milk and vanilla until well blended. Stir in the butter mixture then spread over the cooled cake.

P.S. as a little tip, I usually get WAY more zucchini then our little family needs, so I send it through the grater on my food processor then freeze it in 2 cup increments so I can make stuff throughout the year!
Content in the Meantime
Picture
11 Comments

Caramel Puffed Wheat Squares

8/16/2013

0 Comments

 
In an effort to cut back on costs, I tried making my own granola bars, but they really weren't that great. For the recipe, I bought a bag of puffed wheat. Unfortunately, the puffed wheat sat in my cupboard for at least a month without being eaten. A couple Sundays ago I decided it was time to do something with this neglected cereal. Here is the recipe I made, which was adapted from a recipe I found at The Mother Huddle.
Kit's Crafts - Caramel Puffed Wheat Squares
Ingredients:
8 oz bag Puffed wheat
1/2 cup Butter
1 cup Brown Sugar
1/2 cup Light Corn Syrup
1 cup Sweetened Condensed Milk
12 oz bag Milk Chocolate Chips

Directions:
Grease a 9" x 13" pan. Pour puffed wheat into a large bowl and set aside.

In a medium saucepan, melt butter over medium low heat, but do not let boil. Add sugar and corn syrup, then turn up the heat and bring to a boil. Add sweetened condensed milk and return to a boil. Then, reduce heat to medium and, stirring constantly, cook to 240⁰ (soft ball stage), which takes about 10-15 minutes.

Pour caramel mixture over puffed wheat and mix thoroughly. Gently press into greased pan with the back of a wooden spoon.

In a small saucepan, melt the chocolate chips. Sporadically drop dollops of the melted chocolate on top of the caramel puffs, then spread into a semi even layer and let cool.

Once both layers are room temperature, cut into 16 rectangles. Store in an air tight container for up to a week.
Picture
0 Comments

Strawberry Bars

8/6/2013

0 Comments

 
I found the recipe for these phenomenal Strawberry Bars through Yummly and let me tell you, this recipe deserves a serious shout out. It is so good, I made it twice in one week and I didn't even share it with my neighbors! It is one of those desserts that you think, "oh, I will just have a small piece", but don't kid yourself, you will definitely be going back for seconds and thirds. It is a perfect combination of pie and bar cookie with a light and decadent strawberry layer on top of a crust that is reminiscent of a buttery short bread. Seriously, make this tonight. Your will not regret it!  
Strawberry Bars
0 Comments
<<Previous
Forward>>
    Kit's Crafts
    Hey there! I'm Kristin, aka Kit. Here is just a peek into my crafting mind. I hope you find something to spur your creativity!
    Instagram

    Kit's Crafts Shop

    Popular Posts

    Picture
    Picture
    Picture
    Picture
    Picture
    Picture

    RSS Feed

    Picture
    Kit's Crafts
    Picture
    The Yarn Box

    Featured Here

    Picture
    Moogly
    Picture

    Categories

    All
    About
    Baby
    Baking
    Bio
    Caramel
    Child
    Chocolate
    Christmas
    Cooking
    Crochet
    Decor
    Dessert
    Dress
    Free Knit/crochet Pattern
    Free Sewing Pattern
    Interior Design
    Knitting
    Link Party
    Materials
    Pattern
    Quiet Book
    Quiet Book
    Recipe
    Selling Handmade Goods
    Sewing
    Spats
    T Shirt
    Tutorial

    Archives

    July 2020
    January 2020
    July 2019
    November 2018
    September 2018
    August 2018
    July 2018
    May 2018
    April 2018
    February 2018
    January 2018
    April 2016
    September 2015
    March 2015
    February 2015
    November 2014
    October 2014
    September 2014
    August 2014
    July 2014
    June 2014
    May 2014
    April 2014
    March 2014
    February 2014
    January 2014
    December 2013
    November 2013
    October 2013
    September 2013
    August 2013
    July 2013
    June 2013
    May 2013
    April 2013
    March 2013
    February 2013
    January 2013
    December 2012
    November 2012
    October 2012

Powered by Create your own unique website with customizable templates.