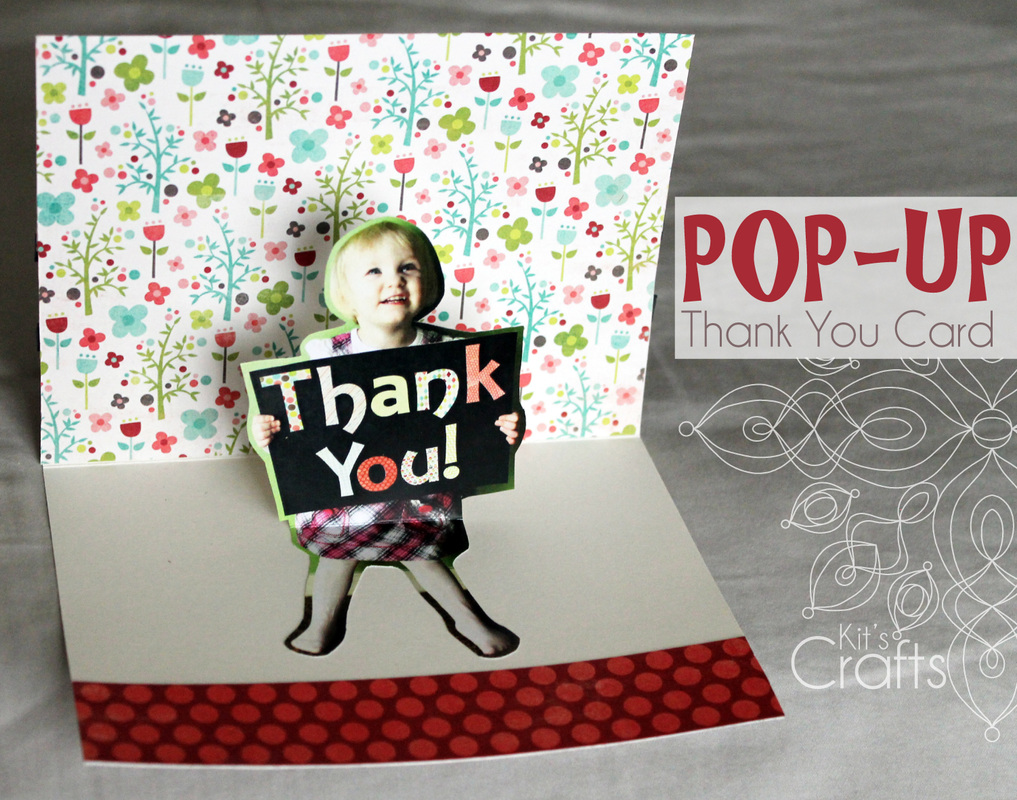
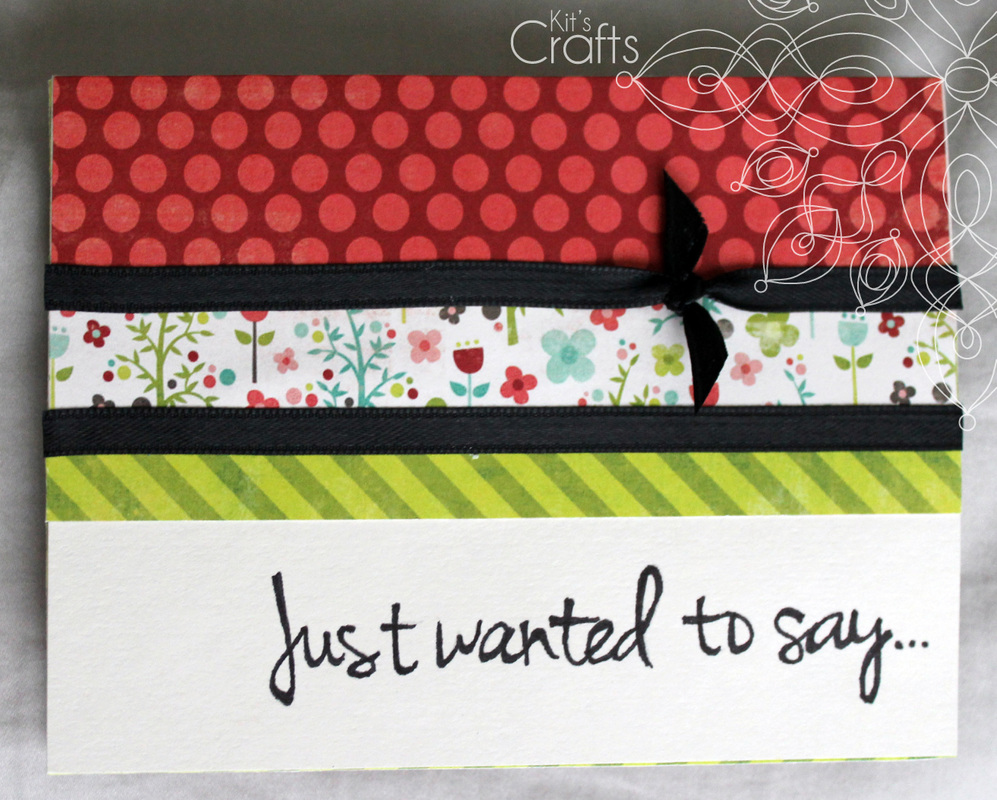
This is one of those clever ideas that I wish I came up with. I stumbled across this little pop up card while perusing through my Google+ communities, which, by the way, is a perfect place to get amazing ideas and advice. Anyway, the genius behind this post is Helen Bird from Spoonful. The tutorial is really great too, so I will just refer you there. Below is my rendition. Hope you can come up with a reason to make this cute little token of gratitude!
4 Comments
Last week, I posted a lovely little A-Frame Play Tent that was decorated with a fabric fan garland. I found the tutorial for this adorable string of fans at Blooms and Bugs. I really loved the outcome, however there are a few things that I would probably do different if I were to make it again. I think it looks better when hung vertically (pictured below) as opposed to horizontally (shown in the tutorial). If you want a horizontal garland, here are a few suggestions:
You might also like: I grew up building forts using blankets, stools, chairs or whatever looked useful, so when I saw how simple and inexpensive it is to build an A-frame play tent I knew it had to happen. I ended up making one for my daughter and my niece. Seriously, it cost less than $10 total and took all of an afternoon to make. The best tutorial I found for this creation came from Twirl for a Rainy Day Tent. I contemplated redoing the tutorial with the few tweaks I made, but I have had a few too many projects on my plate in preparation for Christmas. So, instead, I am providing you with a link to the tutorial I used and a list of my little tips. Tips: * Watch out for bowing and large blemishes when picking up your furring strips * If you aren't down with buying thrift store sheets and/or you don't want to do any sewing, look for curtain panels instead of a flat sheet * When drilling your holes, do two of the furring strips at once so that the holes line up and mark them, then paint the ends of the pairs different colors * I sanded my furring strips because they are pretty rough just from the store By the way, I will be posting about the fabric fan garland next week. You might also like:Hey there! Do you remember the String Art Star Ornament I posted a while ago? I enjoyed making that so much, that I thought I would do another little craft involving string art. Mine is a Christmas decoration, but you could always spell something else out or use a different color string to make it more of a year round thing. Materials: Block of wood at least 1/2" thick Printer/printer paper Tissue Paper Masking Tape Wire Nails (#18 x 5/8") Needle Nose Pliers Thick thread Mechanical Pencil top (or yarn needle with a dull end) (optional) Super Glue Directions: 1. Measure out your block of wood. Using Word or a similar program, type your word, keeping it within your measurements, then print. Trace your word onto the tissue paper and make dots where you want to put your nails. Line up and tape the tissue on the wood and, using the pliers to hold the nails in place, begin to hammer in the nails. 2. Unscrew the top of a mechanical pencil off and thread it onto the red string. Use this to help guide the thread around the nails. Start a square knot, but wait to tighten it until it is around one of the nails and leave a long tail. 3. Once you have made your way all around, use the original tail to tie another knot. Before cutting the string, put a spot of super glue on the knot and let it dry, then clip the tails. You might also like:Are you LOVING all the string art going around on Pinterest?! There are some seriously creative uses for this technique. Any who, I thought I would bring you a quick tutorial for a Christmas ornament featuring #StringArt that I made for those in my Crafty Christmas Ornament Swap group. (On Thursday, I will share with you the AMAZING ornaments that everyone else made.) Materials: Tissue Paper Sewing Gauge (or ruler) Wire Nails (#18 x 5/8") Wooden Star ornament (I got mine at Michael's) Thick red thread Mechanical Pencil top (or yarn needle with a dull end) (optional) Super Glue Gold Pen (the border) Directions: 1. Trace the star on a piece of tissue paper, then, using a sewing gauge, draw another star 1/4" inside the first one. Mark where you want to put your nails. Line up the tissue on the flat side of your ornament and begin to hammer in the nails, taking care not to go through to the back. 2. Unscrew the top of a mechanical pencil off and thread it onto the red string. Use this to help guide the thread around the nails. Start a square knot, but wait to tighten it until it is around one of the nails and leave a long tail. 3. Once you have made your way all around, use the original tail to tie another knot. Before cutting the string, put a spot of super glue on the knot and let it dry, then clip the tails. By the way, I also made the ornament below. I found the tutorial over at Notable Nest. You might also like: Here is the other half of the Asymmetrical Ruffle Christmas Stocking for a little girl that had this mini quiet book attached to the front. As I had mentioned before, this stocking was donated to Helping Kids with Cancer. This little book is a spin off from the Dress Up Page that I made as part of the Quiet Book I did about a year ago. That page was easily my favorite page to make. The little dresses are so fun to "design" it is hard to stop! I hope you enjoy the tutorial! Materials Needed: 2 rectangles at 5" x 6" of fabric (Inside panels) 1 rectangle at 9" x 6" of fabric (Outside)2 rectangles at 4.5" x 6" of a reinforcement material, such as a sturdy outdoor fabric or canvas Velcro Sewing machine/thread/pins/scissors Pattern (UNCHECK the fit to page box) Felt for the girl and back of the dresses (you can get felt sheets for $0.37 at JoAnn's)Steam a Seam Embroidery floss and needle (face and crown) 1/4" double fold bias tape or fabric to make your ownScraps of fabric for the dresses and castle Ribbon and/or lace for embellishment Inside Directions: 1. Pre-wash all fabrics before cutting. 2. Place the 2 inside panels face down on the table. Place and pin a rectangle of reinforcement material on top of each panel, lining up the top and sides. Baste stitch around the edges. 3. Cut two 5" strips of the soft side of the Velcro. Place an pin one strip about 1" from the top of one of your inside panels. Place and pin the second strip about 3/4" below the first. Straight stitch along the top and bottom of each strip. 4. Pin the two inside panels right sides together and sew along the inside at a 1/2" seam. Iron open the seam , then top stitch on each panel. 5. Cut the girl from the felt as well as from the steam a seam, then center and iron in place. With a straight stitch and starting at the bottom of the legs in the middle, sew straight about 3" or so to create the legs. Satin stitch around the body, except for the head. Cut the under dress and hair from both the fabric and the steam a seam. Iron in place, then satin stitch around the edges with a matching thread. Cut a piece of the soft side of the Velcro to fit on the chest of the girl, then pin and sew in place. 6. Trace the face and crown onto tissue paper and use that as a guide to embroider the face and crown. Outside Directions: 1. Cut your castle, roofs and flag from the fabric and steam a seam, then iron in place on the front of the book. Satin stitch around the edges, extending the back side of the flag down to the roof to create a flag pole. 2. If you are attaching this book to the Ruffle Stocking from Tuesday, cut a 1" square piece of the reinforcement fabric and place it on the wrong side of the exterior fabric where you would like the eye to go (I just held mine in place instead of pinning) then sew the eye portion of the large eye and hook in place. 3. Cut a rectangle of fabric at 3" x 2". Fold in half so that the 2" sides meet. Sew along one side with a 1/4" seam allowance, then sew again from the same side with a 1 1/2" seam allowance. Clip the remaining fabric and turn right side out. Connect your Velcro and cut a piece to fit the tab just made. Attach the prickly side to the tab and the soft side to the back side of the book in the middle about 1/4" from the edge. Then, place and pin the tab with the Velcro facing up on the front of the book and baste in place. 4. Place the outside of the book face down on the table, place the inside face up on top, pin and baste around the edges. For the binding, please refer to the detailed instructions of how I bound the pages in my quiet book. For the dresses, please refer to the Dress Up Page from the quiet book for detailed instructions. You might also like:Last week, I posted about Blazing Needles and the incredible donation they made to fill stockings that I had created. These stockings are being donated to Helping Kids With Cancer in an effort to bring some Christmas cheer to children fighting cancer and their families. I also made and filled another stocking to be donated (I just can't help myself!). Best part is that I am providing you with quick tutorial of how I made this lovely item. There are two parts to it, the stocking itself, which I will show today, and a mini quiet book closet with Velcro dress up clothes, which I will show on Thursday. Stocking Materials: 12" of a sturdy fabric or 24" of a lighter fabric (44"wide) 9" of fabric (for the flap and the loop to hang it) (44" wide) 5 rectangles of fabric measuring 14" x 6" (for the ruffles) Sewing Machine/Pins/Thread/Scissors Iron/Ironing Board Stocking Pattern Directions: 1. Pre-wash all fabric. Print the pattern, making sure that the box labeled "fit to page" is NOT checked. Piece together and tape the main stocking before cutting out. 2. Fold your main fabric in half and cut 2 stocking patterns, repeat if you are using a lighter weight fabric. Fold your flap fabric in half and cut 4 flaps (the last page of the pattern). 3. Pin 2 of your flaps right sides together. Sew along the rounded edge using a 1/2" seam allowance. Unfold and iron the seam to one side. Sew along the seam, attaching it to the side you just ironed it to. (This causes the fabric to fold to one side making a cleaner finish). Repeat this step, but iron the seam to the other side and sew it to the other side. Make a few clips along the seam so that it lays flat when you fold it right side out. (You should have a visible seam on only one side of each flap which will be the wrong side). 4. Lay down one of your stockings with the wrong side up. Place one of the flaps with the right side down on top. Line up the top edges and pin. Sew together using a straight stitch, then zig zag along the edge. Repeat the same process with the remaining stocking and flap. 5. Open up the flap and iron the seam toward the stocking. Top stitch along the top of the stocking, being careful to catch the seam as you sew. 6. Cut a 2 1/2" x 4" rectangle of fabric for your loop. Fold the rectangle so that the 4" sides meet and sew along this same edge using a 1/4" seam allowance. Turn the loop right side out and iron. Fold in the loop in half so the short ends meet. with the flap unfolded, place and pin the loop on the wrong side of the back stocking about 1 1/2" from the top and 1" from the side. Sew with a straight stitch and a zig zag stitch. (Please refer to the Origami Stocking for further pictorial representation) 1. To do the ruffles, fold each of your 5 rectangles in half, wrong sides together, and iron. Next, do a "dry fitting" as in place the rectangles about where you would like them to go on the stocking. This is especially necessary if you are using directional fabric or putting tulle on one side. Mark the side of the ruffle that will be angling up toward the flap with a pin. 2. Using a basting stitch, sew about 1/4" from the top of each rectangle, rounding off the corner that will be angling up toward the flap at about 1" - 2" from the end. The rounding off doesn't have to be exact as you will be bunching it anyway, but if you are really nervous about it, use a cup or a bowl to draw a round line on the ruffle before you begin sewing. 3. Pull one of the strings on each ruffle to bunch it and tie off the ends when it is bunched enough, then cut off the excess fabric from the rounded corner. 4. Do another "dry fitting" by placing all of your ruffles on the front stocking, then pin the bottom most ruffle in place and sew using a zig zag stitch to prevent unraveling. Repeat until all of the ruffles are attached; placing the topmost ruffle right under the flap. 5. If you are planning on adding the mini quiet book, then place the hook end of a large eye and hook under the bottom most ruffle and mark with a fabric pen, then hand sew to the front. 6. Pin the front and back stockings right sides together, tucking the ruffles a bit as you go. Starting about 1/2" from the top of the stocking and with the flap unfolded, sew the stocking together using a 1/2" seam allowance. End about 1/2" from the top on the opposite side. Cut off any excess fabric from the ruffles and make small clips about 1/2" apart in the seam allowance at the rounded portions of the stocking, taking care not to cut through the seam. 7. Turn the stocking right side out and sew along the flap sides with a 1/2" seam allowance. Fold the flap down and you have a lovely ruffled stocking! You might also like: Lets get real, the holiday season is upon us and Christmas isn't really that far away. If you have high hopes for a handmade Christmas, now is the time to get started on those one of a kind gifts. The great news is that there are a LOT of gift ideas out there that really don't take much time. Today, I am going to highlight some from this very website to get you jump-started. This first group is for all of the knitters out there. 1. T-Shirt Yarn Star Bracelet - The great thing about this gift is that you don't even have to make a trip to the craft store, just make your own tarn from your closet! 2. Fancy Spats - Liana - Use some left over yarn from your stash for this adorable fashion statement. 3. Baby Bear Hat - Made with chunky yarn and few embellishments, this darling hat is incredibly quick and easy to make. 4. Tractor Hat - This is a great hat for the boys in your life. Plus, it is a great base for an earflap hat, just swap out the chart. Now to some lovely crochet projects. 1. Fancy Spats - Cathedral - These little shoe collars are the perfect gift for that person with a unique style. 2. T-Shirt Yarn Cluster Bracelet - If you are low on cash, then this is the item to give to your friends. Not only is it adorable, but you can make it from t-shirts in your closet. 3. Ruffle Wreath - Perhaps you would like to add to your decor stash or maybe you just aren't sure what to buy for someone on your list. This gorgeous wreath is easy to make and fairly inexpensive too. (You can make the flowers from old sweaters!) 4. Broomstick Lace Headband - Really, does it get any easier?! Make these as stocking stuffers and use up some of your left over yarn or even make some tarn to create this headband with. Ok Sewers, here are some ideas for you. 1. Poinsettia Stocking - So, the stocking itself is pretty cool, but you could use the same technique for a pillow, which would also be adorable. 2. DIY Library Bag - This bag is so easy and doesn't take much material. It would make a great gift for friends and family. You could make it on a smaller scale and fill it with homemade soaps and scrubs. 3. Custom Stuffie - Here is an outline for how to make your own custom little stuffed animal for the little cutie in your life. 4. Men's Dress Shirt to Baby Dress - This would be awesome out of a great red or green plaid shirt! Here are some random crafts that don't necessarily fall under a specific category. 1. Pallet Growth Chart - This would be a great gift for someone with growing children or grand children 2. DIY Bath Crayons - Can we say stocking stuffers? 3. Olliblocks - So fun, so quick, so easy. 4. Nativity Puppets - Switch up the telling of Jesus' birth with some simple felt puppets If you are not so much into making things, but want the look of handmade, check out my Etsy Shop. You might also like: Last Saturday, I guest posted on Chaos with a Curve, where I did a tutorial for a Thanksgiving banner that included printables. To display this banner, I decorated my sister-in-law's mantle. You may remember the Gold-Dipped Pumpkins from last week that were on this mantle, well here is another piece of that puzzle. Today, I bring you Paper Bag Poppies. These little beauties became the anchor for the decor along with a frame I found at a thrift store and some left over fabric. Hope you enjoy this tutorial! Materials: Paper Lunch Bags Poppy Template Acrylic Paint/Paint Brush (Optional) Gold Marker (Optional) Stapler/Staples Glue Gun/Glue Sticks Directions: 1. Lay out the bag with the folded flap up. 2. Fold the flap down 3. Trace the template onto the bag as shown 4. Cut out 7 petals for each flower, find the center of the straight edge, then make a 1" cut Painting: 1. Water down your paint (equal parts water and paint), then dampen one of the petals with a brush and water, then brush the watered down paint onto the petal. Repeat with remaining petals. 2. Once the petals have all dried, use the gold marker to create an outline along the edges of each petal. 3. The petals tend to curl from the paint. Use the marker to straighten them out or, if you want them to curl a bit in the other direction, use the blade of open scissors to curl the edges as you would for curling ribbon. Finishing: 1. Overlap and staple each petal at the 1" cut. 2. On the backside of one petal, place some glue along the stapled edge, then overlap another petal and attach the two. Continue gluing and placing the remaining petals in the same fashion. 3. Cut a 6" square of paper and scribble on one side with the gold marker. Crumple the paper, then unfold and crumple again, this time tucking the edges under and toward the middle. Glue to the center of the flower. By the way, here is the completed mantle (the Be Thankful banner is over at Chaos with a Curve): You might also likeWhere I partiedGreat news! I was asked to guest post over at Chaos with a Curve! For the event, I decided it would be fun to decorate my sister-in-law's mantle for Thanksgiving. On Saturday, you will find a great tutorial for a Thanksgiving Banner, along with printables, over at Chaos with a Curve. There were quite a few other things that I made for this mantle as I was trying to spend as little money as possible. Today, I am going to show you how I made some gold dipped pumpkins. My initial inspiration for these little lovelies, were some gold dipped fruit by Chatelaine I found on Pinterest. I headed to Michaels and was lucky to find some paper mache pumpkins on sale. Only problem was that I couldn't stomach wasting that much paint, plus it seemed like such a ridiculous mess. I went back to the internet to find a better way and was lucky to find a wonderful tutorial by Homey Oh My! for a gold dipped pumpkin vase. Essentially, you fake the dip and spray paint the pumpkin instead. Simply put, BRILLIANT! Anyway, here is the process to recreate my pumpkins. Materials: Paper mache pumpkins Torn up pages from a book Modpodge Foam Brush Tin Foil Gold Spray Paint (mine was a primer and paint in one) Directions: 1. If you would like the book page effect, start by modpodging the torn book pages to each of the pumpkins and set aside to dry. 2. Once dried, wrap tin foil around the top 2/3 of your pumpkin. Make sure to use only one sheet of foil, as it is pretty difficult to hold the pumpkin when you piece sheets together. Then, in a well ventilated area, spray the pumpkins. The key here is to start spraying on the tin foil then sweep your arm toward the base of the pumpkin and stop spraying (refer to photos). Also, tilt the spray tip in that direction. Set aside to dry for about 30 minutes. You might also like |
Hey there! I'm Kristin, aka Kit. Here is just a peek into my crafting mind. I hope you find something to spur your creativity!
Kit's Crafts ShopPopular PostsFeatured HereCategories
All
Archives
July 2020
|