
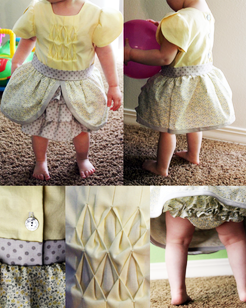
The idea of drafting a pattern used to terrify me. I always thought of pattern making as something that only professionals could do. Then, a little over a year and a half ago, I was looking to turn a men's dress shirt into a baby dress and stumbled upon The Metro Dress by Shwin & Shwin. Their website is chock full of wonderful patterns as well as instructions on various sewing techniques and even how to draft your own sewing patterns. I thought back to The Metro Dress last month when I saved one of my husband's dress shirts from the good will pile. Below is the upcycled version of said shirt.
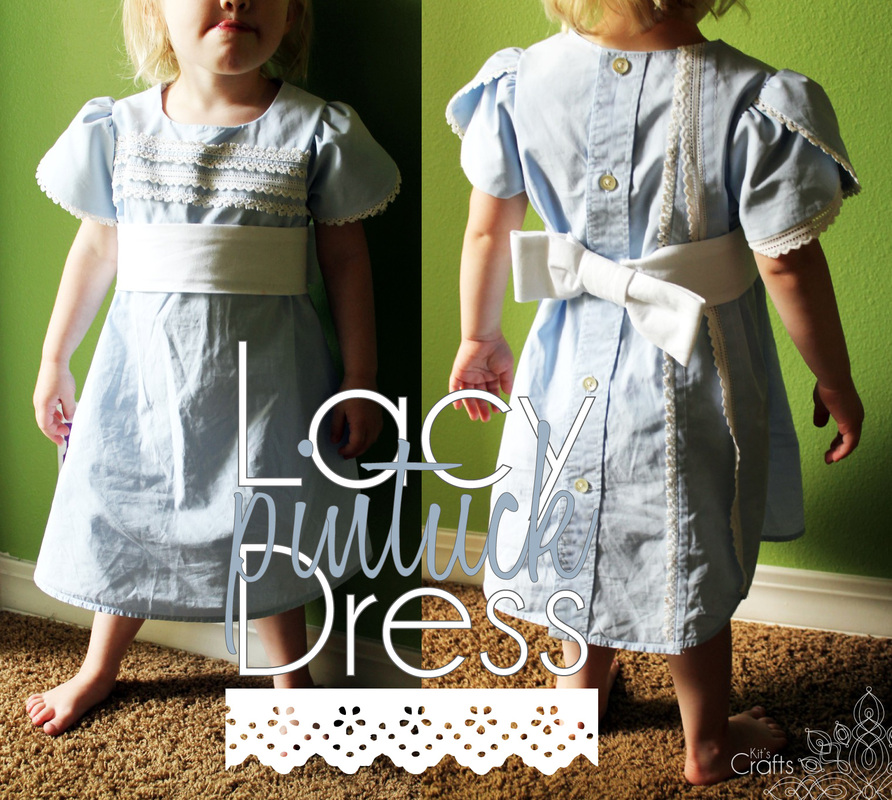
I apologize for the wrinkles, I didn't have time to take photos before church...
For this tutorial, I will refer to a few other websites that I used to create this little lovely. The dress involves a few advanced techniques, but don't be intimidated, just take your time and go step by step.
A few tips before we get started, first off, if you have never done pintucks before practice sewing these little beauts on some scrap fabric before attacking the dress shirt. Also, always sew your pintucks before cutting your fabric as they will pull the fabric and mess up the pattern if you don't. As a side note, I tried to use as much of the finished shirt as I could to cut back on the time/effort factor. You will notice that I kept the original hem as well as the buttons/button holes.
A few tips before we get started, first off, if you have never done pintucks before practice sewing these little beauts on some scrap fabric before attacking the dress shirt. Also, always sew your pintucks before cutting your fabric as they will pull the fabric and mess up the pattern if you don't. As a side note, I tried to use as much of the finished shirt as I could to cut back on the time/effort factor. You will notice that I kept the original hem as well as the buttons/button holes.
Materials:
Large paper or smaller pieces taped together
Well fitting dress to draw pattern from
Men's dress shirt (I used a size medium for a tiny toddler)
Lace Trim (yardage depends on the amount of tucks)
Fabric Pen/Pencil
Iron/Ironing Board
About 1/2 yard of white fabric for the lining and bow belt
Sewing machine/scissors/pins/thread
Directions:
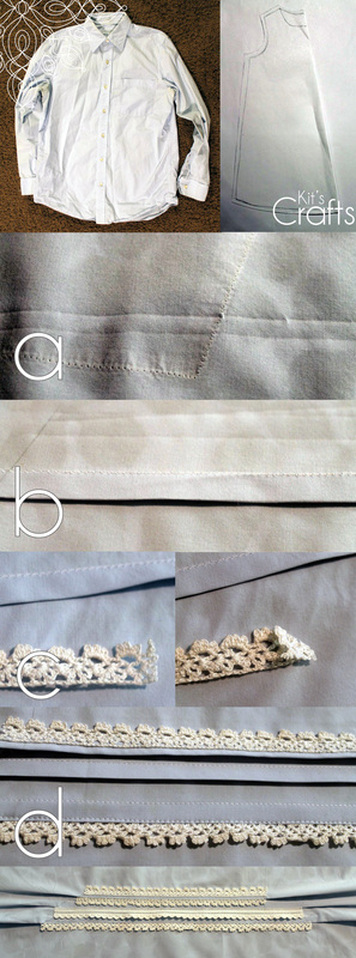
1. To begin with, use the well fitting dress to draft your pattern. However, don't cut your pattern from the shirt just yet. If you have never drafted a pattern, head over to Shwin & Shwin for directions. I made a simple A-line shape. For the petal sleeves, I did a longer and wider version of the sleeves on The Yellow Dress also by Shwin & Shwin. (Are you sensing a theme...)
2. Cut the sleeves and collar off the shirt and cut the side seams to separate the front from the back. This will make placing the pintucks easier. Before making any pattern cuts, however, sew your pintucks. Use your pattern piece to estimate where you want your tucks to go, keeping in mind that your fabric will shorten as you add the pintucks. Start by Determining how wide you want your pintuck (mine were about 1/4" wide) then, on the right side with a fabric pen/pencil, draw a straight line about that length above where you want the pintuck to sit (a). Fold along the line you just drew, wrong sides together, and iron, then sew using your desired width as your seam allowance, iron down the fold and presto, your first pintuck (b). (As a side note, I suggest starting on your lowest pintuck on the front and the pintuck closest to the buttons.) To add the lace in, simply place the lace under the pintuck and sew them both down to the fabric. I started on the button side of the shirt which is the back side of my dress. Originally, I wasn't planning on putting anything on the back, but there was a pocket on the shirt that I had to address. I unpicked the pocket and, much to my dismay, the shirt was actually dyed after it was sewn so there were teeny white spots along the needle holes left from the pocket (a). When I added the lace in, I took a shortcut. I applied Fray Check to the end of the lace trim that would be exposed. Once the Fray Check dried, I folded the lace end to form a 45 degree angle then sewed it under the the pintuck (c). On the front, I sewed the top piece of lace at the same time as my final pintuck (d).
Large paper or smaller pieces taped together
Well fitting dress to draw pattern from
Men's dress shirt (I used a size medium for a tiny toddler)
Lace Trim (yardage depends on the amount of tucks)
Fabric Pen/Pencil
Iron/Ironing Board
About 1/2 yard of white fabric for the lining and bow belt
Sewing machine/scissors/pins/thread
Directions:
1. To begin with, use the well fitting dress to draft your pattern. However, don't cut your pattern from the shirt just yet. If you have never drafted a pattern, head over to Shwin & Shwin for directions. I made a simple A-line shape. For the petal sleeves, I did a longer and wider version of the sleeves on The Yellow Dress also by Shwin & Shwin. (Are you sensing a theme...)
2. Cut the sleeves and collar off the shirt and cut the side seams to separate the front from the back. This will make placing the pintucks easier. Before making any pattern cuts, however, sew your pintucks. Use your pattern piece to estimate where you want your tucks to go, keeping in mind that your fabric will shorten as you add the pintucks. Start by Determining how wide you want your pintuck (mine were about 1/4" wide) then, on the right side with a fabric pen/pencil, draw a straight line about that length above where you want the pintuck to sit (a). Fold along the line you just drew, wrong sides together, and iron, then sew using your desired width as your seam allowance, iron down the fold and presto, your first pintuck (b). (As a side note, I suggest starting on your lowest pintuck on the front and the pintuck closest to the buttons.) To add the lace in, simply place the lace under the pintuck and sew them both down to the fabric. I started on the button side of the shirt which is the back side of my dress. Originally, I wasn't planning on putting anything on the back, but there was a pocket on the shirt that I had to address. I unpicked the pocket and, much to my dismay, the shirt was actually dyed after it was sewn so there were teeny white spots along the needle holes left from the pocket (a). When I added the lace in, I took a shortcut. I applied Fray Check to the end of the lace trim that would be exposed. Once the Fray Check dried, I folded the lace end to form a 45 degree angle then sewed it under the the pintuck (c). On the front, I sewed the top piece of lace at the same time as my final pintuck (d).
3. Cut the dress from the shirt. Line up the hem of your pattern with the hem of the shirt, pin in place and cut away. I cut the back side with the shirt buttoned up. Cut an extra front piece out of the white lining fabric, including enough length to hem the bottom. Cut a total of 8 sleeve pieces from the shirt sleeves. The extra pieces will be used as lining.
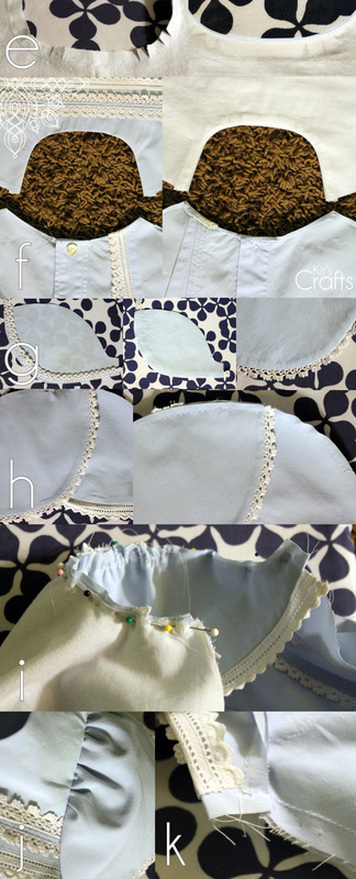
4. With right sides together, pin the front piece to the lining. Pin and sew along the collar. Make a few small clips in the corners of the collar taking care not to penetrate the seam. Unfold the seam and with the seam allowance under the lining piece, top stitch next to the seam, making sure to catch the seam allowance. Fold the lining back under the dress and iron in place (e). For the back side of the dress, create a rolled hem along the collar.
5. Line up the shoulders of the front and back pieces. With right sides together, pin and sew along each shoulder. Iron the seam open.
6. For the sleeves, start by laying one sleeve piece right side up. Place some lace trim along the outer edge facing into the sleeve (this works best with stretchy lace). Next lay down another sleeve piece with the right side down. Pin and sew the outer edge. Open up the seam and top stitch along the seam on the lining side taking care to catch the seam allowance. Fold the lining in place and iron (g). Repeat with the remaining sleeve pieces.
7. Over lap two sleeve pieces. Since we are making a puff sleeve here, you don't need to be precise. Baste along the top of the sleeve (h). Repeat for the remaining sleeve pieces keeping in mind which one will be in front. Pull one of the basted threads to gather the sleeve, then pin into the shoulder space, adjusting the gather to best fit in the space (i). Sew the sleeve into the shoulder.
8. Line up the sides of the dress and bottoms of the sleeves and pin. Fold the lace trim to the inside of the sleeve. Sew up the sides and sleeves (k).
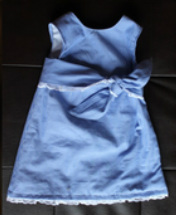
9. For the bow belt, I will refer you to Tilly and the Buttons.
If you make this dress or a version of it, I would love to see it! Email me at [email protected]
4. With right sides together, pin the front piece to the lining. Pin and sew along the collar. Make a few small clips in the corners of the collar taking care not to penetrate the seam. Unfold the seam and with the seam allowance under the lining piece, top stitch next to the seam, making sure to catch the seam allowance. Fold the lining back under the dress and iron in place (e). For the back side of the dress, create a rolled hem along the collar.
5. Line up the shoulders of the front and back pieces. With right sides together, pin and sew along each shoulder. Iron the seam open.
6. For the sleeves, start by laying one sleeve piece right side up. Place some lace trim along the outer edge facing into the sleeve (this works best with stretchy lace). Next lay down another sleeve piece with the right side down. Pin and sew the outer edge. Open up the seam and top stitch along the seam on the lining side taking care to catch the seam allowance. Fold the lining in place and iron (g). Repeat with the remaining sleeve pieces.
7. Over lap two sleeve pieces. Since we are making a puff sleeve here, you don't need to be precise. Baste along the top of the sleeve (h). Repeat for the remaining sleeve pieces keeping in mind which one will be in front. Pull one of the basted threads to gather the sleeve, then pin into the shoulder space, adjusting the gather to best fit in the space (i). Sew the sleeve into the shoulder.
8. Line up the sides of the dress and bottoms of the sleeves and pin. Fold the lace trim to the inside of the sleeve. Sew up the sides and sleeves (k).
9. For the bow belt, I will refer you to Tilly and the Buttons.
If you make this dress or a version of it, I would love to see it! Email me at [email protected]
You might also like:
 |  |  |  |


 RSS Feed


