
This is a page I made for a quiet book 2 years ago. Since then, it has held up pretty good, until last month when my toddler started to rip the leather cords I used to hold the beads. It occurred to me that perhaps this issue could have been averted had I used a different material, so here is my updated version.
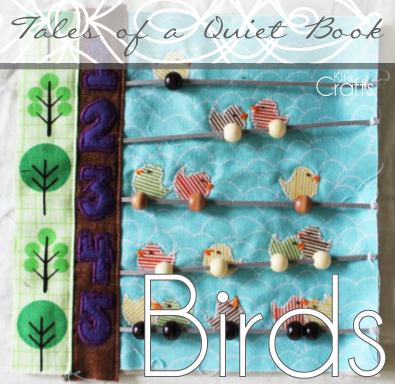
I got the inspiration for this page from Made by Molly, the difference being that she did a page with birds on a fence. Although the construction of this page is somewhat time consuming because of the birds, overall, this page is fairly easy.
Materials Needed:
* Fabric (remember to prewash all fabrics)
* Felt for the numbers
* 3/8" ribbon for the "wire" (this is the update)
* Embroidery floss and needle
* 15 wooden beads
* Steam a Seam
* 9"x9" of reinforcement
* Pattern, remember to UNCHECK the fit to page box
* Duct tape
Assembly:
* Cut a 3" by 9" rectangle for the telephone pole and iron in half lengthwise
* Cut 15 birds from fabric and from the steam a seam
* Cut 5 strips of ribbon 9" long and either melt the ends over a flame or apply some Fray Check to prevent fraying.
* Using template, place pole and ribbons on page (I purposely placed my "wires" on different angles rather then making them straight, because I knew keeping them parallel would be pretty tricky and I liked the look), then place and iron birds to page and remove the pole and ribbons.
* Satin stitch around the edge of the birds
* Embroider eyes and beaks
* Place the ribbons again, then, using a zigzag stitch with the length very close together, zigzag through the ribbons on the side opposite the binding, repeat for all strips
* Thread the beads onto the ribbons
* One at a time, pull each ribbon taut and use a small piece of duct tape to hold it in place, then repeat the zigzag stitch, being careful to penetrate the ribbon
* Attach the pole to the page by first straight stitching along the fold, then satin stitch over the straight stitch.
* Cut the numbers from felt and steam a seam, then iron onto the pole and satin stitch around the edge of the numbers
* Attach a 1 1/2" binding
For more pages and some tips visit my Quiet Book page.
You might also like:
 |  |  |  |


 RSS Feed


