
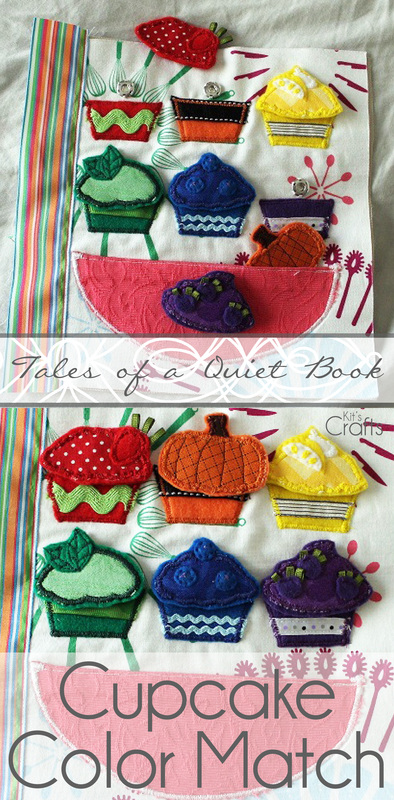
These little cupcakes are one of my proudest quiet book moments. The page is a bit on the time consuming side, but so darn cute! I came across a little baking page by Imagine Our Life when I was originally looking for quiet book ideas, which inspired the lovely page in this tutorial. (By the way, the only updates to this tutorial are to the pictures).
For more pages and some tips visit my Quiet Book page.
Materials Needed:
* Fabric (remember to prewash all fabrics)
* Felt for the backs of the tops and the liners
* Various ribbons for adornment
* Embroidery floss and needle
* Steam a Seam
* Snaps
* 9"x9" of reinforcement and some for to reinforce the snaps
* Pattern, remember to UNCHECK the fit to page box
Directions:
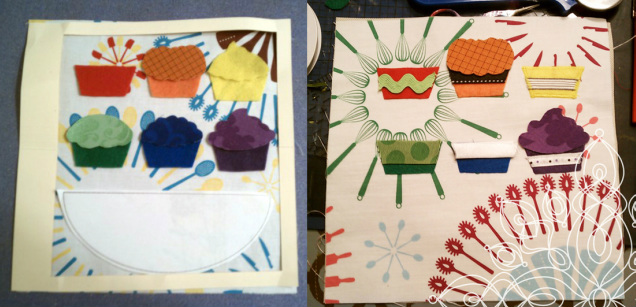
* Cut a cupcake liner from each color of felt and steam a seam
* Layout the liners on the page using the template, then iron onto page
* Place embellishments (I used ribbon for all of mine) and sew embellishments to page going through the reinforcement. (As a side note, you may want to hit the ends of the ribbons with Fray Check before attaching them to the page). Then, using a satin stitch, attach the cups to the page
* Cut 2 bowls from fabric and, with right sides together, sew just along the top. Turn the bowl right side out and top stitch along the seam. Using the template, place the bowl on the page and attach with a satin stitch.
Materials Needed:
* Fabric (remember to prewash all fabrics)
* Felt for the backs of the tops and the liners
* Various ribbons for adornment
* Embroidery floss and needle
* Steam a Seam
* Snaps
* 9"x9" of reinforcement and some for to reinforce the snaps
* Pattern, remember to UNCHECK the fit to page box
Directions:
* Cut a cupcake liner from each color of felt and steam a seam
* Layout the liners on the page using the template, then iron onto page
* Place embellishments (I used ribbon for all of mine) and sew embellishments to page going through the reinforcement. (As a side note, you may want to hit the ends of the ribbons with Fray Check before attaching them to the page). Then, using a satin stitch, attach the cups to the page
* Cut 2 bowls from fabric and, with right sides together, sew just along the top. Turn the bowl right side out and top stitch along the seam. Using the template, place the bowl on the page and attach with a satin stitch.
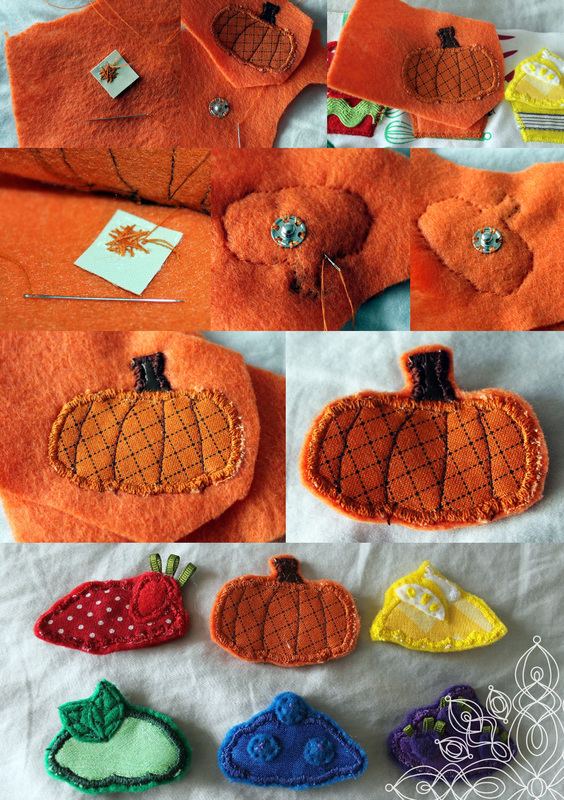
Now its onto the cupcake tops. Here is where the time consuming part comes in.
* Cut each top/embellishment from their respective fabric as well as from steam a seam,
* Attach each embellishment to each top and do any embroidery work
* Iron top to a strip of felt of the same color and attach to felt using a satin stitch
* Sew female side of each snap to the page above the cupcake liners (make sure to go through the reinforcement on the back of the page)
* Cut a piece of the reinforcement just bigger than the snap, then sew the male side of the snap to a piece of felt going through the reinforcement, don't cut the thread
* Place the top where you would like it to be on the page, then put your thumb over the top where the snaps would meet and position the male side of the snap beneath your thumb. Sew the cupcake top to the felt with the snap, now tie and cut your thread.
* Cut the top from the felt, leaving a tiny halo of felt around the top
* Continue in this manner for all of the cupcake tops
* Sew on a 1 1/2" binding and you are done!
For more pages and some tips visit my Quiet Book page.
You might also like:
 |  |  |  |


 RSS Feed


