Kit's Crafts
  • Home
  • About
    • Selling Handmade Goods
  • Knitting
  • Crochet
  • Sewing
  • Crafting
    • Just for Fun
    • Wall Decor
    • Christmas Fun
    • Party On
  • From the Kitchen
    • Chocolate
    • Sweet
    • Savory
  • Quiet Book
  • The Shop

A-Frame Play Tent

1/2/2014

7 Comments

 
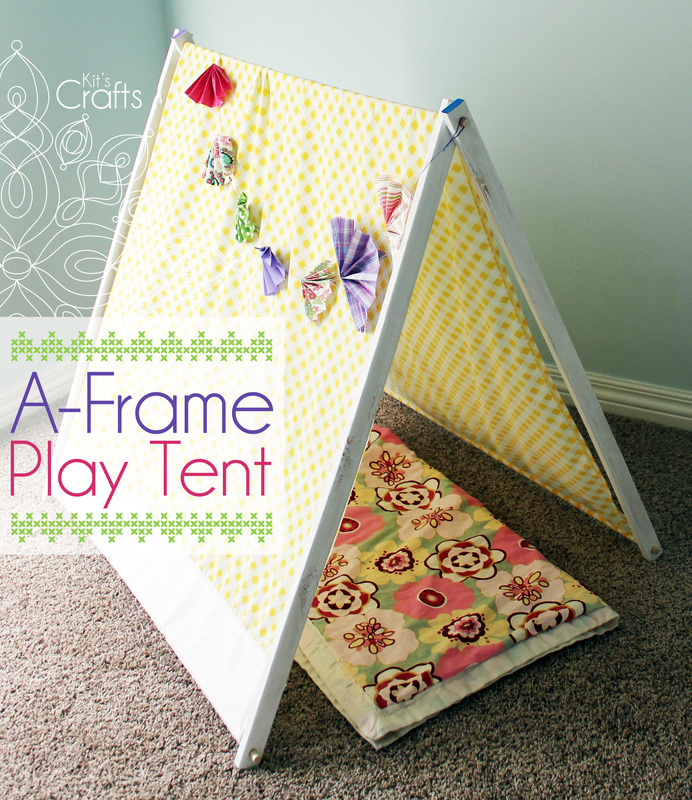
I grew up building forts using blankets, stools, chairs or whatever looked useful, so when I saw how simple and inexpensive it is to build an A-frame play tent I knew it had to happen. I ended up making one for my daughter and my niece. Seriously, it cost less than $10 total and took all of an afternoon to make. The best tutorial I found for this creation came from Twirl for a Rainy Day Tent. I contemplated redoing the tutorial with the few tweaks I made, but I have had a few too many projects on my plate in preparation for Christmas. So, instead, I am providing you with a link to the tutorial I used and a list of my little tips.
Kit's Crafts - A-Frame Play Tent
Tips:
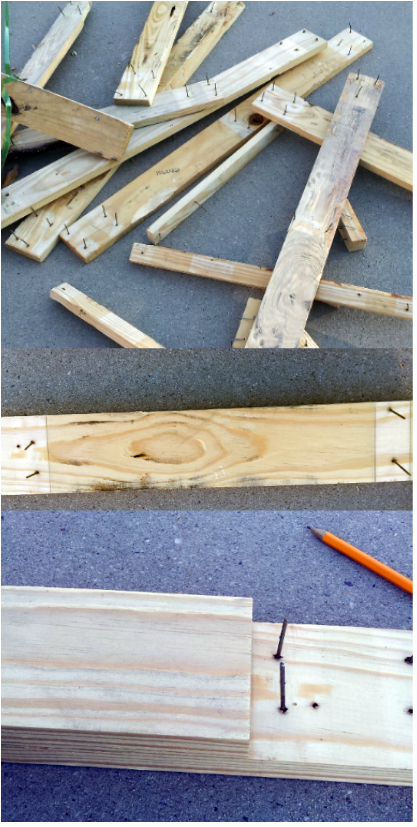
* Watch out for bowing and large blemishes when picking up your furring strips
* If you aren't down with buying thrift store sheets and/or you don't want to do any sewing, look for curtain panels instead of a flat sheet
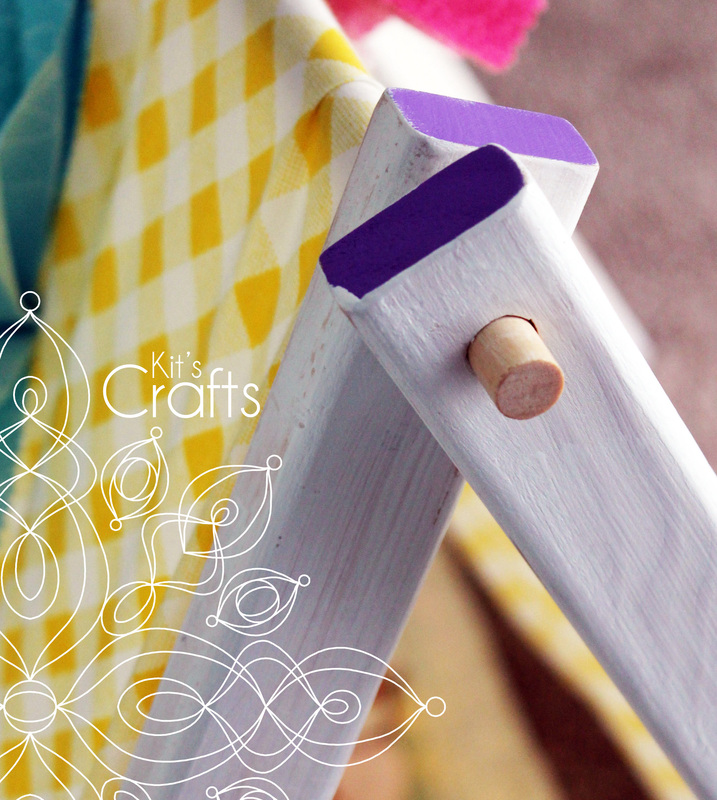
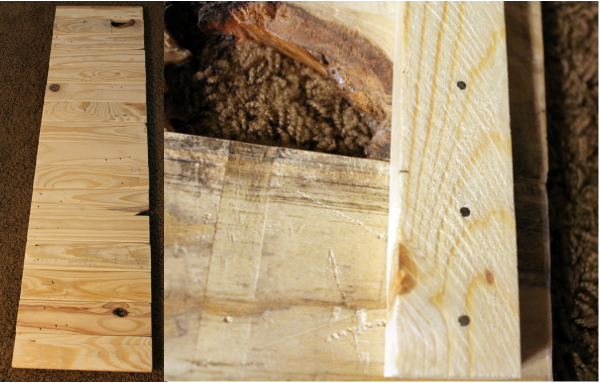
* When drilling your holes, do two of the furring strips at once so that the holes line up and mark them, then paint the ends of the pairs different colors
* I sanded my furring strips because they are pretty rough just from the store

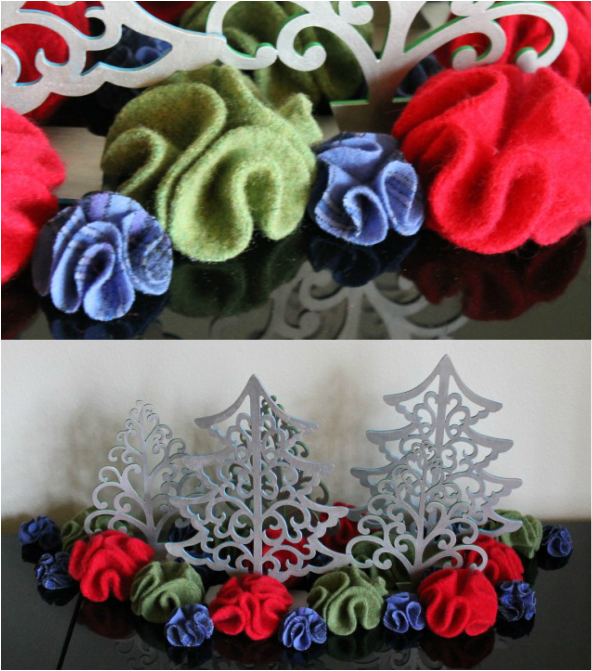
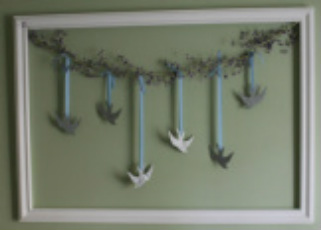
By the way, I will be posting about the fabric fan garland next week.
Kit's Crafts - A-Frame Play Tent
Foodies and Crafties Soiree

You might also like:

Picture
Picture
Picture
Picture
7 Comments

Dress Up Mini Quiet Book

12/5/2013

1 Comment

 
Here is the other half of the Asymmetrical Ruffle Christmas Stocking for a little girl that had this mini quiet book attached to the front. As I had mentioned before, this stocking was donated to Helping Kids with Cancer. This little book is a spin off from the Dress Up Page that I made as part of the Quiet Book I did about a year ago. That page was easily my favorite page to make. The little dresses are so fun to "design" it is hard to stop! I hope you enjoy the tutorial!
Kit's Crafts - Dress Up Mini #QuietBook
Materials Needed:
2 rectangles at 5" x 6" of fabric (Inside panels)
1 rectangle at 9" x 6" of fabric (Outside)2 rectangles at 4.5" x 6" of a reinforcement material, such as a sturdy outdoor fabric or canvas
Velcro
Sewing machine/thread/pins/scissors
Pattern (UNCHECK the fit to page box)
Felt for the girl and back of the dresses (you can get felt sheets for $0.37 at JoAnn's)Steam a Seam
Embroidery floss and needle (face and crown)
1/4" double fold bias tape or fabric to make your ownScraps of fabric for the dresses and castle
Ribbon and/or lace for embellishment

Inside Directions:
1. Pre-wash all fabrics before cutting.
2. Place the 2 inside panels face down on the table. Place and pin a rectangle of reinforcement material on top of each panel, lining up the top and sides. Baste stitch around the edges.
3. Cut two 5" strips of the soft side of the Velcro. Place an pin one strip about 1" from the top of one of your inside panels. Place and pin the second strip about 3/4" below the first. Straight stitch along the top and bottom of each strip.
4. Pin the two inside panels right sides together and sew along the inside at a 1/2" seam. Iron open the seam , then top stitch on each panel.
5. Cut the girl from the felt as well as from the steam a seam, then center and iron in place. With a straight stitch and starting at the bottom of the legs in the middle, sew straight about 3" or so to create the legs. Satin stitch around the body, except for the head. Cut the under dress and hair from both the fabric and the steam a seam. Iron in place, then satin stitch around the edges with a matching thread. Cut a piece of the soft side of the Velcro to fit on the chest of the girl, then pin and sew in place.
6. Trace the face and crown onto tissue paper and use that as a guide to embroider the face and crown.
Kit's Crafts - Dress Up Mini #QuietBook
Outside Directions:
1. Cut your castle, roofs and flag from the fabric and steam a seam, then iron in place on the front of the book. Satin stitch around the edges, extending the back side of the flag down to the roof to create a flag pole.
2. If you are attaching this book to the Ruffle Stocking from Tuesday, cut a 1" square piece of the reinforcement fabric and place it on the wrong side of the exterior fabric where you would like the eye to go (I just held mine in place instead of pinning) then sew the eye portion of the large eye and hook in place.
3. Cut a rectangle of fabric at 3" x 2". Fold in half so that the 2" sides meet. Sew along one side with a 1/4" seam allowance, then sew again from the same side with a 1 1/2" seam allowance. Clip the remaining fabric and turn right side out. Connect your Velcro and cut a piece to fit the tab just made. Attach the prickly side to the tab and the soft side to the back side of the book in the middle about 1/4" from the edge. Then, place and pin the tab with the Velcro facing up on the front of the book and baste in place.
4. Place the outside of the book face down on the table, place the inside face up on top, pin and baste around the edges. For the binding, please refer to the detailed instructions of how I bound the pages in my quiet book.
Kit's Crafts - Dress Up Mini Quiet Book
For the dresses, please refer to the Dress Up Page from the quiet book for detailed instructions.
Foodies and Crafties Soiree

You might also like:

Picture
Picture
Picture
Picture
1 Comment

Little Girl Asymmetrical Ruffle Stocking

12/3/2013

0 Comments

 
Last week, I posted about Blazing Needles and the incredible donation they made to fill stockings that I had created. These stockings are being donated to Helping Kids With Cancer in an effort to bring some Christmas cheer to children fighting cancer and their families. I also made and filled another stocking to be donated (I just can't help myself!). Best part is that I am providing you with quick tutorial of how I made this lovely item. There are two parts to it, the stocking itself, which I will show today, and a mini quiet book closet with Velcro dress up clothes, which I will show on Thursday.
Kit's Crafts - Little Girl #AsymmetricalRuffle #Stocking
Stocking Materials:
12" of a sturdy fabric or 24" of a lighter fabric (44"wide)
9" of fabric (for the flap and the loop to hang it) (44" wide)
5 rectangles of fabric measuring 14" x 6" (for the ruffles)
Sewing Machine/Pins/Thread/Scissors
Iron/Ironing Board
Stocking Pattern

Directions:
1. Pre-wash all fabric. Print the pattern, making sure that the box labeled "fit to page" is NOT checked. Piece together and tape the main stocking before cutting out.
2. Fold your main fabric in half and cut 2 stocking patterns, repeat if you are using a lighter weight fabric. Fold your flap fabric in half and cut 4 flaps (the last page of the pattern).
3. Pin 2 of your flaps right sides together. Sew along the rounded edge using a 1/2" seam allowance. Unfold and iron the seam to one side. Sew along the seam, attaching it to the side you just ironed it to. (This causes the fabric to fold to one side making a cleaner finish). Repeat this step, but iron the seam to the other side and sew it to the other side. Make a few clips along the seam so that it lays flat when you fold it right side out. (You should have a visible seam on only one side of each flap which will be the wrong side).
4. Lay down one of your stockings with the wrong side up. Place one of the flaps with the right side down on top. Line up the top edges and pin. Sew together using a straight stitch, then zig zag along the edge. Repeat the same process with the remaining stocking and flap.
5. Open up the flap and iron the seam toward the stocking. Top stitch along the top of the stocking, being careful to catch the seam as you sew.
6. Cut a 2 1/2" x 4" rectangle of fabric for your loop. Fold the rectangle so that the 4" sides meet and sew along this same edge using a 1/4" seam allowance. Turn the loop right side out and iron. Fold in the loop in half so the short ends meet. with the flap unfolded, place and pin the loop on the wrong side of the back stocking about 1 1/2" from the top and 1" from the side. Sew with a straight stitch and a zig zag stitch. (Please refer to the Origami Stocking for further pictorial representation)
Kit's Crafts - Little Girl #AsymmetricalRuffle #Stocking
1. To do the ruffles, fold each of your 5 rectangles in half, wrong sides together, and iron. Next, do a "dry fitting" as in place the rectangles about where you would like them to go on the stocking. This is especially necessary if you are using directional fabric or putting tulle on one side. Mark the side of the ruffle that will be angling up toward the flap with a pin.
2. Using a basting stitch, sew about 1/4" from the top of each rectangle, rounding off the corner that will be angling up toward the flap at about 1" - 2" from the end. The rounding off doesn't have to be exact as you will be bunching it anyway, but if you are really nervous about it, use a cup or a bowl to draw a round line on the ruffle before you begin sewing. 
3. Pull one of the strings on each ruffle to bunch it and tie off the ends when it is bunched enough, then cut off the excess fabric from the rounded corner.
4. Do another "dry fitting" by placing all of your ruffles on the front stocking, then pin the bottom most ruffle in place and sew using a zig zag stitch to prevent unraveling. Repeat until all of the ruffles are attached; placing the topmost ruffle right under the flap.
5. If you are planning on adding the mini quiet book, then place the hook end of a large eye and hook under the bottom most ruffle and mark with a fabric pen, then hand sew to the front.
6. Pin the front and back stockings right sides together, tucking the ruffles a bit as you go. Starting about 1/2" from the top of the stocking and with the flap unfolded, sew the stocking together using a 1/2" seam allowance. End about 1/2" from the top on the opposite side. Cut off any excess fabric from the ruffles and make small clips about 1/2" apart in the seam allowance at the rounded portions of the stocking, taking care not to cut through the seam.
7. Turn the stocking right side out and sew along the flap sides with a 1/2" seam allowance. Fold the flap down and you have a lovely ruffled stocking!
Kit's Crafts - Little Girl #AsymmetricalRuffle #Stocking

You might also like:

Picture
Picture
Picture
0 Comments

Handmade Christmas Ideas

11/19/2013

0 Comments

 
Lets get real, the holiday season is upon us and Christmas isn't really that far away. If you have high hopes for a handmade Christmas, now is the time to get started on those one of a kind gifts. The great news is that there are a LOT of gift ideas out there that really don't take much time. Today, I am going to highlight some from this very website to get you jump-started.
Kit's Crafts - #HandmadeChristmas Knitting
This first group is for all of the knitters out there.
1. T-Shirt Yarn Star Bracelet - The great thing about this gift is that you don't even have to make a trip to the craft store, just make your own tarn from your closet!
2. Fancy Spats - Liana - Use some left over yarn from your stash for this adorable fashion statement.
3. Baby Bear Hat - Made with chunky yarn and few embellishments, this darling hat is incredibly quick and easy to make.
4. Tractor Hat - This is a great hat for the boys in your life. Plus, it is a great base for an earflap hat, just swap out the chart.
Kit's Crafts - #HandmadeChristmas Crochet
Now to some lovely crochet projects.
1. Fancy Spats - Cathedral - These little shoe collars are the perfect gift for that person with a unique style.
2. T-Shirt Yarn Cluster Bracelet - If you are low on cash, then this is the item to give to your friends. Not only is it adorable, but you can make it from t-shirts in your closet.
3. Ruffle Wreath - Perhaps you would like to add to your decor stash or maybe you just aren't sure what to buy for someone on your list. This gorgeous wreath is easy to make and fairly inexpensive too. (You can make the flowers from old sweaters!)
4. Broomstick Lace Headband - Really, does it get any easier?! Make these as stocking stuffers and use up some of your left over yarn or even make some tarn to create this headband with.
Kit's Crafts - #HandmadeChristmas Sewing
Ok Sewers, here are some ideas for you. 
1. Poinsettia Stocking - So, the stocking itself is pretty cool, but you could use the same technique for a pillow, which would also be adorable.
2. DIY Library Bag - This bag is so easy and doesn't take much material. It would make a great gift for friends and family. You could make it on a smaller scale and fill it with homemade soaps and scrubs.
3. Custom Stuffie - Here is an outline for how to make your own custom little stuffed animal for the little cutie in your life.
4. Men's Dress Shirt to Baby Dress - This would be awesome out of a great red or green plaid shirt!
Kit's Crafts - #HandmadeChristmas
Here are some random crafts that don't necessarily fall under a specific category.
1. Pallet Growth Chart - This would be a great gift for someone with growing children or grand children
2. DIY Bath Crayons - Can we say stocking stuffers?
3. Olliblocks - So fun, so quick, so easy.
4. Nativity Puppets - Switch up the telling of Jesus' birth with some simple felt puppets

If you are not so much into making things, but want the look of handmade, check out my Etsy Shop.

You might also like:

Picture
Picture
Picture
Picture
Gina's Craft Corner
0 Comments

Owl Costume

10/31/2013

0 Comments

 
About a year or two ago, I happened upon the #CrocodileStitch and fell in love. My immediate thought was that it looked an awful lot like feathers. I knew that I needed to make an owl hat at some point. Well, last month, when I was thinking about what Halloween costume to make for my daughter, I thought back to the croc stitch and decided to use that as a base for the costume. I wish I could have brought the pattern to all of you sooner, but I wanted to make sure and get it tested first. I considered waiting until next year, but, well, I got too excited! So, here you go, a lovely little crochet costume!
Kit's Crafts - Owl Costume #CrochetPattern
This pattern includes a hat, capelet and spats. I would consider this pattern intermediate as there are front and back post stitches as well as the use of the crocodile stitch. The hat is worked from the top down with the wings, eyes, beak and ears sewn on after. The capelet and spats are worked from the bottom up.

Gauge:

2” = 7 stitches x 7 rows (in pattern stitch, FPDC, SC portion)

Sizes:
Baby (12 – 18 months), Toddler (2 – 3 years), Child (4 – 10 years)

Materials:
500 - 550 yards (80 – 90 meters) Worsted Weight Yarn
I (5.5 mm) Hook

Yarn Needle
3 half inch (1.3 cm) buttons

Only $5.50 for a .pdf download
Kit's Crafts - Owl Costume #CrochetPattern

You might also like

Picture
Picture
Picture
Picture
0 Comments

Kitty Bonnet

10/22/2013

0 Comments

 
A few years back, a friend gave me her small stash of yarn as sh didn't figure she would use it. Within the skeins was this fuzzy black yarn that I didn't really care for. It has been kicking around the bottom of my large plastic tote this whole time without an evident purpose. Well, at the beginning of this month I saw it and thought, "What the heck, I will make a quick bonnet from this and hope for the best." When I finish it, I actually really liked the little hat, so I thought I would add it to my list of free knit patterns. Enjoy!
Kit's Crafts - Kitty Bonnet #FreePattern
I only did one size for this bonnet, however, it is REALLY stretchy and could probably fit anywhere from a 1-year-old up to a small 3-year-old. It is knit flat from the front to the back then folded in half and sewn together on one side. It is a VERY easy pattern and I would recommend it for beginners.

Gauge: 2" = 14 rows x 8 stitches in Garter Stitch

Materials:
Size 10 knitting needles
100 yards fuzzy worsted weight yarn
2 stitch markers
Yarn needle

Abbreviations:
CO = Cast On
K = Knit
STS = Stitches
PM = Place Marker
SSK = Slip, Slip, Knit
K2Tog = Knit 2 Together

Pattern:
CO 60 using long tail cast on method
Knit every row until piece measures 3.5"
K30, PM, K30
K1, SSK, K to 2sts before marker, SSK, SL marker, K2tog, K to 3sts before end, K2tog, K1
K across
repeat previous 2 rows 8X
Bind off leaving a long enough tail to sew the two sides together. Your piece should measure approximately 14" x 5 1/2"

Ears (make 2):
CO 20 using long tail cast on method

Row 1: K1, SSK, K14, K2tog, PM, K1 (18 STS) 
Rows 2, 4, & 6: K across
Rows 3, 5 & 7: K1, SSK, K to 2 before the marker, K2tog, slip the marker, K1 (16 STS) (14 STS) (12 STS)
Row 8: K7, PM, K7
Row 9: K to 2 before the marker, SSK, slip the marker, K2tog, K to end (10 STS)
Row 10: K across
Repeat Rows 9 and 10 until there are only 4 STS left. For the next row, SSK, K2tog, turn K2tog
Bind off, leaving a long enough tail to sew the ear to the hat. 

Finishing:
Fold your hat in half so that the shorter ends are together and sew along the bind off side. 

Position and attach each ear. 

Cut 6 pieces of yarn twice the length you would like the braids to be. Fold three of the pieces in half. Pull the loop at the half of these three strands through one corner of the hat, then pull the loose ends of these same three pieces through the loop and pull tight. Braid the three (now six) strands and tie a knot at the bottom. Repeat on the other corner with the remaining three lengths of yarn.

Weave in any loose ends.

You might also like

Picture
Picture
Picture
Picture
0 Comments

Pallet Growth Chart

10/3/2013

10 Comments

 
A couple weeks ago, while driving to my sister-in-law's house, I noticed piles of "trash" on the curb in front of many of the houses. Most of the mounds were branches from trimmed trees and bushes, but as I kept driving, I passed one heap with two pallets on top of it. I didn't get too far before turning the car around and loading up the pallets into my trunk. I had a few ideas in mind of what I could use these treasures for, but what I eventually landed on was a growth chart. For the last six months or so, I have had this project in the back of my mind. I have seen so many darling versions all over Etsy and Pinterest, but I really didn't want to go out an buy any supplies as my budget is basically nothing. So, that weekend, my loving husband helped me pull the pallets apart and cut them in to pieces so I could make the sweet creation in the picture below.
Kit's Crafts - #DIY Pallet Growth Chart
Kit's Crafts - DIY Pallet Growth Chart
Materials:
1 Pallet, although we did use one board from the second pallet, but you could make your chart shorter or narrower
Saw/Hammer/Nails
Medium Grit Sandpaper (ideally along with a rotary sander)
2 Boards at 1" x 1 1/2" and the length of your chart
Paper/printer
Pencil
Foam Brushes
Acrylic Paint
Polycrylic Sealant
Fine Grit Sandpaper
Picture Hanging Kit

Directions:
Begin by breaking apart the pallets using your hammer to pry up the boards. It may be helpful to take a second hammer and pound the first to get it wedged under the board better. Remove the nails. I used the marks created by weathering to figure out the width and cut one board, then used that board to mark the rest. Sand down the front and sides of your cut boards.
Kit's Crafts - DIY Pallet Growth Chart
Line up your pallet boards in the order you would like them to be, right side up, then flip the boards over and place each 1 x 1 1/2" board about 2" - 3" from the side and nail them to each board (I used 2 nails on each side for each pallet board). Wipe down your chart so that there is no sawdust left behind and let it dry.
Kit's Crafts - DIY Pallet Growth Chart
Now comes the fun part; deciding what image to paint on your chart. I wanted mine to be gender neutral and I didn't want anything too juvenile so that it could hang in a more visible place then the bedroom some day. I modified an image I found online, then, to transfer the image to my chart, I remembered a technique I learned in 4th grade. The chart is basically broken down into 16 segments vertically (as in there are 16 pallet boards), so I segmented my image into 16 slices and used that to redraw the picture. For the ruler part, print this template on card stock to use as a stencil (the rectangle on the bottom left is to help place the letters). Periodically check the measurements as you are tracing the tick marks to make sure they are in the right place.

Here are the numbers: 23 45 6. Cut each number, making a straight edge along the left side of the digit. Then, using a pencil, color the back of the page. Position the number on the chart, using the rectangle from the stencil. Trace the number with the pencil and when you remove the page, there should be a number transferred onto the wood. 

Paint your image and your ruler marks with the acrylic paint. Once the paint has dried, go over the surface with your fine grit sandpaper, being careful not to remove too much paint, and follow the directions on the can to apply the polycrylic. Use the picture hanging kit to hang the chart on the wall.
Kit's Crafts - DIY Pallet Growth Chart

You might also like:

Picture
Picture
Picture
Picture

Where I partied:

Content in the Meantime
KitchenFun
 photo TGIF_zps40a588c0.png
Picture
Picture
10 Comments

Custom Stuffie

9/26/2013

0 Comments

 
Sometime ago, a friend contacted me to make a custom stuffed animal for her little girl. One of her child's favorite games on the iPad is Grolly and since there is no merchandise available, she wanted me to make a Grolly for her girl. Here is how I did it.
Kit's Crafts - DIY Custom Stuffie
Before embarking on this endeavor, I suggest looking at the construction of a few other stuffed animals that are similar to what you are going to make, whether online or in person. Also, you may want to do a mock up of your pattern in some scrap fabric or at least with tape and paper to see how your pattern looks in 3D. 

Materials:
Fabric of your choice (about a yard for most animals, PS, the remnant bin is a GREAT place to look for this project)
Wonder Under (if you are using thinner fabric, such as flannel or cotton)
Paper
Pencil
Scissors
Sewing supplies (sewing machine, thread, etc.)
Felt and Steam a Seam for the face and any other appliques, like spots
Fiber Fill

Directions:
To begin with, break down your custom stuffie into basic 3 dimensional shapes. For example, I wanted the front of Grolly to be basically flat, but I wanted the back to be more 3 dimensional, so I broke him down into a 3-sided pyramid in my mind. This helps you to come up with a construction plan. I started by drawing the front, creating a fold line so he was symmetrical, then adding 1/2" around the edges (using a sewing gauge) for the seam allowance. To create the two back pieces, I started by tracing the front piece and then drawing how I wanted the back to swoop into the tail. I added a 1/2" seam allowance to this then cut those pieces from my fabric and wonder under. I added the bottom triangle just to ensure that he sat straight. There was no real rhyme or reason behind the size or shape of this, I basically guessed and adjusted it as needed with my mock up.
Kit's Crafts - Custom Stuffie
Before sewing any of the pieces together, add any applique you want, such as spots or the face using the steam-a-seam to attach the piece, then satin stitching around the shape. Something to consider here is the fabric you use. I used felt for everything but the orange patch on the front of Grolly and right before I sent it to my friend, I noticed some fraying near a corner. I hit it with Fray Check, so I wouldn't have to sew the whole thing over again, but I wish I had just used felt. Also, make sure you place everything you are applying before attaching any of the appliques.
Kit's Crafts - DIY Custom Stuffie
Now to the fun part, sewing it all together. Start by sewing any limbs/appendages and stuffing them. You may want to put some pipe cleaners in some of the appendages. I did for the antenna so it would stick straight up.

Pin together your main body pieces, right sides together, and consider your limbs/appendages. You will want your limbs to be inside the body at this point so when you turn your stuffie right side out the limbs will be on the right side. Don't forget to leave about a 3"-5" opening in a discrete location to turn the little guy right side out. Clip any rounded edges (as in the photo below).

Turn the stuffie right side out, then stuff tiny parts first (I started with the tail), then move to the bigger ones. Once stuffed, before closing up shop, give the stuffie a once over to check for any weird lumps that can be fixed real quick on the sewing machine. Then hand sew the opening shut.

I know that this is a pretty loose outline so if you have any questions pertaining to your specific stuffie, don't be shy, email me at kitscrafts2012@gmail.com! I'm nice, I promise, I won't bite :)
Kit's Crafts - Custom Stuffie

You might also like:

Picture
Picture
Picture
Picture
0 Comments

Towel Dress

9/17/2013

1 Comment

 
Last Christmas, a woman that my mother-in-law visits gave her a bunch of kitchen towels that were embellished with embroidery and crochet motifs. These were then passed around to all of the daughters. When I saw the intricate work that had been done I knew I couldn't use them as just a towel, so I decided to make a dress featuring at least one of them. To make things easy on myself, I bought a pattern Butterick pattern on sale. I made this dress a couple months ago and thought I had taken progress pictures, but I can't find them, so, if I do, I will post them.
Kit's Crafts - Towel Dress
The only adjustments I made to the pattern was to add sleeves, a sash and of course the decorative towel. To add in the towel, I just cut out the front of the top, then I placed  the towel over the cut out piece towel where I wanted the towel to lie and pinned the two together. Then I cut the towel following the outline of the cut piece and basted the two together. I followed the rest of the directions in the pattern, but for the sleeves, I used a tutorial by Shwin & Shwin.

You might also like:

Picture
Picture
Picture
Picture
1 Comment

Package Pals

9/3/2013

2 Comments

 
Last July I was lucky enough to sign up and be a package pal to the lovely and talented Anna from 64 Color Box. The event was hosted by Stars & Sunshine and C.R.A.F.T. Basically, the idea is to send a package of crafting goodness to someone who will in turn send you a package of crafting goodness. Perhaps the greatest idea ever! Anyway, I sent Anna Hazel from Colette Patterns, which is a darling dress pattern and I got to make Olliblocks!
Olliblocks
Go check out the other great packages by clicking the link below!
Picture
2 Comments
<<Previous
Forward>>
    Kit's Crafts
    Hey there! I'm Kristin, aka Kit. Here is just a peek into my crafting mind. I hope you find something to spur your creativity!
    Instagram

    Kit's Crafts Shop

    Popular Posts

    Picture
    Picture
    Picture
    Picture
    Picture
    Picture

    RSS Feed

    Picture
    Kit's Crafts
    Picture
    The Yarn Box

    Featured Here

    Picture
    Moogly
    Picture

    Categories

    All
    About
    Baby
    Baking
    Bio
    Caramel
    Child
    Chocolate
    Christmas
    Cooking
    Crochet
    Decor
    Dessert
    Dress
    Free Knit/crochet Pattern
    Free Sewing Pattern
    Interior Design
    Knitting
    Link Party
    Materials
    Pattern
    Quiet Book
    Quiet Book
    Recipe
    Selling Handmade Goods
    Sewing
    Spats
    T Shirt
    Tutorial

    Archives

    January 2020
    July 2019
    November 2018
    September 2018
    August 2018
    July 2018
    May 2018
    April 2018
    February 2018
    January 2018
    April 2016
    September 2015
    March 2015
    February 2015
    November 2014
    October 2014
    September 2014
    August 2014
    July 2014
    June 2014
    May 2014
    April 2014
    March 2014
    February 2014
    January 2014
    December 2013
    November 2013
    October 2013
    September 2013
    August 2013
    July 2013
    June 2013
    May 2013
    April 2013
    March 2013
    February 2013
    January 2013
    December 2012
    November 2012
    October 2012

Powered by Create your own unique website with customizable templates.