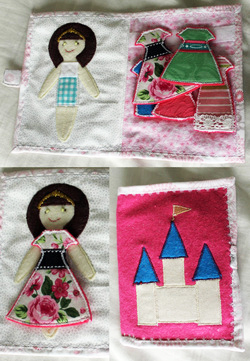
Two years ago, I made a quiet book for my daughter and the pages were my first posts to this website. Since then the quiet book has actually stood the test of the toddler. However, there are a couple of things I would do differently if I were to make the book again. Over the next little while I plan to update those previous posts. To see the other pages as well as a list of tips, visit my Quiet Book page.
0 Comments
The idea of drafting a pattern used to terrify me. I always thought of pattern making as something that only professionals could do. Then, a little over a year and a half ago, I was looking to turn a men's dress shirt into a baby dress and stumbled upon The Metro Dress by Shwin & Shwin. Their website is chock full of wonderful patterns as well as instructions on various sewing techniques and even how to draft your own sewing patterns. I thought back to The Metro Dress last month when I saved one of my husband's dress shirts from the good will pile. Below is the upcycled version of said shirt.
Nothing is more essential for a child's room than storage and it is always helpful to find an adorable solution. I was on Pinterest a few weeks ago and stumbled upon the perfect tutorial by Make It and Love It. I used a basic gray duck cloth because that is what I had around, but how cute would this be in a bright pattern?! Anyway, today is a shout out to the tutorial for this lovely little bin.
Today's post is a shout out to a wonderful pattern and tutorial by Sewing in No Mans Land. I found this lovely little dress on Pinterest a few months ago and knew it had to happen. Below is my version in which I used fabric remnants. You might also like:There are so many crafting mediums I enjoy, but I tend to always go back to a few trusty standbys; namely, knitting, crochet and sewing. Generally, I tend to rotate through the different techniques about every month and a half. However, when I found out last February that I was going to do the Beehive Bazaar, I went into production mode with knit and crochet, so my sewing machine did not leave its' case for quite a while. Apparently, my crafting addiction needed to make up for lost time because in the last two weeks, I sewed this skirt, a dress, a canvas container, a frilly apron and a large tote. Not to mention the 3 projects I have in mind that I still want to sew up. Don't, worry, I will blog about them all and share links to tutorials. This large doily was part of a stack of doilies and lace trims my grandmother gave me about a year ago. To make the pattern for this skirt I primarily followed a tutorial over at Made, which was so great, I didn't feel that it was worth re-doing. The only deviation from the tutorial is to add the doily on top. Materials: Large piece of paper (or a few letter sized taped together) Pencil Ruler About 1 yard of fabric (depending on how large the skirt will be) Sewing machine/thread/pins/scissors Large Doily Wide Elastic Directions: To make the pattern, go to this tutorial over at Made. Keep in mind how long the doily is and whether you want the skirt to extend past the bottom, just reach it or not hit the hem at all (like I did). Once you have the pattern drawn up, cut it from your fabric as described in the tutorial, then create a rolled hem along the bottom edge of your fabric. Fold your doily in half and iron the fold, then fold it in half again and iron the fold. Now, line up your pattern to the folded edge of the doily and cut the hole for the waist. Unfold the doily and lay it right side up on the table, then place your fabric skirt on top of the doily, right side up as well. Pin around the waist, then sew at your determined seam allowance. Then bring the doily through the waist hole and on top of the fabric skirt and iron along the seam. Lastly, go back to the tutorial to add in the waist band. You might also like:For Christmas, I gave my child some fake food to go with a little shopping cart she had adored at the store. Along with the plastic fruit and veggies came some small cardboard food boxes. I knew the second I saw these that it would be a matter of days for these little cartons to hit the trash because they would quickly get squished and torn up. To prevent this inevitable fate, I reinforced the boxes with cardboard and laminated them with packing tape. Truth be told, this is an activity to do while watching a show or something because it is a little time consuming. Materials: Fake Food Boxes Cardboard Craft Knife or Scissors Glue Gun/Glue Sticks Packing Tape (optional) Directions: 1.Use your fake food box to determine the width of your cardboard fillers, then cut strips of cardboard at that width, then, cut rectangles from the strip at the same length as the box. 2. Once you have enough rectangles to fill the box, use the glue gun to stick the pieces together. 3. Put the stack of glued cardboard inside the box then put some glue on the end of the cardboard stack and close the box, gluing the end shut. Repeat for the other end. To further the lasting ability of these boxes, you can laminate the exteriors by wrapping them with a layer of packing tape. You might also like:One of my most favorite crochet stitches is the shell stitch. I am not sure what it is about that stitch, but I find myself reverting back to the shell when designing patterns, whether it is the small one featured here or the large shell I used in the Shell Dress from last May, I just can't help myself! It is just such a beautiful stitch! Anyway, if you have been wanting to learn how to do the shell stitch, here is the perfect pattern to start with. Like the Seeds Pixie Bonnet from last month, the basic design is a rectangle that is folded in half and sewed up the back. Give it a spin, let me know what you think! I would consider this an advanced beginner pattern as it combines basic stitches. It is pretty easy, though, you will catch the rhythm soon enough and be shelling along without thinking. I made this in just one size, but you can go up or down by adjusting your hook/yarn. Print the pattern. Gauge: 2” = 9 stitches x 10 rows in single crochet Size: Newborn – 3 months Materials: 60 – 70 yards (55 – 65 meters) worsted weight yarn H/8 (5.00 mm) Hook Yarn Needle Abbreviations: CH = Chain ST = Stitch SC = Single Crochet YO = Yarn Over Pattern: Row 1: With a tail 12” long, CH 50, SC in the 2nd ch from the hook, *SK 2ch, 5DC in the next ch, SK 2ch, SC in the next ch, repeat from * 7 more times (8 shells) Row 2: CH3 (counts as the 1st dc), 2DC in the 1st sc, SK 2dc, SC in the next st, *SK 2dc, 5DC in the next st, SK 2dc, SC in the next st, repeat from * 6 more times, SK 2DC, 3Dc in the next st Row 3: CH 1, SC in the 1st st, *SK 2dc, 5 DC in the next st, SK 2dc, SC in the next st, repeat from * 7 more times Rows 4 – 15: Repeat rows 2 & 3 Finishing: Fold the bonnet in half so the short sides meet and seam up the chain side with the 12” tail, fasten off and weave in ends. To make the ties, CH 40, SC in one of the corners of the hat, then SC along the bottom of the hat, CH 41, turn, SC in the 2nd ch from the hook, then across the remaining chs, SC along the bottom of the hat, SC along the original chs, fasten off. Weave in ends. You might also like:One of my most favorite things to knit or crochet is a pixie bonnet. The simplicity of the little hat is so enticing and just begs for personalization with cables or lace. All you do is knit/crochet up a rectangle, fold it in half and sew along the cast on edge. I wrote this particular pattern with a beginner in mind and kept it simple. This is a great one for learning because you practice stockinette, moss/seed, ribbing and there is a buttonhole involved, which are great techniques for a beginner project! Perfect for beginners, this pattern is quick and easy to make. Essentially you are creating a large stockinette swatch that is punctuated by rows of moss/seed stitch to break up the monotony. Finish off with a few ribbing rows, then sew up the cast on edge to create a lovely pixie bonnet. It is written using US standards and worked flat. The finished product (after being folded and sewn) is approximately 6 ¾” high and 6 ½” wide. I wrote this for a toddler size, but you could make it bigger or smaller by adjusting your needles and/or yarn or if you want to use it for a smaller child, leave off the extension strap and button one corner to the other. Print the Pattern. Gauge: 1” = 5 stitches x 6 rows in stockinette stitch Size: Toddler Materials: 90 – 100 yards (80 – 90 meters) worsted weight yarn Size 6 (4.25mm) knitting needles Yarn Needle Abbreviations: K = Knit P = Purl SL = Slip Stitch ST = Stitch Button Hole {refer to pictures} = SL1{A}, bring yarn to the front {B}, SL1 {C}, *slip first sl st over second sl st {D}**, SL1, repeat * to **, SL1, repeat * to **, 3 sts should be bound off {E}, SL first st on right needle back to left needle {F}, turn work. Bring yarn to wrong side of work {G}, *P into the first st on the left needle without dropping the stitch {H}, slip stitch from right needle to left needle {I}, repeat from * until 4 stitches have been created {J} (one more than was bound off), turn work. The front side should be facing you {K}, SL first st from left needle to the right needle {L}, pass the second stitch on the right needle over the slipped stitch {M} (getting rid of the extra stitch), SL 1 st from right needle to left needle {N} and K that stitch {O}. Pattern: Using long tail cast on, with a 30” – 35” tail, CO 60 sts Row 1: K to end Row 2: K2, P to last 2 sts, K2 Rows 3 – 10: Repeat rows 1 & 2 Row 11: K2, (P1, K1) to last 2 sts, K2 Row 12: K2, (K1, P1) to last 2 sts, K2 Rows 13 & 14: Repeat rows 11 & 12 Rows 15 – 28: Repeat rows 1 – 14 Rows 29 – 38: Repeat rows 1 – 10 Row 39: K2, (P2, K2) to last 2 sts, K2 Row 40: K2, (K2, P2) to last 2 sts, K2 Row 41: K2, button hole, (P2, K2) to last 2 sts, K2 Row 42: K2, (K2, P2) to last 2 sts, K2 Bind off. Weave in ends. Use tail to sew up the back of the bonnet, then position and attach button. Extension Strap Pattern: CO 28 sts Rows 1& 2: (K2, P2) to the end Row 3: K2, button hole, (P2, K2) to last 2 sts, P2 Row 4: (K2, P2) to the end Bind off. Weave in ends. You might also like: This is one of those clever ideas that I wish I came up with. I stumbled across this little pop up card while perusing through my Google+ communities, which, by the way, is a perfect place to get amazing ideas and advice. Anyway, the genius behind this post is Helen Bird from Spoonful. The tutorial is really great too, so I will just refer you there. Below is my rendition. Hope you can come up with a reason to make this cute little token of gratitude! You might also like:Last week, I posted a lovely little A-Frame Play Tent that was decorated with a fabric fan garland. I found the tutorial for this adorable string of fans at Blooms and Bugs. I really loved the outcome, however there are a few things that I would probably do different if I were to make it again. I think it looks better when hung vertically (pictured below) as opposed to horizontally (shown in the tutorial). If you want a horizontal garland, here are a few suggestions:
You might also like: |
Hey there! I'm Kristin, aka Kit. Here is just a peek into my crafting mind. I hope you find something to spur your creativity!
Kit's Crafts ShopPopular PostsFeatured HereCategories
All
Archives
July 2020
|