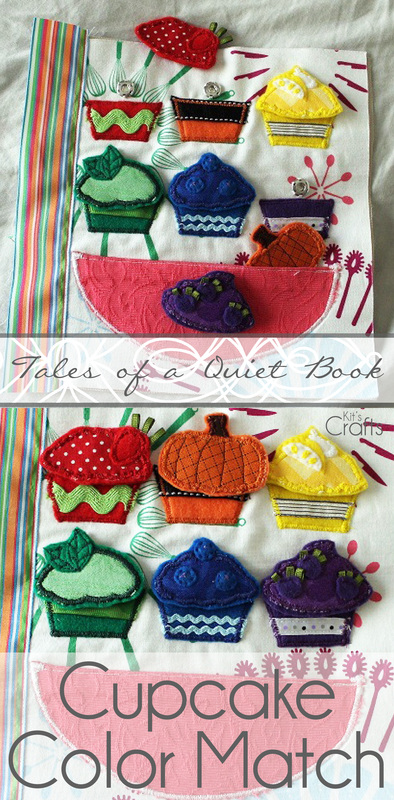
These little cupcakes are one of my proudest quiet book moments. The page is a bit on the time consuming side, but so darn cute! I came across a little baking page by Imagine Our Life when I was originally looking for quiet book ideas, which inspired the lovely page in this tutorial. (By the way, the only updates to this tutorial are to the pictures).
0 Comments
This page is perhaps the most friendly of all the pages as the smiling face waves hello. The inspiration came from two places. The face and hair came from Craftalicious, but the waving hand came from a pirate page at Orange Crafts. If I were to make this over again, I might add a little pocket to the shirt that would hold hair ties.
Just like the Babushkas Page of a couple weeks ago, this page doesn't need any construction updates, just photo updates. It is actually the first quiet book page I made as, the name page is one of the most classic quiet book pages. This particular page does double duty, however, because it features a zippered pocket to store the letters. You can download a pattern for the pocket that gives the option of a scalloped top, or a zig-zag top. To create the name, make a pattern in Word (I used Janda Manatee Bubble for my font on this page).
The construction of this page hasn't had any issues, the update here is just the pictures. They needed some touching up. Originally, I found this babushka page when looking for inspiration and essentially duplicated it, but added my own flare. I'm quite pleased about how it turned out, however, there was a bit of a snare that turned into a learning experience for the rest of the pages. By the way, I did create a boy version of this page that features woodland creatures.
So I am pretty sure that this is the last of the pages with an update in the construction of the page. I will still be updating the rest of them, but more to edit the pictures, not so much editing the instruction. Ultimately, though, the purse has left the book, but is still the crayon container of choice.
Most of the lace up quiet book pages include a shoe and weaving pages are usually pies or just strips of felt. I wanted both of these pages, but I couldn't find anything that I really liked. While perusing quiet books on Etsy to gain inspiration, I came across the Monster Album. A couple of days after first seeing this little book, it hit me, monsters under the bed!
This is a page I made for a quiet book 2 years ago. Since then, it has held up pretty good, until last month when my toddler started to rip the leather cords I used to hold the beads. It occurred to me that perhaps this issue could have been averted had I used a different material, so here is my updated version.
Two years ago, I made a quiet book for my daughter and the pages were my first posts to this website. Since then the quiet book has actually stood the test of the toddler. However, there are a couple of things I would do differently if I were to make the book again. Over the next little while I plan to update those previous posts. To see the other pages as well as a list of tips, visit my Quiet Book page.
This is a post I have been looking forward to for quite some time. It is the LAST POST for the quiet book! I can't believe it is finally done! The day after I finished it, I found myself anxiously looking for something to work on, which I will post about later.... Anyway, I am very pleased with the results of my efforts on this book and hope you feel the same. Unlike the previous pages, I have not provided a pattern for the cover. Essentially, I found some silhouettes online that I liked then printed them out, cut them from fabric and satin stitched them to the front. If you choose to do the same, I suggest adding Steam a Seam to your list of materials. Materials Needed: * Fabric for the front and back cover, exterior binding side, bias tape and interior (remember to prewash and iron all fabrics) * Large snap * 1/2" ribbon * Reinforcement for the covers, side and handle * 2 1/2" x 8" rectangle of stiff plastic (I used 2 layers of heavy duty template plastic for quilting) * Fray Check Exterior: * Cut two fabric and reinforcement rectangles at 8 3/4" x 10" for the front and back cover * Add whatever decoration you would like to the front, bearing in mind that there will be a 1/2" bias tape running around the exterior edges and allowing for a 3/8" seam to the binding and making room for the snap in the middle toward the right edge * Stack your completed pages and measure the height then add 3 1/2". Cut a rectangle for the binding (fabric and reinforcement) using this measurement for the width by 10" for the height * I added a little lace trim to the binding, I found it at Michaels in the scrapbook section and it has a sticky back, which was quite useful, I attached it 1/4" from the edge * With right sides together (including the reinforcement), sew the cover to the binding side and the back to the binding side * Iron the seams toward the back and front, then straight stitch close to the edge of the seam to reinforce this seam and secure the lace * Place the female side of the snap about an inch from the edge of the front and centered then hand sew to attach * Cut a rectangle of the cover fabric at 2 3/4" by the height of your completed pages plus 4 1/2" * Fold this rectangle in half to find the center then position and sew the male side of your snap to the front of one side of the rectangle * Fold the rectangle with right sides together and sew along sides with a 3/8" seam allowance * Unfold the rectangle and iron, then position the non-snap side in the center of the back cover with the snap facing up and satin stitch along the edge to attach to the back cover Handle: * Cut a rectangle of your binding side fabric at 3" x 6" and a rectangle of reinforcement at 2 1/2" x 6" * Iron 1/4" of each long side of your fabric rectangle toward the wrong side * Slide the reinforcement under this fold and sew to secure * Fold and iron each long side 5/8" (the center) toward the reinforcement side (you may need to pin to secure for sewing) * Turn handle over and using either a decorative stitch or a zig zag, sew along the center to secure the sides, then do the same along each side * Mark the center of binding side 2" from the top and bottom, then position the handle on these marks and satin stitch the ends as well as about 1/8" up each side Interior: * Cut two rectangles of the interior fabric at 9 7/8" x 10" and one rectangle at the height of your completed pages plus 1 1/4" by 10" * Cut 4 lengths of ribbon at 11" each (this is perhaps a little excessive, but I figure you can always shorten but you can't really lengthen) * Line up the 10" sides of your binding and one of the larger rectangles and mark along the 10" edge for the ribbons at 3" and 7" * Center a ribbon at each mark and sandwich between the two rectangles (right sides together), then sew with a 3/8" seam allowance, repeat for the other side of the binding * Iron seam toward the binding, then using either a decorative stitch or a zig zag, secure the seam and the ribbons Attaching Interior to Exterior: * For the length of the bias tape, refer back to the height of your completed pages, times that by 2 and add 65, the width will be 2 1/4". You should have one long strip, please go to Prudent Baby for instructions. * To make the bias tape, refer to Creative Little Daisy for instructions, but when you put the pin in your ironing board, make the width 1 1/4". Your bias tape should fold over 1/2" on either side with 1/4" between the edges of the fabric. Please email me with any questions at [email protected]. * Place the interior and exterior on top of each other with wrong sides together and pin * Starting at one side of the interior binding side, baste along the edges at about 1/4" from the edge, but DO NOT close, stop at the opposite side of the binding that you started at so you can insert the stiff plastic into the binding * Trim edges to match each other This next step I did not realize was needed until I finished my book, so I had to improvise, which is why mine is different and I don't have progress pictures. Basically, you are stiffening up the binding so when you hold the handle your cover doesn't scrunch up and things fall out. * On the interior, find the center of the short side of the binding and mark the entire length of the long side of the binding 1 1/8" on either side of the center with a fabric pen and straight stitch along these marks * Measure and mark 5/8" from the top with a fabric pen and straight stitch along this line * Slide your stiff plastic rectangle (2" x 8 1/5") into the pocket you just created, then sew along the bottom to secure it * Baste along the bottom edge of the binding side * Refer back to the Page Bindings instructions for sewing the bias tape around the cover (I started in the center top of the back cover), making sure not to catch the ribbons or the wrong side of the snap rectangle Finishing: * Put all of your pages into the book using just the ribbons attached to the back cover of the book * Tie a semi loose bow with the front cover ribbons, then cut leaving plenty to untie and retie the ribbons * Use fray check to prevent the ribbons from fraying * Bask in the delight of a finished project Many of the quiet books out there sew two pages, right sides together, then flip them right side out, which is fine, but I personally like the look of the books over at Orange Crafts, which have bias tape around the edges, so that is precisely how I set up these pages. If you prefer the other method, sew the pages with a 1/2" seam allowance and adjust your measurements for the cover, which I will post next week. As a side note, the amount of fabric that I prescribe is ONLY for the 7 pages (front and back) which have been made for this book. If you would like to use the same fabric around the cover, you will need to account for those measurements, which will be given next week. Materials: * 16" of fabric with a 45" width * Iron and Ironing board * Long pin or needle * Eyelet punch, setter and anvil * Metal eyelets Creating the Bias Tape: * Cut 7 strips of fabric, 2 1/4" wide by 45" long So, there are quite a few ways of doing this. Of course, there are the bias tape makers, some of which will even iron it for you after folding, but I am cheap. So I searched the web and I found some pretty interesting methods, The Scientific Seamstress has a great print out for a bias tape maker out of cardstock and, talk about creative, Meijo's Joy has a bias tape maker created from a craft cutter! However, neither of these were the right size and I wanted something that I could do specific to this project. I found the answer at Creative Little Daisy. Please go to her website for instructions, but when you put the pin in your ironing board, make the width 1 1/4". Your bias tape should fold over 1/2" on either side with 1/4" between the edges of the fabric. Please email me with any questions at [email protected]. Sewing pages: Remove all removeable pieces and be careful not to catch the moving pieces when you are sewing. For this step, I went back to the web to find a great solution for doing this, because when I have done blanket bindings before, I always miss the edge on the bottom in places. I found the BEST method on Honey Bear Lane, but rather than redirect you, I posted what I did as it would be easier than trying to describe the specifics. * Match up what pages you would like to go together then, with wrong sides together, baste along the outside about 1/4" from the edges * Unfold one of your bias tapes and line up the edge of the bias tape with the edge of the page (I started on the binding edge because I figure the seam would be more hidden that way) * Starting about 1/4 of the page away and sew along the fold until about 1/4" from the end, back stitch and cut the thread * For the corner, hold the bias tape straight out in front, then fold the tape at a 90 degree angle away from the page, then fold back, lining the fold with the edge just sewn and the tape edge with the edge of the page, pin along this side * Start at the edge and sew along the fold line of the bias tape and over the corner folds you just made until a 1/4" from the next edge, backstitch and clip thread * Repeat the last two steps for all corners DO NOT CLOSE UP THE OPENING ON THE BEGINNING SIDE * Line up the edge of the bias tape along the side you began on, fold back so the fold is at the halfway point, 4 1/2", then cut the remaining off so there is about 1/2" fold over, pin * Line up the remaining bias tape with the page edge and overlap the fold about 1 to 1 1/2", then cut the remaining tape and pin * Sew along the remaining edge to close the gap, removing the pins as you go * Turn the page over and fold the bias tape over the edges of the page * Line up the fold of the bias tape with the seam created from sewing the other side (this ensures that you catch both sides), pinning as you go * For the corners, continue folding the tape over the edge as if the page keeps going and there will be a 45 degree angle, turn 90 degrees and continue folding over the next edge, pinning as you go * You have a few options at this point, you can do a straight stitch about 1/8" in from the edge or you can satin stitch around the edges, or you can get fancy and pick a frilly stitch (I went with fancy) to secure the remaining side of the bias tape Finishing: * On the binding side, mark for your eyelets, I put them 1 1/2" from the edge of the page and at 2 1/2" and 6 1/4" from the bottom * Punch a hole at each of those marks with your eyelet punch * Set the eyelet (If you have questions about the eyelets, refer to the monster page or email me) |
Hey there! I'm Kristin, aka Kit. Here is just a peek into my crafting mind. I hope you find something to spur your creativity!
Kit's Crafts ShopPopular PostsFeatured HereCategories
All
Archives
July 2020
|